
Owner's Manual


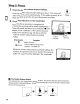

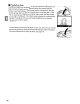
Table Of Contents
- Using the Supplied Manuals
- Quick Start Guide
- Owners Manual
- Two-Button Reset
- Set Language / Time
- Table of Contents
- Q & A Index
- Supplied Accessories
- Parts & Controls
- Getting Started
- Basic Photography & Playback
- Focus
- Image Size & Quality
- Release Mode
- Using the Built-In Flash
- ISO Sensitivity
- P, S, A, and M Modes
- Exposure
- White Balance
- Picture Controls
- Active D-Lighting
- Multiple Exposure
- Using an Optional GPS Unit
- More Playback Options
- Connecting to Other Devices
- Menu Guide
- Compatible Lenses
- Optional Flash Units
- Other Accessories
- Care / Maintenance
- Troubleshooting
- Error Messages
- Defaults
- Memory Card Capacity
- Specs
- Index
- Corrections to Manual
- Software Installation Instructions
- Scan of Software CD-ROM
- AC Power Cord Specs
- Warranty

Step
6:
Shoot
Smoothly press
the
shutter-release
button
the
rest
of
the
way
down
to
release
the
shutter and record
the
photograph. The access lamp next
to
the
memory
card slot cover will light. Do
not
eject the
memory
card
or
remove
or
disconnect the
power
source
until
the
lamp
has gone
out
and
recording
is
complete.
EI
II
Turning
the
Camera
Off
Turn
the
camera
off
when shooting
is
complete.
Power switch
• Camera
Off
Display
If
the
camera
is
turned
off
with
a battery and
memory
card inserted,
the
number
of
exposures remaining will be displayed in the control panel.
[531J
• Auto (Flash off)
Mode
Choose this
mode
where flash photography
is
prohibited, when photographing infants, or
to
capture natural lighting under
low
light
conditions.
.~
~mode
39