
Owner's Manual


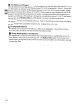


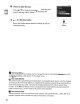

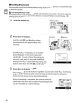
Table Of Contents
- Using the Supplied Manuals
- Quick Start Guide
- Owners Manual
- Two-Button Reset
- Set Language / Time
- Table of Contents
- Q & A Index
- Supplied Accessories
- Parts & Controls
- Getting Started
- Basic Photography & Playback
- Focus
- Image Size & Quality
- Release Mode
- Using the Built-In Flash
- ISO Sensitivity
- P, S, A, and M Modes
- Exposure
- White Balance
- Picture Controls
- Active D-Lighting
- Multiple Exposure
- Using an Optional GPS Unit
- More Playback Options
- Connecting to Other Devices
- Menu Guide
- Compatible Lenses
- Optional Flash Units
- Other Accessories
- Care / Maintenance
- Troubleshooting
- Error Messages
- Defaults
- Memory Card Capacity
- Specs
- Index
- Corrections to Manual
- Software Installation Instructions
- Scan of Software CD-ROM
- AC Power Cord Specs
- Warranty

Inserting
Memory
Cards
The camera stores pictures on Secure Digital
(SO)
memory
cards (available
separately).
1 Turn
the
camera off. Power switch
Always
turn
the
camera
off
before inserting
or
removing
memory
cards.
2 Open
the
card slot cover.
Slide
the
card slot cover
out
(CD)
and open
the
card slot
(@).
3 Insert
the
memory
card.
Holding
the
memory
card
as
shown at right, slide
it
in
until
it
clicks
into
place. The
memory
card access
lamp
will
light
for a
few
seconds. Close
the
memory
card slot cover.
~
Inserting
Memory
Cards
Inserting memory cards upside
down
or backwards could
damage the camera or the card. Check
to
be sure the card
is
in
the correct orientation.
Access
lamp
Front
ISO -AUTO
l'
[F
0'-]
NORM
i!i!IJ]
A
~
~
~AF.A
c::
:+J
If
F Q r
is
displayed in
the
control panel
as
shown at right,
format
the
card
as
described
on
the
following
page.
~
The
Access
Lamp
Do
not
remove the battery or disconnect the power source while the memory card
access
lamp
is
lit. Failure
to
observe this precaution could result in damage
to
the card.
29