
Owner's Manual


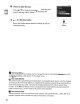

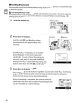
Table Of Contents
- Using the Supplied Manuals
- Quick Start Guide
- Owners Manual
- Two-Button Reset
- Set Language / Time
- Table of Contents
- Q & A Index
- Supplied Accessories
- Parts & Controls
- Getting Started
- Basic Photography & Playback
- Focus
- Image Size & Quality
- Release Mode
- Using the Built-In Flash
- ISO Sensitivity
- P, S, A, and M Modes
- Exposure
- White Balance
- Picture Controls
- Active D-Lighting
- Multiple Exposure
- Using an Optional GPS Unit
- More Playback Options
- Connecting to Other Devices
- Menu Guide
- Compatible Lenses
- Optional Flash Units
- Other Accessories
- Care / Maintenance
- Troubleshooting
- Error Messages
- Defaults
- Memory Card Capacity
- Specs
- Index
- Corrections to Manual
- Software Installation Instructions
- Scan of Software CD-ROM
- AC Power Cord Specs
- Warranty

4 Remove the battery when charging
is
complete.
Charging
is
complete when
the
CHARGE
lamp stops
blinking. Remove
the
battery and
unplug
the
charger.
Insert
the
Batter}!
1 Turn the camera off.
Always
turn
the
camera
off
before inserting
or
removing batteries.
Power switch
2 Open
the
battery-chamber cover.
Open
the
battery-chamber cover on
the
bottom
of
the
camera.
3 Insert the battery.
Insert
the
battery
as
shown at right.
4 Close the battery-chamber cover.
II
Removing
the
Battery
Before removing
the
battery,
turn
the
camera off.
To
prevent short-circuits, replace
the
terminal cover when
the
battery
is
not
in
use.
23