
Owner's Manual

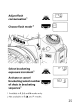
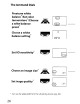
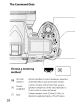

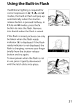
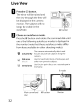
Table Of Contents
- Using the Supplied Manuals
- Quick Start Guide
- Owners Manual
- Two-Button Reset
- Set Language / Time
- Table of Contents
- Q & A Index
- Supplied Accessories
- Parts & Controls
- Getting Started
- Basic Photography & Playback
- Focus
- Image Size & Quality
- Release Mode
- Using the Built-In Flash
- ISO Sensitivity
- P, S, A, and M Modes
- Exposure
- White Balance
- Picture Controls
- Active D-Lighting
- Multiple Exposure
- Using an Optional GPS Unit
- More Playback Options
- Connecting to Other Devices
- Menu Guide
- Compatible Lenses
- Optional Flash Units
- Other Accessories
- Care / Maintenance
- Troubleshooting
- Error Messages
- Defaults
- Memory Card Capacity
- Specs
- Index
- Corrections to Manual
- Software Installation Instructions
- Scan of Software CD-ROM
- AC Power Cord Specs
- Warranty

Using
the
Built-in Flash
If additional
lighting
is
required for
correct exposure in
A~,
7',
~~,
and
~
modes,
the
built-in
flash will
pop
up
automatically
when
the
shutter-
release
button
is
pressed halfway.
In
P,
S,
A,
and M modes, press
the
~
button
to
raise
the
flash. Remove
lens hoods
when
the
flash
is
raised.
If
the
flash
is
raised, pictures can only
be taken
when
the
flash-ready
ind
i
ca
to
r
(~)
is
disPIayed. If
th
e flash-
ready indicator
is
not
displayed,
the
flash
is
charging; remove your finger
briefly
from
the
shutter-release
button
and
try
again.
To
save
power
when
the
flash
is
not
in
use,
press
it
gently
downward
until
the
latch clicks
into
place.
31