
Owner's Manual
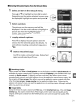
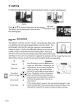
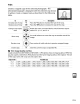
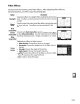
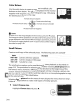
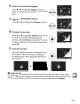

Table Of Contents
- Using the Supplied Manuals
- Quick Start Guide
- Owners Manual
- Two-Button Reset
- Set Language / Time
- Table of Contents
- Q & A Index
- Supplied Accessories
- Parts & Controls
- Getting Started
- Basic Photography & Playback
- Focus
- Image Size & Quality
- Release Mode
- Using the Built-In Flash
- ISO Sensitivity
- P, S, A, and M Modes
- Exposure
- White Balance
- Picture Controls
- Active D-Lighting
- Multiple Exposure
- Using an Optional GPS Unit
- More Playback Options
- Connecting to Other Devices
- Menu Guide
- Compatible Lenses
- Optional Flash Units
- Other Accessories
- Care / Maintenance
- Troubleshooting
- Error Messages
- Defaults
- Memory Card Capacity
- Specs
- Index
- Corrections to Manual
- Software Installation Instructions
- Scan of Software CD-ROM
- AC Power Cord Specs
- Warranty

6 Select the second photograph.
Press
....
or
~
to
highlight
Image 2. Repeat
Steps
2-5
to
select
the
second
photo
and adjust
gain.
7 Highlight the Preview column.
Press
....
or
~
to
highlight
the
Preview column.
8 Preview the overlay.
Press
...
or"
to
highlight
Overlay and press ®
(to
save
the
overlay
without
displaying a
preview,
highlight
Save and press
@).
To
return
to
Step 7 and select
new
photos
or
adjust gain,
press
E{18.
9 Save the overlay.
Press
®
while
the
preview
is
displayed
to
save
the
overlay. After
an
overlay
is
created,
the
resulting image will be displayed full-frame in
the
monitor.
+
~
Image Overlay
The overlay
has
the
same
photo
info (including date
of
recording, metering, shutter speed,
aperture, exposure mode, exposure compensation, focal length, and image orientation) and
values
for
white
balance and Picture Control
as
the
photograph selected for Image
1.
219