
Owner's Manual
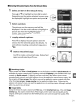
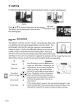
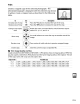
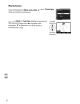
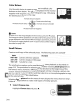
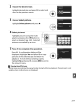
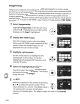
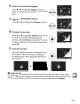

Table Of Contents
- Using the Supplied Manuals
- Quick Start Guide
- Owners Manual
- Two-Button Reset
- Set Language / Time
- Table of Contents
- Q & A Index
- Supplied Accessories
- Parts & Controls
- Getting Started
- Basic Photography & Playback
- Focus
- Image Size & Quality
- Release Mode
- Using the Built-In Flash
- ISO Sensitivity
- P, S, A, and M Modes
- Exposure
- White Balance
- Picture Controls
- Active D-Lighting
- Multiple Exposure
- Using an Optional GPS Unit
- More Playback Options
- Connecting to Other Devices
- Menu Guide
- Compatible Lenses
- Optional Flash Units
- Other Accessories
- Care / Maintenance
- Troubleshooting
- Error Messages
- Defaults
- Memory Card Capacity
- Specs
- Index
- Corrections to Manual
- Software Installation Instructions
- Scan of Software CD-ROM
- AC Power Cord Specs
- Warranty

II
Creating
Retouched
Copies
from
the
Retouch
Menu
1 Select an
item
in
the
retouch menu.
Press'"
or'"
to
highlight
an
item,
~
to
select.
Depending on
the
option
selected, a menu may
be displayed;
highlight
an
option
and press
~.
CI
RETOUCH
MENU
• [}-ughtlng I'i1 .
Reltty!
(orrt(tlon @
~
Tnm
)t
I
~~
III
filter tHtct\ :)
Color
balJn(e
.~
..
.('
Small
Picture
r.
ra
Imag!
cwtrlay
!2J
.
2 Select a picture.
The pictures on
the
memory
card will be
displayed.
Use
the
multi
selector
to
highlight
a
picture (to
view
the
highlighted
picture full
screen, press and hold
the
<f{
button).
--
.,
--"
..
_~._..
. _
""
.
3 Display retouch
options.
Press
@
to
display retouch options
(see
the
section for
the
selected
option
for details).
To
exit
without
creating a retouched copy, press
MENU.
..
4 Create a
retouched
copy.
Press
®
to
create a retouched copy. Retouched
copies are indicated by a
~
icon.
•
Retouching
Copies
Copies created
with
Trim
or
Small
picture
can
not
be
further
modified.
Quick
retouch
is
not
available
with
copies created
with
D-lighting; similarly,
D-lighting
is
not
available
with
copies
created
with
Quick
retouch.
D-lighting, red-eye correction, filter effects (cross screen
excepted), quick retouch, and color balance can
not
be applied
to
monochrome copies. With
the exception
of
Cross screen, filter effects can
not
be applied
to
copies created
with
filters
other
than Cross screen.
Image
overlay
can be applied
multiple
times. Otherwise the
options in the retouch menu can each be applied once
to
existing copies, although
multiple
edits may result in loss
of
detail.
•
Image
Quality
Except in
the
case
of
copies created
with
Trim
(pg. 213), Small
picture
(pg. 216), and
Image
overlay
(pg. 218), copies created from
JPEG
images are the same
size
and quality
as
the
original, while copies created from
NEF
(RAW)
photos are saved
as
large fine-quality
JPEG
images.
211