
Owner's Manual

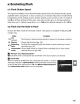

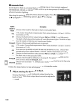


Table Of Contents
- Using the Supplied Manuals
- Quick Start Guide
- Owners Manual
- Two-Button Reset
- Set Language / Time
- Table of Contents
- Q & A Index
- Supplied Accessories
- Parts & Controls
- Getting Started
- Basic Photography & Playback
- Focus
- Image Size & Quality
- Release Mode
- Using the Built-In Flash
- ISO Sensitivity
- P, S, A, and M Modes
- Exposure
- White Balance
- Picture Controls
- Active D-Lighting
- Multiple Exposure
- Using an Optional GPS Unit
- More Playback Options
- Connecting to Other Devices
- Menu Guide
- Compatible Lenses
- Optional Flash Units
- Other Accessories
- Care / Maintenance
- Troubleshooting
- Error Messages
- Defaults
- Memory Card Capacity
- Specs
- Index
- Corrections to Manual
- Software Installation Instructions
- Scan of Software CD-ROM
- AC Power Cord Specs
- Warranty

2
Adjust
settings
for
group
A.
Choose
the
flash control
mode
and
output
level for the
flash units in
group
A.
3
Adjust
settings
for
group
B.
Choose
the
flash control
mode
and
output
level for
the
flash units in
group
B.
4 Select
the
channel.
S Press
®.
6 Compose
the
shot.
Compose
the
shot and arrange
the
flash units
as
shown below. Note
that
the
maximum distance at which
the
remote flash units can be placed may vary
with
shooting conditions.
70
ml33
ft.
or
less
60
0
or
less
~
30
0 I
"r
/,
5
ml7
5
ft.
or
less
or
ess!
"
~--~
f'
\
~--
=-~)S'"
.-
-,
-:
-
'.
I,(~
Camera
.~:
\
','"
/"
~
(built-in
flash)
30
0 or
less
'
.'
"
, I
_'<~/
,,5
ml7
5 ft. or
less
\ 't'
60
0
or
less
'
Wireless remote
sensors
on
flash units
should
face camera.
7 Set
the
remote
flash
units
to
the
selected channel.
Turn all
the
remote flash units on and set
them
to
the
channel selected in
Step
4.
See
the Speedlight instruction manuals
for
details.
189