
Owner's Manual


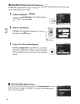


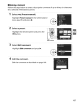


Table Of Contents
- Using the Supplied Manuals
- Quick Start Guide
- Owners Manual
- Two-Button Reset
- Set Language / Time
- Table of Contents
- Q & A Index
- Supplied Accessories
- Parts & Controls
- Getting Started
- Basic Photography & Playback
- Focus
- Image Size & Quality
- Release Mode
- Using the Built-In Flash
- ISO Sensitivity
- P, S, A, and M Modes
- Exposure
- White Balance
- Picture Controls
- Active D-Lighting
- Multiple Exposure
- Using an Optional GPS Unit
- More Playback Options
- Connecting to Other Devices
- Menu Guide
- Compatible Lenses
- Optional Flash Units
- Other Accessories
- Care / Maintenance
- Troubleshooting
- Error Messages
- Defaults
- Memory Card Capacity
- Specs
- Index
- Corrections to Manual
- Software Installation Instructions
- Scan of Software CD-ROM
- AC Power Cord Specs
- Warranty

II
Measuring
a
Value
for
Preset
White
Balance
1 Light a reference object.
Place
a neutral gray
or
white
object
under
the
lighting
that
will be used in
the
final photograph. In studio settings, a standard gray panel can be used
as
a
reference object. Note
that
exposure
is
automatically increased by 1
EV
when
measuring
white
balance; in exposure
mode
M,
adjust exposure
so
that
the
electronic analog exposure displays shows
±O
(pg. 84).
2 Set white balance to PRE (Preset manual).
Press
the
WB
button
and rotate
the
main command dial
until
PRE
is
displayed in
the
control panel.
ce
:,;.....:;
.--
IkDl
l
~
(S
QUAL
WB
button Main command dial
n
U
Controlpanel
5
FS.b
PrE
3 Select direct measurement mode.
Release
the
WB
button
briefly and
then
press
the
button
until
the
PRE icon in
the
control panel starts
to
flash. A
flashing
P,-E
will also appear in
the
control panel and
viewfinder. At default settings,
the
displays will flash for
about
six seconds.
To
exit
without
measuring a value for
preset
white
balance, press
the
WB
button
again.
~
I 1
'I
I
'\
Viewfinder
101