Nikon DIGITAL CAMERA Userls Manual
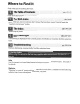
Where to Find It Find what you're looking for from: a'The Table of Contents pp. viii-xiii Find items by function or menu name. a The QBrA Index pp. iv-vt~ Know what you want to do but don't know the function name? Find it from the "question and answer" index. a The Index pp.27p-278 c ,~: ,,~ Search by key word. a Error Messages pp. 255-257 If a warning is displayed in the control panel, viewfinder, or monitor, find the solution here. Troubleshooting pp. 250-25:4- .
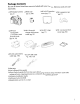
Package Contents Be sure all items listed here were included with your camera. Memory cards are sold separately. o 090 digital camera 0 Body cap (pg. 3) (pp. 3, 240) o EN-EL3e o MH-18a quick rechargeable Li-ion battery with terminal cover (pp. 22, 23) o EG-D2 audio/video cable (pg. 146) charger with power cable (pg. 22) o BM-l 0 LCD monitor 0 DK-5 eyepiece cap cover (pg. 17) o AN-DCl strap (pg. 17) o B5-1 accessory shoe (pg. 17) cover (pg. 233) 0 UC-E4 USB cable (pp.
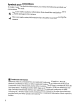
Symbols and Conventions To make it easier to find the information you need, the following symbols and conventions are used: ~ B B This icon marks cautions; information that should be read before use to prevent damage to the camera. This icon marks notes; information that should be read before using the camera. Trademark Information Macintosh, Mac as, and QuickTime are registered trademarks of Apple Inc.
lID9() m Introduction =-- Basic Photography and Playback L!j More on Photography (All Modes) r.
Q&A Index Find what you're looking for using this "question and answer" index.
Camera Setup Question Key phrase How do I stop parts of my photos from blinking? Photo info, highlights How do I focus the viewfinder? How do I keep the monitor from turning off? How do I set the clock? How do I set the clock for daylight saving time? How do I change time zones when I travel? How do I adjust monitor brightness? How do I restore default settings? How do I turn off the light on the front of the camera? Can I display a framing grid in the viewfinder? How do I view the control panel in the
Taking Photographs Question Is there an easy way to take snapshots? Is there an easy way to take more creative shots? Can I take pictures without the flash? How do I bring out a portrait subject? How can I get good landscape shots? How do I take close ups of small objects? How do I "freeze" a moving subject? Can I include night backgrounds in my portraits? How do I take a lot of photographs quickly? Can I shoot a self-portrait? Is there a remote control for this camera? How do I adjust exposure? How do I fr
Viewing and Retouching Photographs Se~page Question Can I view my photographs on the camera? Can I view more information about photos? Key phrase Camera playback Photo info How do I get rid of an unwanted photo? Deleting individual photos Can I delete several photos at once? Can I zoom in on pictures to make sure they're in focus? Can I protect photos from accidental deletion? Is there an automatic playback ("slide show") option? Can I view my photos on TV? Can I view my photos in High Definition? How
Table of Contents Q&A Index For You r Safety .
~ Sports Ii'I Night Portrait Framing Pictures in the Monitor (Live View) Basic Playback Deleting Unwanted Photographs Recording and Viewing Movies (Live View) More on Photography (All Modes) Focus 42 42 .
Picture Controls Selecting Nikon Picture Controls Modifying Existing Picture Controls Creating Custom Picture Controls Sharing Custom Picture Controls Managing Custom Picture Controls Active D-Lighting Multiple Exposure The GP-1 GPSUnit More on Playback Full-Frame Playback Photo Information Thumbnail Playback Calendar Playback Taking a Closer Look: Playback Zoom Protecting Photographs from Deletion Deleting Individual Photographs Pictmotion Slide Shows Connections Viewing Photographs on TV Standard Defi
Slide Show Print Set (DPOF) Q The Shooting Menu: Shooting Options Set Picture Control Manage Picture Control Image Quality Image Size White Balance ISO Sensitivity Settings Active D-Lighting Color Space Long Exp.
d9: LCD Illumination d 10: Exposu re Delay Mode d 11: Flash Warning d 12: MB-080 Battery Type e: Bracketing/Flash 183 183 183 184 185 e1: Flash Shutter Speed e2: Flash Cntrl for Built-in Flash e3: Modeling Flash e4: Auto Bracketing Set e5: Auto FP e6: Bracketing Order f: Controls 185 185 191 191 195 195 196 f1 : :~: Switch f2: OK Button (Shooting Mode) f3: Assign FUNC.
Straighten Distortion Control Fisheye Side-by-Side Comparison @ Recent Settings/~ My Menu @ Recent Settings: Viewing Recent Settings ~ My Menu: Creating a Custom Menu Technical Notes Compatible Lenses Compatible CPU Lenses Non-CPU Lenses Optional Flash Units (Speedlights) The Nikon Creative Lighting System (CLS) Flash Contacts Other Accessories Caring for the Camera Storage Cleaning The Low-Pass Filter Caring for the Camera and Battery: Cautions Troubleshooting 221 222 222 223 224 224 225 227 228 22
For Your Safety To prevent damage to your Nikon product or injury to yourself or to others, read the following safety precautions in their entirety before using this equipment. Keep these safety instructions where all those who use the product will read them. The consequences that could result from failure to observe the precautions listed in this section are indicated by the following symbol: ~ • This icon marks warnings. To prevent possible injury, read all warnings before using this Nikon product. .
& Observe proper precautions when handling batteries Batteries may leak or explode if improperly handled. Observe the following precautions when handling batteries for use in this product: • Use only batteries approved for use in this equipment. • Do not short or disassemble the battery. • Be sure the product is off before replacing the battery. If you are using an AC adapter, be sure it is unplugged. • Do not attempt to insert the battery upside down or backwards.
Notices • No part of the manuals included with this product may be reproduced, transmitted, transcribed, stored in a retrieval system, or translated into any language in any form, by any means, without Nikon's prior written permission. • Nikon reserves the right to change the specifications of the hardware and software described in these manuals at any time and without prior notice. • Nikon will not be held liable for any damages resulting from the use of this product.
Notices for Customers in Canada ATTENTION CAUTION Cet appareil numerique de la c1asse Best This Class B digital apparatus complies with conforme ala norme NMB-003 du Canada. Canadian ICES-003. Symbol for Separate Collection in European Countries This symbol indicates that this product is to be collected separately. The following apply only to users in European countries: • This product is designated for separate collection at an appropriate collection point. Do not dispose of as household waste.
Disposing of Data Storage Devices Please note that deleting images or formatting memory cards or other data storage devices does not completely erase the original image data. Deleted files can sometimes be recovered from discarded storage devices using commercially available software, potentially resulting in the malicious use of personal image data. Ensuring the privacy of such data is the user's responsibility.
Introduction This chapter covers information you will need to know before using the camera, including the names of camera parts, how to use the camera menus, and how to ready the camera for use. Overview '.......................................................... 2 Getting to Know the Camera....................................................................................... 3 The Ca mera Body The Mode Dial..............................................................................................
Overview Thank you for your purchase of a Nikon single-lens reflex (SLR) digital camera. To get the most from your camera, please be sure to read all instructions thoroughly and keep them where they will be read by all who use the product. ~ Use Only Nikon Brand Accessories Only Nikon brand accessories certified by Nikon specifically for use with your Nikon digital camera are engineered and proven to operate within its operational and safety requirements.
Getting to Know the Camera EI Take a few moments to familiarize yourself with camera controls and displays. You may find it helpful to bookmark this section and refer to it as you read through the rest of the manual. ~. The Camera Bod~ 1 3 ------7~~~ 4--~ 5--~ ~,.---11 ~~--12 '-----13 ------20 ---21 17 _~,..".--.2.
The Camera Body (Continued) 1 Built-in flash 70 9 Mirror 43,246 2 ~ (flash mode) button 70 10 DC-IN connector for optional EH-5a or ~ (flash compensation) button 91 EH-5 AC adapter 239 3 Microphone 50, 170 11 USB connector Connecting to a computer 149 4 Infrared receiver 69 to a printer 151 Connecting 5 BKT (bracketing) button 92 147 6 Connector cover 146, 147, 149, 151 12 HDMI mini-pin connector 146 7 Lens release button 26 13 Video connector 241 8 Focus-mode selector 54, 59 14 Accessory terminal 4
The Camera Body (Continued) 1 Viewfinder eyepiece .32 2 DK-21 viewfinder eyepiece cup 17 3 iii! (delete) button Deleting pictures .49 Deleting pictures during playback 140 FM~ (format) button .30 4 Monitor Live view 43 Viewing pictures 50 Full-frame playback 128 50, 128 5 [B (playback) button 6 MENU (menu) button 19, 159 7 ?/o-..
The Mode Dial The camera offers a choice of the following eleven shooting modes: II ~ S, A, and MModes Select these modes for full control over camera settings. .... --- - _ . P-Programmed auto (pg. 80): Camera A-Aperture-priorityauto (pg. 81): Adjust chooses shutter speed and aperture, user controls other settings. aperture to soften background details or increase depth-of-field to bring both main subject and background into focus. S-Shutter-priorityauto (pg.
The Control Panel - - - - - - - - - - - - 14 1 ---------13 2-----r-------12 3 ----+1 .----r--~..".--_=:~T-------'r--11 ~------10 5 6 9 --[ikii ~~;A~'~~~"&'I3~lj I 1 Shutter speed Shutter-priorityauto Manual exposure mode Exposure compensation value Flash compensation value White balance fine-tuning White balance color temperature White balance preset number.
The Control Panel (Continued) 15 - - - - - - - - - - - , - - - - - - - - - - - - 27 16 - - - - - - - - - - - , 17 - - - - - - - - - 1S Flash compensation indicator 16 "Clock not set" indicator Clock battery Warnings 17 Flexible program indicator 18 Metering 19 Focus points AF-area mode 20 Autofocus mode 21 Black-and-white indicator 22 Number of exposures remaining Number of shots remaining before memory buffer fills Preset white balance recording indicator Capture mode indicator ISO sensitivity ISO se
The Viewfinder 1 I I I i 2 I -P----f7 co~!~t-----JI l] L:J I - - [3 8 [[oJ] 8 ~] ----------I --J~~=t1==8:::.: r ~ 5 6 I 7 -----r-------l 8 '/ I 3 I I B-~-----+------="'" 4--r;rre CD -if l as BSFB 8::"",L..:': ~~~u~~BB Bl&~ 910 II I 20 11 I 1~1~ 12 ~ I 21 J 15 j r.L1j :l 1 1 I I 24I 22 23 I 25 1 Framing grid (displayed when On is 17 Number of exposures remaining 35 selected for Custom Setting d2) ..........
The Shooting Information Dis~ Shooting information, including shutter speed, aperture, the number of exposures remaining, and AF-area mode, is displayed in the monitor when the !Ill button is pressed. Press the Imm button again to change selected settings (pg. 12). To clear shooting information from the monitor, press the Imm button a third time or press the shutter-release button halfway. At default settings, the monitor will turn off automatically if no operations are performed for about 10 seconds.
The Shooting Information Display (Continued) 1 Shooting mode A~O auto/\i) auto (flash off) .
II Changing Settings in the Shooting Information Display (Quick Settings Display) To change settings for the items listed below, press the mm 1m ..... . button in the shooting information display. Highlight items using the multi selector and press @ to jump to the menu for the highlighted item.
The Command Dials The main- and sub-command dials are used alone or in combination with other controls to adjust a variety of settings. Sub-command dial Main-command dial :.: button: metering ?/o-.. (WB) button: -------, white balance II/mage Quality and Size Set image quality (pg. 62).
Choose an image size (pg. 63). + [5311 ~ (QUAL) button Sub-command dial Control panel AF button Main command dial Control panel Main command dial Control panel II Autofocus Mode Choose an autofocus mode (pg.54). II Release Mode Choose a release mode (pg.64). II ISO Sensitivity Set ISO sensitivity (pg. 74). + ~~ ISO button Main command dial Control panel II Exposure Choose a combination of aperture and shutter speed (exposure mode P; pg. 80). ~ .
Choose a shutter speed (exposure mode Sor M; pp. 81, 83). ~( 250 ~ NORM Mode S or M Main command dial Choose an aperture (exposure mode Aor M; pp. 82, 83). l£L EID ~.~ ~AF-A [5 3 11 [: : :'J A I'.i'lll l' Control panel ~ ~ NORM 60 (FB )EID ~ ~AF'A [:::J I'.i'lll A [53 1J ModeAorM Sub-command dial :.: button Main command dial Control panel Main command dial Control panel l' Control panel Choose a metering method (pg.87). Set exposure compensation (pg.90).
Select bracketing exposure increment (pg. 92, 192). 3F (:~) +4•• - OKT button Sub-command dial Control panel II White Balance Choose a white balance setting (pg. 95). n U __[ ~ A Main command dial Control panel Sub-command dial Control panel Main command dial Control panel Sub-command dial Control panel Fine-tune white balance (pg. 97), set color temperature (pg. 99), or choose a white balance preset (pg. 106). II Flash Settings Choose flash mode (pg. 71).
Attaching the AN-DCl Camera Stra~ Attach the strap as shown below. The BM-l 0 Monitor Cover A clear plastic cover is provided with the camera to keep the monitor clean and protect it when the camera is not in use. To attach the cover, insert the projection on the top of the cover into the matching indentation above the camera monitor (CD) and press the bottom of the cover until it clicks into place (@).
Camera Menus Most shooting, playback, and setup options can be accessed from the camera menus. To view the menus, press the MENU button. MENU button Tabs-------------. Choose from playback, shooting, Custom Settings, setup, retouch, and recent settings menus (see below). Slider shows position in current menu. Current settings are shown by icons. [ Menu options Options in current menu. The following menus are available: _ .•. ~, ••• __ . . . . . ' _ , . , . . . . . . ••• [E] ,,_, 'U' • • , .
Using Camera Menus The multi selector and @ button are used to navigate the camera menus. ® button Move cursor up ~nd Select highlighted +~item ®~J+ £::, Cancel return.. to prevIous menu ~ Select highlighted item or display sub- \) .. menu Move cursor down Follow the steps below to navigate the menus. 1 Display the menus. MENU button Press the MENU button to display the menus. 2 Highlight the icon for the current menu. Press
........................ 4 S .. .................... Position the cursor in the selected menu. a Press ~ to position the cursor in the selected menu. y Hide Image Highlight a menu item. . PlAYBACK MENU '~'-'I ':C'£ . Playback folder • [:;j !>lIPlay mode Image reView r: Rotate ta!i Plctmotion () Slide Ihol'/ S 0N OFF :J CJ . Press .. or ... to highlight a menu item. 6 Display options. Press item. 7 ~ to display options for the selected menu Highlight an option. Press .. or ...
Hel~ If a? icon is displayed at the bottom left corner of the monitor, help can be displayed by pressing the ?/o-.. button. A description of the currently selected option or menu will be displayed while the button is pressed. Press. or .... to scroll through the display. SHOO!I~--,G_M_E_NU [J o ISO IfnllllVl!Y IftlinQl ActIve D-LIQhlInQ ~ Color lP~(e Lang exp NR ~ HIgh ISO NR , t,; . ,Ii"" slIf.ll OFF 1m S~~Amctiiiv~erifO~ld~f~rrm;• • • • ~~J I @ OVle lettingl 1;:.1 .
First Steps Charge the Batter~ hI The camera is powered by an EN-EL3e rechargeable Li-ion battery (supplied). The EN-EL3e is not fully charged at shipment. To maximize shooting time, charge the battery in the supplied MH-18a quick charger before use. About two and a quarter hours are required to fully recharge the battery when no charge remains. 1 Plug the charger in. Insert the AC adapter plug into the battery charger and plug the power cable into an electrical outlet. 2 Remove the terminal cover.
4 Remove the battery when charging is complete. Charging is complete when the CHARGE lamp stops blinking. Remove the battery and unplug the charger. Insert the Batter}! 1 Turn the camera off. Power switch Always turn the camera off before inserting or removing batteries. 2 Open the battery-chamber cover. Open the battery-chamber cover on the bottom of the camera. 3 Insert the battery. Insert the battery as shown at right. 4 Close the battery-chamber cover.
~ The Battery and Charger Read and follow the warnings and cautions on pages xiv-xv and 248-249 of this manual. Do not use the battery at ambient temperatures below O°C (32°F) or above 40°C (104 OF). Charge the battery indoors at ambient temperatures between 5-35°C (41-95 OF); for best results, charge the battery at temperatures above 20°C (68°F). Battery capacity may temporarily drop if the battery is charged at low temperatures or used at a temperature below the temperature at which it was charged.
Attach a Lens Care should be taken to prevent dust from entering the camera when the lens is removed. An AF-S OX NIKKOR 18-1 OSmm f/3.5-S.6G ED VR lens is used in this manual for illustrative purposes. ----::=::;:::::;:;:;;;::::::~x-- Mounting index \\3S':~-7-"~~- Focal length index m CPU contacts (pg.228) @-Rearcover ~- Focus mode switch (pg. 25, 273) VR (vibration reduction) switch '---Focus ring (pg. 59,273) 1 Remove the rear lens cap and the camera body cap.
II Detaching the Lens I~.I Be sure the camera is off when removing or exchanging lenses. To remove the lens, press and hold the lens release button while turning the lens clockwise. After removing the lens, replace the lens cap, rear cover, and camera body cap. II Vibration Reduction (VRj AF-S DX Zoom-Nikkor 18-105 mm f/3.s-s.
Basic Setu~ A language-selection dialog will be displayed the first time the camera is turned on. Choose a language and set the time and date. Note that if the time and date are not set, mm3 will blink in the monitor and the time and date recorded with photographs " will be incorrect. I!I 1 Turn the camera on. Power switch A language-selection dialog will be displayed. 2 Select a language. Press ~ or'" to highlight the desired language and press @.
6 Choose a date format. Press .... or ... to choose the order in which the year, month, and day will be displayed and press ®. IJ World time D~tp format y YfllJ1lYear/MonthlOay . ltIDIY MonthlOay/Yw OtlllY~ 7 Exit to shooting mode. Press the shutter-release button halfway to exit to shooti ng mode. • The Setup Menu Language and date/time settings can be changed at any time using the Language (pg. 204) and World time (pg. 204) options in the setup menu.
Inserting Memory Cards The camera stores pictures on Secure Digital (SO) memory cards (available separately). 1 Turn the camera off. Power switch Always turn the camera off before inserting or removing memory cards. 2 Open the card slot cover. Slide the card slot cover out (CD) and open the card slot (@). 3 Insert the memory card. Holding the memory card as shown at right, slide it in until it clicks into place. The memory card access lamp will light for a few seconds.
II Formatting Memory Cards Memory cards must be formatted after being used in other devices. Format the card as described below. ~ Formatting Memory Cards Formatting memory cards permanently deletes any data they may contain. Be sure to copy any photographs and other data you wish to keep to a computer before proceeding (pg. 148). 1 Turn the camera on. 2 Press the FO~ buttons. Power switch :.: button UiJ button Hold the Fc§3 (::.: and Wi) buttons down simultaneously for approximately two seconds.
II Removing Memory Cards After confirming that the access lamp is off, turn the camera off, open the memory card slot cover, and press the card in to eject it (CD). The card can then be removed by hand (@). ~ Memory Cards • Memory cards may be hot after use. Observe due caution when removing memory cards from the camera. • Memory cards that have been formatted in a computer or other device must be reformatted in the camera before they can be used for recording or playback.
Mjust Viewfinder Focus The camera is equipped with diopter adjustment to accommodate individual ~ differences in vision. Check that the display in the viewfinder is in focus before ~ framing pictures in the viewfinder. 1 Remove the lens cap and turn the camera on. 2 Focus the viewfinder. Power switch Rotate the diopter control until the viewfinder display and focus point are in sharp focus.
Basic Photography and Playback This chapter outlines the basics oftaking and viewing photographs in auto and scene modes. It assumes that default camera settings are used; for information on restoring default settings, see page 258. "Point-and-Shoot" Photography (~ and
"Point-and-Shoot" Photography (~O and c}) Modes) This section describes how to take photographs in A&O (auto) mode, an automatic "point-and-shoot" mode in which the majority of settings are controlled by the camera in response to shooting conditions, and in which the flash will fire automatically if the subject is poorly lit. To take photographs with the flash off while leaving the camera in control of other settings, rotate the mode dial to @ to select auto (flash off) mode.
3 Check the number of exposures remaining. The exposure count displays in the control panel and viewfinder show the number of photographs that can be stored on the memory card. Check the number of exposures remaining. If there is not enough memory to store additional photographs at current settings, the display will flash as shown at right. No further pictures can be taken until the memory card has been replaced (pg. 31) or photographs have been deleted (pp. 49, 162). \_i_! 1"_ _ -..
Step 2: Choose Shooting and Focus Modes 1 Select A8° or @ mode. Mode dial To take photographs without the flash, rotate the mode dial to cl). Otherwise, rotate the mode dial to A~. 2 Select autofocus. Focus-mode selector Rotate the focus-mode selector to AF (autofocus). Step 3: Check Camera Settin~ Check settings in the control panel. The default settings for A~O and cl) mode are listed below. [ AF-area mode) [ Autofocus mode) , fr dr_ [ Flash mode ~ . 6I AUTO I [Image size I-! [ . . . . . .
Step 4: Frame the Photo9-@P.h 1 Ready the camera. When framing photographs in the viewfinder, hold the handgrip in your right hand and cradle the camera body or lens with your left. Keep your elbows propped lightly against your torso for support and place one foot half a pace ahead of the other to keep your upper body stable. In @ mode, shutter speeds slow when lighting is poor; use of a tripod is recommended. Hold the camera as shown at right when framing photographs in portrait (tall) orientation.
Step 5: Focus 1 Press the shutter-release button halfway. Press the shutter-release button halfway to focus. The camera will select the focus points automatically. If the subject is poorly lit, the flash may pop up and the AF-assist illuminator may light. 2 Check the indicators in the viewfinder. .... . . . r .~. When the focus operation is complete, the selected focus points will be briefly highlighted, a beep will sound, and the in-focus indicator (e) will appear in the viewfinder.
Step 6: Shoot Smoothly press the shutter-release button the rest of the way down to release the shutter and record the photograph. The access lamp next to the memory card slot cover will light. Do not eject the memory card or remove or disconnect the power source until the lamp has gone out and recording is complete. EI II Turning the Camera Off Turn the camera off when shooting is complete.
• The Built-in Flash If additional lighting is required for correct exposure in A8° mode, the built-in flash will pop up automatically when the shutter-release button is pressed halfway. Flash range varies with aperture and ISO sensitivity (pg. 266); remove lens hoods when using the flash. If the flash is raised, photographs can only be taken when the flash-ready indicator (~) is displayed.
Creative Photography (Scene Modes) The camera offers a choice of six "scene" modes. Selecting a program automatically optimizes settings to suit the selected scene, making creative photography as easy as rotating the mode dial. =:~d'=l ~=:_:===:=_~. cri~iOl1____ .z I Portrait EI -.. -...--._.- For portraits. -ill-Iandscape"-"-'-'-For-natural-ancfma'n=m-a-d'e-landscapes"'in-aa-ylrghtorat-nTgEt~-'-'--"'" _-- -- . - . -- -r For moving -su-f)]ects:-··--------··--··-··.·--·-·-··--··-·--···-·-.....--_.-.. -.
~ CloseUp Use for close-up shots of flowers, insects, and other small objects (a macro lens can be used to focus at very close ranges). The camera automatically focuses on the subject in the center focus point. Use of a tripod is recommended to prevent blur. ~ Sports High shutter speeds freeze motion for dynamic sports shots in which the main subject stands out clearly. The built-in flash and AF-assist illuminator,turn off automatically.
Framing Pictures in the Monitor (Live View) Press the (bY] button to frame pictures in the monitor. 1 Press the ~ button. The mirror will be raised and the view through the lens will be displayed in the camera monitor. The subject will no longer be visible in the viewfinder. CD @ ~~7I111S")- - . ............. .' ".~" '--~""""----"-"'"" ""~ _.. _.. _-,,... ..' ' ,,,,, ..• _.,, ,, , .- Item CD Shooting mode ® Time remaining , ..
2 Choose an autofocus mode. Press the AF button and rotate the command dial until one of the following autofocus modes is displayed in the monitor (note that these autofocus modes differ from those available in other shooting modes): Mode'T ················Descrlpilon AF button . ----.--.----.. i·Th-eEa m-era"autom'atica,'rydetects"'-"-Fa~e . !and focuses on portrait subjects [!] ... pnonty :facing the camera. Use for portraits.
4 Choose the focus point. Wide and normal area autofocus: Rotate the focus selector lock to lie" and use the multi selectorto move the focus point to any point in the frame. Return the focus selector lock to ilL" when selection is complete. Focus selector lock Focus point Face-priority autofocus: A double yellow border will be displayed when the camera detects a portrait subject facing the camera (if multiple faces, up to a maximum of five, are detected, the camera will focus on the closest subject).
Manual focus: Focus using the lens focusing ring. 6 Take the picture. IB Press the shutter-release button the rest of the way down to take pictures in the current release mode (pg. 64). The monitor will turn off. When shooting is complete, the photograph will be displayed in the monitor for 4 s or until the shutter-release button is pressed halfway. The camera will then return to live view mode. 7 Exit live view mode. Press the ~ button to exit live view mode.
~ Face-Priority AF The camera's ability to detect faces depends on a variety of factors, including whether or not the subject is facing the camera. The camera may be unable to detect subjects that are not facing the camera or faces that are hidden by sunglasses or other obstructions or that take up too much or too little of the frame. If no face is detected whE~n the shutter-release button is pressed halfway, the camera will focus on the subject in the center of the frame.
Basic Playback At default settings, photographs are automatically displayed for about 4 s after shooting. If no photograph is displayed in the monitor, the most recent picture can be viewed by pressing the [B button. 1 Press the [EI button. A photograph will be displayed in the monitor. ~ button t§ B ,-1 .,' j' Vvtl CS ~ ~~/""J 2 View additional pictures. Additional pictures can be displayed by pressing ..... or~. To view additional information on the current photograph, press'" and'" (pg.129).
Deleting Unwanted Phot09-@Phs To delete the photograph currently displayed in the monitor, press the Note that photographs can not be recovered once deleted. 1 un button. Display the photograph. Display the photograph you wish to delete as described on the previous page. [B 1-:-1 button Ili~ IS~ ISO ?/e>.. 2 '--'----_ _----.J Delete the photograph. Press the un button. A confirmation dialog will be displayed. iii! button Press the un button again to delete the image and return to playback.
Recording and Viewing Movies (Live View) Movies up to 2 GB in size can be recorded in live view mode. Before recording, choose frame size and sound options in the Movie settings menu (pg. , 70). 1 Press the ~ button. (Q button The mirror will be raised and the view through the lens will be displayed in the camera monitor. The subject will no longer be visible in the viewfinder. ~The"lcon A , . icon (pg. 43) will be displayed if there is insufficient space on the memory card to record movies. 2 Focus.
~ Recording Movies Banding or distortion may be visible in the monitor and in the final movie under fluorescent, mercury vapor, or sodium lamps or if the camera is panned horizontally or an object moves at high speed through frame. Bright light sources may leave after-images when the camera is panned. Jagged edges, false colors, moire, and bright spots may also appear. When recording movies, avoid pointing the camera at the sun or other strong light sources.
II Viewing Movies Movies are indicated by a .. icon in full-frame playback (pg. 128). The following operations can be performed while a movie is displayed: ltiJ---- Movie indicator Use To .. .. Start/pause/ resume , ----Time remaining -"""';;:'--:-':::;;;:;:::'t;' Description ",,,,,,,': Press @ to start, pause, or resume playback. Press .... or ~ to rewind or fast forward. While playback is paused, press .... or ~ to rewind or advance one frame.
More on Photography (All Modes) This and the following two chapters build on the Tutorial to cover more advanced shooting and playback options. Focus . Autofocus 54 54 .. 56 . 57 . 59 . Focus Point Selection Focus Lock Manual Focus Image Quality and Size . 61 Image Quality .. Image Size . 62 63 Release Mode . 64 . 65 66 68 Continuous Mode (~) .. Using an Optional Remote Control (u) . Self-Timer Mode EI Using the Built-in Flash Flash Mode 70 . 71 . ISO Sensitivity .
Focus Focus can be adjusted automatically (see "Autofocus;' below) or manually (pg. 59). The user can also select the focus point for automatic or manual focus (pg. 59) or use focus lock to focus to recompose photographs after focusing (pg. 57). Autofocus When the focus mode selector is set to AF, the camera Focus mode selector focuses automatically when the shutter-release button is pressed halfway. In single-point AF, a beep will sound when the camera focuses.
. . Getting Good Results with Autofocus Autofocus does not perform well under the conditions listed below. The shutter release may be disabled if the camera is unable to focus under these conditions, or the in-focus indicator (e) may be displayed and the camera may sound a beep, allowing the shutter to be released even when the subject is not in focus. In these cases, rotate the focus mode selector to M and use manual focus (pg. 59), or use focus lock (pg.
Focus Point Selection The camera offers a choice of eleven focus points that together cover a wide area of the frame. At the default settings, the camera chooses the focus point automatically or focuses on subject in the center focus point. The focus point can also be selected manually to compose photographs with the main subject positioned almost anywhere in the frame. 1 Choose single- or dynamic-area AF.
Focus Lock Focus lock can be used to change the composition after focusing, making it possible to focus on a subject that will not be in a focus point in the final composition. It can also be used when the autofocus system is unable to focus (pg. 55). Focus lock is most effective when Single point, Dynamic area, or 3D-tracking (11 points) is selected for Custom Setting a1 (AF-area mode; pg. 173). 1 Focus.
Do not change the distance between the camera and the subject while focus lock is in effect. If the subject moves, focus again at the new distance. • Continuous Mode (pg. 65) Use the AE-VAF-L button to lock focus in continuous mode. • See Also Custom Setting f4 (Assign AE-L/AF-L Button; pg. 200) controls the behavior of the AE-lIAF-L button.
Manual Focus Manual focus is available for lenses that do not support autofocus (non-AF Nikkor lenses) or when autofocus does not produce the desired results (pg. 55). To use manual focus, set the camera focus-mode selector and/or the lens focus-mode switch as follows: • AF-S lenses: Set the lens focus-mode switch to M. • AF lenses: Set the both the camera focus-mode selector and the lens focus-mode switch to M. • Manual focus lenses: Set the camera focus-mode switch to M.
II The Electronic Rangefinder If the lens has a maximum aperture of f/5.6 or faster, the viewfinder focus indicator can be used to confirm whether the subject in the selected focus point is in focus (the focus point can be selected from any of the 11 focus points). After positioning the subject in the selected focus point, press the shutter-release button halfway and rotate the lens focusing ring until the in-focus indicator (e) is displayed.
Image Quality and Size Together, image quality and size determine how much space each photograph occupies on the memory card. Larger, higher quality images can be printed at larger sizes but also require more memory, meaning that fewer such images can be stored on the memory card. Image Quality and Size ~ . JPEG fine .•... .•.• .• • . •.'I ,.;L. ,. r" . I JPEG normal ...... '. ~. JPEG basic .. ~.
Image Qualit~ The camera supports the following image quality options (listed in descending order by image quality and file size): Option ' File typeT ····"....·....·Description·.. -....·,..·, · , ......., ..1 IRaw 12-bit data from the image sensor are saved directly to the memory .. !card. Choose for images that will be processed on a computer. JPEG NEF: copies of NEF (RAW) images can be created using the NEF (RAW) ! iprocessing option in the retouch menu (pg.
Image Size Image size is measured in pixels. The following options are available. ! Image size Size (pixels) ····r . ····················Approximate·siZewhenprlntedai200dpiii _ L (default) M ........... S " - _ 4,288 x 2,848 3,216 x 2,136 2,144 x 1,424 _ _ N •••••".· •• ' " . -•••-••• " ,...... •••••••••• • • • • • 54.5 x 36.2 em (21.4 x 14.2 in.) 40.8x27.1 em 6.1 x 10.7 27.2 x 18.1 em 0.7 x 7.1 *-'ApproxTmate··size·when"pri·ntecfat·206 Cfpi.·..
Release Mode Release mode determines how the camera takes photographs: one at a time, in a continuous sequence, with a timed shutter-release delay, or with a remote control. __''''_N_..__ ' .., ..,_.,.,.''''_'_'''' ··""'''''·'N,,_,.~'N'''' . ""'n_'~_.' Mode , ••"., ..n .. "~_ .._ _ .•,, ,,,"w' •.,,"'',,,,_''_ _ ''''''NN'Nn.''.. '' ... _'.,___,,N ..,. _ _ _ _ _ , Description ... .. . . ICamera takes one photograph each time shutter-release button is [§] Single frame pressed.
Continuous Mode To take pictures in ~L (continuous low speed) and ~H (continuous high speed) modes: , Select ~ L or ~H mode. Press the Q1j button and rotate the main command dial until the desired setting is displayed in the control panel. ~I}QJ button 2 Main command dial QhL ~H Control panel Frame a photograph, focus, and shoot. While the shutter-release button is pressed all the way down, pictures will be taken at up to 4.
Self-Timer Mode @ The self-timer can be used to reduce camera shake or for self-portraits. 1 Mount the camera on a tripod. Mount the camera on a tripod or place the camera on a stable, level surface. 2 Select ~ mode. Press the QlJ button and rotate the main command dial until the control panel. ~ is displayed in Control panel 3 Frame the photograph. Frame the photograph. Before taking a photograph with the flash in P, S, A, or M modes (pg.
4 Start the timer. Press the shutter-release button halfway to focus, and then press the button the rest of the way down to start the self-timer. The self-timer lamp will start to blink and a beep will begin to sound. Two seconds before the photograph is taken, the self-timer lamp will stop blinking and the beeping will become more rapid. At default settings, the shutter will be released ten seconds after the timer starts.
Using an Optional Remote Control (Ai Use the optional ML-L3 remote control for self-portraits (pg. 241) or to operate the camera remotely. ~ Before Using the Remote Control Before using the remote control for the first time, remove the clear plastic battery insulator sheet. 1 Mount the camera on a tripod. Mount the camera on a tripod or place the camera on a stable, level surface. 2 Select i~ or amode.
4 Cover the viewfinder After framing the photograph, remove the viewfinder eyepiece cup and insert the supplied DK-S eyepiece cap as shown. This prevents light entering via the viewfinder interfering with exposure. S Take the photograph. Aim the transmitter on the ML-L3 at the infrared receiver on the camera and press the shutter-release button on the ML-L3. In delayed remote mode, the selftimer lamp will light for about two seconds before the shutter is released.
Using the Built-in Flash The camera supports a variety of flash modes for photographing poorly lit or backlit subjects. II Using the Built-in Flash: A~, 2", ~, and ~ Modes 1 Choose a shooting mode. Rotate the mode dial to select the desired mode. 101 2 Choose a flash mode. Press the ~ button and rotate until the desired flash mode is displayed in the control panel (pg. 71 ). ......................... 3 Take pictures.
Flash Mode Press the ~ button and rotate the main command dial until the desired flash mode is displayed in the control panel. ~ button Control panel The current flash mode is displayed in the control panel as shown below. ....------@ (red-eye reduction): Use for portraits. Red-eye reduction lamp lights before flash fires, reducing "red-eye:' 7f!i) 1 ~ ~ ~ I 'AU'TOeLJ I$l (offl: Fla sh does not Iire even wh en Ii9htin9 is poor 0 r su bj ect is back-lit.
The flash modes available depend on the mode currently selected with the mode dial. Auto+Slow sync Auto ET~F ~ AUTO '.SLOW' Auto+ red-eye is reduction f:j «'CIJ. Slow sync+ red-eye reduction U . \1)., .. ~ ~T.O S,M Fill flash Fill flash '0 pi> ~I ~ '~o~1 slow sync . , REAR I~I .~ ";' .~. . red-eye reduction .[j Rearcurtain+ Slow sync+ SLOW. P,A * SLOW is displayed after main 72 Off . AUTO Red-eye reduction Off Auto+ Red-eye reduction Slow sync ..
II Lowering the Built-in Flash To save power when the flash is not in use, press it gently downward until the latch clicks into place. • The Built-in Flash Use with CPU lenses with focal lengths of 18-300 mm or non-CPU lenses with focal lengths of 18-200 mm (pg. 232; note that auto flash level control is available with CPU lenses only). Remove lens hoods to prevent shadows. Lenses that block the subject's view of the red-eye reduction lamp may interfere with red-eye reduction.
ISO Sensitivity "ISO sensitivity" is the digital equivalent of film speed. The higher the ISO sensitivity, the less light needed to make an exposure, allowing higher shutter speeds or smaller apertures. ISO sensitivity can be set between values roughly equivalent to ISO 200 and ISO 3200 in steps equivalent to '13 EV. For special situations, ISO sensitivity can be lowered below ISO 200 by about 0.3 EV (t 0.3, equivalent to ISO 160),0.7 EV (t 0.1, equivalent to ISO 125), or 1.
Two-Button Reset The camera settings listed below can be restored to default values by holding the 12 and AF buttons down together for more than two seconds (these buttons are marked by a green dot). The control panel turns off briefly while settings are reset. Custom Settings are not affected. ·······~·_~--~~~···~-~~~OptTon- ~_.----- ~----Defaujt---_ . _'1 f-mag'equ-aTity-(pg':'6'2T-~ ''''''''_''_''_'~'_'''_''~''m~ i]PEG"normar _......... 4- •· Image size (pg. 63) L Release mode (pg.
76
P, S, A, and MModes P, S, A, and Mmodes offer control over a variety of advanced settings, including shutter speed and aperture, metering, flash compensation, and white balance. Shutter Speed and Aperture . Mode P (Programmed Auto) . 78 80 . 81 . 82 . 83 . 85 Mode S (Shutter-Priority Auto) Mode A (Aperture-Priority Auto) Mode M (Manual) Long Time-Exposures (M Mode Only) Metering 87 . 87 Autoexposure Lock (P, S, and A Modes Only) . Exposure· . 88 . 90 . 91 .
Shutter Speed and Aperture P, S, A, and M modes offer different degrees of control over shutter speed and aperture: Mode IProgrammed auto P Description ......... ,Camera-sets shutter speed-and aperturefor'optimai"ex'pc>-sure: I(pg. 80) sishutter~priorityal.ltC> :(pg. 81) m .,-- :Recommended for snapshots and in other situations in which Lth~reI~li~~I~ti~~~?~?ju~~~~~~r~s~~~i~9s: . :User chooses shutter speed; camera selects aperture for best :results. Use to freeze or blur motion . .
B Shutter Speed and Aperture The same exposure can be achieved with different combinations of shutter speed and aperture. Fast shutter speeds and larger apertures freeze moving objects and soften background details, while slow shutter speeds and small apertures blur moving objects and bring out background details. Shutter speed --------.1 @!'~ I Aperture I 'OCt nI-(F j_1..2J ]~ t- [teJriJ " AF·A ..... (a:_'_:'I -'), » ...
Mode P (Programmed Auto} In this mode, the camera automatically adjusts shutter speed and aperture for optimal exposure in most situations. This mode is recommended for snapshots and other situations in which you want to leave the camera in charge of shutter speed and aperture. To take photographs in programmed auto: 1 Rotate the mode dial to P. 2 Frame a photograph, focus, and shoot.
Mode S (Shutter-Priority Autol In shutter-priority auto, you choose the shutter speed while the camera automatically selects the aperture that will produce the optimal exposure. Use slow shutter speeds to suggest motion by blurring moving subjects, high shutter speeds to "freeze" motion. To take photographs in shutter-priority auto: 1 Rotate the mode dial to s. 2 Choose a shutter speed.
Mode A (Aperture-Priority Auto} In aperture-priority auto, you choose the aperture to control depth of field (see below) while the camera automatically selects the shutter speed that will produce the optimal exposure. To take photographs in aperture-priority auto: 1 Rotate the mode dial to A. 2 Choose an aperture.
Mode M (Manuall In manual exposure mode, you control both shutter speed and aperture. To take photographs in manual exposure mode: 1 Rotate the mode dial to M. 2 Choose aperture and shutter speed. Mode dial Checking exposure in the electronic analog exposure display (pg. 84), rotate the main command dial to choose a shutter speed and the sub-command dial to choose an aperture.
B The Electronic Analog Exposure Display If a CPU lens is attached and a shutter speed other than c.u L c. or - - is selected, the electronic analog exposure display in the viewfinder shows whether the photograph would be under- or over-exposed at current settings. Depending on the option chosen for Custom Setting b1 (EV steps for exposure cntr!.; pg. 177), the amount of under- or over-exposure is shown in increments of 1/3 EV, 112 EV, or 1 EV.
II Long Time-Exposures (M Mode Only) Shutter speeds of IIbL' t b" and can be used for long time-exposure photographs of moving lights, the stars, night scenery, or fireworks. To prevent blurring caused by camera shake, use a tripod and an optional remote control (pg. 241) or remote cord (pg. 241). II - ···Shutterspeedl······ -" Description ·'"-'·'--'~TShutier remains open while-shutter-release button is held down-. Tripod and- til.., to b ! optional remote cord are recommended to prevent blur. ".
4 Open the shutter. bt.l t b: After focusing, press the shutter-release button on the camera or remote cord all the way down. Keep the shutter-release button pressed until the exposure is complete. -: Press the shutter-release button on the remote control all the way down. The shutter will open immediately (quick-response remote) or two seconds after the shutter-release button is pressed (delayed remote) and remain open until the button is pressed a second time. 5 Close the shutter. bt.
Exposure Metering The metering method determines how the camera sets exposure. The following options are available: Method Description ......... ······················IRecommended··in·most·situiitions;··selected·ii·utomiiiicafiy··in·auto··andscene····· ! 3D color i modes. Camera meters a wide area of the frame and sets exposure according ~ matrix II i to distribution of brightness, color, distance, and composition for natural ! results. ..
Autoexposure Lock (P, 5, and A Modes Onl~ Use auto exposure lock to recompose photographs after metering exposure: 1 Select center-weighted or spot metering. :.: button Select mode P, 5, or Aand choose center-weighted or spot metering (exposure lock has no effect in mode M, while auto and scene modes are not recommended as centerweighted and spot metering are not available). 2 Lock exposure. Position the subject in the selected focus point and press the shutter-release button halfway.
• Adjusting Shutter Speed and Aperture While exposure lock is in effect, the following settings can be adjusted without altering the metered value for exposure: Mode Programmec{auto Shutter-priority auto ............... Aperture-priority auto " - .. - Setting shutter speed ··and~iperture·(fiexjbfeprogra·m;·pg:80)·········_···· "' . Shutter speed Aperture The new values can be confirmed in the viewfinder and control panel.
E2g)osure Compensation Exposure compensation is used to alter exposure from the value suggested by the camera, making pictures brighter or darker. It is most effective when used with center-weighted or spot metering (pg. 87). Exposure compensation is available in modes P, S, and A(in mode M, only the exposure information shown in the electronic analog exposure display is affected; shutter speed and aperture do not change).
Flash Compensation Flash compensation is used to alter flash output from the level suggested by the camera, changing the brightness of the main subject relative to the background. Flash output can be increased to make the main subject appear brighter, or reduced to prevent unwanted highlights or reflections. Press the ~ (~) button and rotate the sub-command dial until the desired value is displayed in the control panel.
mosure and Flash Bracketing Bracketing automatically varies selected settings slightly with each shot, "bracketing" the current value. The setting affected is chosen with Custom Setting e4 (Auto bracketing set; pg. 191); below, it is assumed that AE & flash is selected to vary exposure and flash level. Other options can be used to vary exposure or flash level separately or to bracket white balance or Active D-Lighting. 1 Choose the number of shots.
3 Frame a photograph, focus, and shoot. The camera will vary exposure and flash level with each shot. At default settings, the first shot will be taken at the current values for exposure and flash compensation and the following shots at modified values. If the bracketing sequence consists of three shots, the bracketing increment will be subtracted from the current values in the second shot and added in the third shot, "bracketing" the current values.
ra Exposure Bracketing The camera modifies exposure by varying shutter speed and aperture (programmed auto), aperture (shutter-priority auto), or shutter speed (aperture-priority auto, manual exposure mode). When On is selected for ISO sensitivity auto control (pg. 166), the camera will automatically vary ISO sensitivity for optimum exposure when the limits of the camera exposure system are exceeded. In exposure bracketing, shutter speed will only be changed after the camera has adjusted ISO sensitivity.
White Balance White balance ensures that colors are unaffected by the color of the light source. Auto white balance is recommended for most light sources; if necessary, other values can be selected according to the type of source. The following options are available in P, S, A, and M modes (auto white balance is used in auto and scene modes): .... r··························,,·························· Option '!" " Color temp. (K) +_ ! 1. _ A Auto (default) -_ .........•.•••..•.......•.•..•..•••.......
To select a value for white balance, press the WB button and rotate the main command dial until the desired setting is displayed in the control panel. White balance can also be adjusted from the shooting menu (pg. 165). n u (m WB button B Main command dial A J) Control panel ~ (Fluorescent) The bulb type is chosen using the White balance option in the shooting menu (pg.165). B See Also When WB bracketing is selected for Custom Setting e4 (Auto bracketing set, pg.
Fine-Tuning White Balance White balance can be "fine tuned" to compensate for variations in the color of the light source or to introduce a deliberate color cast into an image. White balance is fine tuned using the White balance option in the shooting menu or by pressing the WB button and rotating the sub-command dial. II The White Balance Menu 1 Select a white balance option. Select White balance in the shooting menu (pg. 165), then highlight a white balance option and press ~.
3 Press ®. Press ® to save settings and return to the shooting menu. If white balance has been fine-tuned on the A-B axis, a ~~ icon will be displayed in the control panel. ~ :cS 6~ q[777~jAF.A FS.b ISO-AUTO @ 1> NOR'(~'~~A)_[_S _3_11-J II The WB Button At settings other than 13 (Choose color temp.) and PRE (Preset manual), the WB button can be used to fine-tune white balance on the amber (A)-blue (B) axis (pg.
Choosing a Color Temperature At a setting of 13 (Choose color temp.), color temperature can be selected by pressing the WB button and rotating the sub-command dial until the desired value is displayed in the control panel. Color temperature can also be selected in the shooting menu (pg. 165). ce 1,"""""---"",, 11(ji11 ,~" (S QUAL WB button Sub-command dial Control panel • Color Temperature The perceived color of a light source varies with the viewer and other conditions.
Preset Manual Preset manual is used to record and recall custom white balance settings for shooting under mixed lighting or to compensate for light sources with a strong color cast. Two methods are available for setting preset white balance: Method Description Direct Neutral gray or white object is placed under lighting that will be used in measurement final photograph and white balance is measured by camera (pg. 101). Copy from existing f . . . ... .. ...
II Measuring a Value for Preset White Balance 1 Light a reference object. Place a neutral gray or white object under the lighting that will be used in the final photograph. In studio settings, a standard gray panel can be used as a reference object. Note that exposure is automatically increased by 1 EV when measuring white balance; in exposure mode M, adjust exposure so that the electronic analog exposure displays shows ±O (pg. 84). 2 Set white balance to PRE (Preset manual).
4 Measure white balance. Before the indicators stop flashing, frame the reference object so that it fills the viewfinder and press the shutter-release button all the way down. The camera will measure a value for white balance and store it in preset d-O. No photograph will be recorded; white balance can be measured accurately even when the camera is not in focus. S Check the results. \_1_1 1_---, . . . Good .....
, . Presetd-O The new value for white balance will be stored in preset d-O, automatically replacing the previous value for this preset (no confirmation dialog will be displayed). A thumbnail will be displayed in the preset white balance list. To use the new value for white balance, select preset d-O (if no value has been measured for white balance before d-O is selected, white balance will be set to a color temperature of 5,200 K, the same as Direct sunlight).
II Copying White Balance from d-O to Presets d-1-d-4 Follow the steps below to copy a measured value for white balance from d-O to any of the other presets (d- 1-d-4). 1 Select PRE (Preset manual). Whitt balance U o ,~" InundelCtnt Fluorment i,+) Direct lunli~ht y ~ Flalh ~ Highlight Preset manual in the white balance menu (pg. 95) and press ~. :lll A aoudY {:j a.. (J Shlde (hoole color temp ~lP.R~~ 2 I Select a destination.
II Copying White Balance from aPhotograph (d-1-d-4 Only) Follow the steps below to copy a value for white balance from a photograph on the memory card to a selected preset (d-l-d-4 only). Existing white balance values can not be copied to preset d-O. Existing white balance values can not be copied to preset d-O. 1 Select PRE (Preset manual). CI White balance '.... IncandElcent '"! Fluolemnt .' ,~~ Dir~ct sunlight y ~ Ralh til. Goudy .,. a.. Shade 13 (hoole colol temp.
II Selecting aWhite Balance Preset To set white balance to a preset value: 1 Select PRE (Preset manual). n 'Nhit! bJlance o Highlight Preset manual in the white balance menu (pg. 95) and press ~. 2 Select a preset. Highlight the desired preset and press the ~~ button. To select the highlighted preset and display the fine tuning menu (pg. 97) without completing the next step, press @ instead of pressing the ~~ button. 3 .~. Incandment FluorPlCtnt ;~: DIrect lunllght ~ FIJlh • & CloudY ti. ShJde .
II Entering Q Comment Follow the steps below to enter a descriptive comment of up to thirty-six characters for a selected white balance preset. 1 Select PRE (Preset manual). n Whit~ o ..•.. .. .•, Highlight Preset manual in the white balance menu (pg. 95) and press ~. ~ , ... lit. &. balan(t . __ . In(andemnt Fluormenl DIrect lunlight Flalh Cloudy Shade ._._._ iJ~1 2 Select a preset. Highlight the desired preset and press the ~~ button. ~~ 3 Select Edit comment.
Picture Controls Nikon's unique Picture Control system makes it possible to share image processing settings among compatible devices and software. Select from the Picture Controls provided with the camera to instantly adjust image processing settings, or make independent adjustments to sharpening, contrast, brightness, saturation, and hue. These settings can be saved under new names as custom Picture Controls to be recalled or edited at will.
Selecting Nikon Picture Controls The camera offers six preset Nikon Picture Controls. Choose a Picture Control according to the subject or type of scene. ,,, .., ..,,.,,,.,,,,,,, ..... Description Option IBSD Standard ~~~~-~--~ --.-_.-.-. IBNL Neutral Siandardprocessingforbalancedresuits.Recommendedformosi situations. ~iViTn·im·ai··processi·ngfornaturarresuhs.choo'seforphotogra'phsthatwnr" later be extensively processed or retouched . .pictures ilre en'hancedfor a"'vivid;"'photoprint eHect.
Modifying Existing Picture Controls Existing Nikon or custom Picture Controls can be modified to suit the scene or the user's creative intent. Choose a balanced combination of settings using Quick adjust, or make manual adjustments to individual settings. V,v,d I' 0.. ~ ((:\:-:;Gnd fj 1 Select a Pictu re Control. Adjust settings. Press ~ or to highlight the desired setting and press or ~ to choose a value (pg. 111).
II Picture Control Settings --·~·--'==~~~~~n ==..L Quick adjust . . . ·.. .·. . . ~ . _- .. . .· _.__.-.__._ . D~~~~~~:~~···· ·:~ ·~~-.-.~ _~--_···_ ~ :Choose from options between -2 and +2 to reduce or exaggerate the effect 'of the selected Picture Control (note that this resets all manual adjustments). IFor example, choosing positive values for Vivid makes pictures more vivid. ,Not available with Neutral, Monochrome, or custom Picture Controls.
• The Picture Control Grid Pressing the E{~ button in Step 2 displays a Picture Control grid showing the contrast and saturation for the selected Picture Control in relation to the other Picture Controls (only contrast is displayed when Monochrome is selected). Release the E{~ button to return to the Picture Control menu. • Previous Settings The line under the value display in the Picture Control setting menu indicates the previous value for the setting. Use this as a reference when adjusting settings.
Creating Custom Picture Controls The Nikon Picture Controls supplied with the camera can be modified and saved as custom Picture Controls. 1 In the shooting menu (pg. 165), highlight Manage Picture Control and press ~. 2 Select Save/edit. Highlight Save/edit and press 3 (a Select Manage Picture Control. o E!SO' Y Imase quality Image Silt e:.;, White balance • ISO sensilivity sellings ~ A
6 Name the Picture Control. Keyboard area The text-entry dialog shown at right will be displayed. By default, new Picture Controls are named by adding a two-digit number (assigned automatically) to the name of the existing Picture Control. This name can be edited to create a new name as described below. Name area To move the cursor in the name area, press the E{~ button and press .... or~.
Sharing Custom Picture Controls Custom Picture Controls created using the Picture Control Utility available with ViewNX or optional software such as Capture NX 2 can be copied to a memory card and loaded into the camera, or custom Picture Controls created with the camera can be copied to the memory card to be used in compatible cameras and software. II Copying Custom Picture Controls to the Camera 1 Select Load/save. In the Manage Picture Control menu, highlight Load/save and press ~.
S Name the Picture Control. Name the Picture Control as described on page 114. The new Picture Control will appear in the Picture Control list and can be renamed at any time using the Rename option in the Manage Picture Control menu. II Saving Custom Picture Controls to the Memory Card 1 Select Copy to card. After displaying the Load/save menu as described in Step 1 on page 11 S, highlight Copy to card and press ~. 2 crJ Select a Picture Control.
Managing Custom Picture Controls Follow the steps below to rename or delete custom Picture Controls. II Renaming Custom Picture Controls 1 Select Rename. In the Manage Picture Control menu, highlight Rename and press ~. 2 Select a Picture Control. Highlight a custom Picture Control (C-1 through C-9) and press ~. 3 Rename the Picture Control. 1:1 o R!name~ _ _ .. _~~ __ ~~ __ 1'#SH'()'t,- /0123456789 ,<= >H!ilBCDEFGH 1JKL Rename the Picture Control as described on page 114.
II Deleting Custom Picture Controls from the Memory Card 1 Select Load/save. In the Manage Picture Control menu, highlight Load/save and press ~. 2 Select Delete from card. Highlight Delete from card and press D Mana9t P1ctur~ Control 01 Load/laVe ~. "( COpy locamera :,~ I'l 3 (opylo urd Select a Picture Control. Highlight a custom Picture Control (slot1 through 99) and either: • press ~ to view current Picture Control settings, or • press ® to display confirmation dialog shown at right.
Active D-Lighting Active D-Lighting preserves details in highlights and shadows, creating photographs with natural contrast. Use for high contrast scenes, for example when photographing brightly lit outdoor scenery through a door or window or taking pictures of shaded subjects on a sunny day. To use Active D-Lighting: 1 Select matrix metering. Matrix metering (::-:, pg. 87) is recommended when using Active D-Lighting. 2 Select Active D-Lighting. In the shooting menu (pg.
~ Active D-Lighting Noise (grains, banding, mottling) may appear in photographs taken with Active D-Lighting at high ISO sensitivities. The Brightness and Contrast Picture Control settings (pg. 111) can not be adjusted while active D-Lighting is in effect. In exposure mode M, an Active D-Lighting setting of Auto is equivalent to Normal.
Multiple Exposure Follow the steps below to record a series of two to three exposures in a single photograph, using RAW data from the camera image sensor to produce colors noticeably superior to photographs combined in an imaging application. Multiple exposures can be recorded at any image quality setting. II Creating aMultiple Exposure Note that at default settings, shooting will end and a multiple exposure will be recorded automatically if no operations are performed for 30 s.
5 Set gain. Highlight one of the following options and press @. Option E1 Description .Gain adjusted according to number of On exposures actually recorded (gain for each (default) exposureissetto lhfor2exposures, 'hfor 3 exposures). Gain is not adjusted when recording Off multiple exposure. Recommended if background is dark. 6 Select Done. Highlight Done and press ®. A 1M icon will be displayed in the control panel.
The Iiiijj icon will blink until shooting ends. When shooting ends, multiple exposure mode will end and the III icon will no longer be displayed. Repeat steps 1-7 to take additional multiple exposures. ~ ~ NORM :25 FS.5 [§] ~D~Af.. l' 1.::::) (S 31) mll A .. i.&~j ~ft.., 1. . .l,' " ~.. ,... II Interrupting Multiple Exposures Selecting Multiple exposure in the shooting menu while a multiple exposure is being recorded displays the options shown at right.
The GP-l GPS Unit The GP-1 GPS unit (available separately) can be connected to the camera's accessory terminal as shown below using the cable supplied with the GP-1, allowing information on the camera's current position to be recorded when photographs are taken. Turn the camera off before connecting the GP-1; for more information, see the GP-1 manual. When the camera establishes communication with the GP-1, a ~ :25 FS.O ~ UTO~ ~ icon will be displayed in the control panel. Photo ~.
II Setup Menu Options The GPS item in the setup menu contains the options listed below. • Auto meter off: Choose whether or not the exposure meters will turn off automatically when the GP-l is attached. Option Description Exposure meters turn off automaticafly~ifn-ooperaiionsa-reperformecffor-~ Enable the period specified in Custom Setting c2 (Auto meter-off delay, pg. 179).
126
More on Playback This chapter describes how to view photographs and details the operations that can be performed during playback. Full-Frame Playback . 128 Photo Information . 129 Thumbnail Playback . 135 Thumbnail Playback .. 135 Calendar Playback . 136 Taki n9 a Closer Look: Playback Zoom . 138 Protecting Photographs from Deletion . 139 Deleting Individual Photographs . 140 Pictmotion . 141 Slide Shows .
Full-Frame Playback To play photographs back, press the [B button. The most recent photograph will be displayed in the monitor. 100M09C oseOOl1 JPG 'S/09tZCC" " OJ 49 To Use Description •••• View photo information Press ... or ... to view information about current photograph (pg.129). View thumbnails Zoom in on photograph See page 135 for more information on the thumbnail display. See page 138 for more information on playback zoom. Delete images Return to shooting mode. Dispfaymenus' .
Photo Information Photo information is superimposed on images displayed in full-frame playback. There are up to eight pages of information for each photo. Press. or ... to cycle through photo information as shown below. Note that shooting data, RGB histograms, and highlights are only displayed if corresponding option is selected for Display mode (pg. 163). GPS data are only displayed if a GPS device was used when the photo was taken. File information Overview data GPS data Shooting data 3 I~ ~((@.....
II RGB Histogram 1 5 =---6 7 1 =---8 9 1 Protect status 139 2 Retouch indicator 209 3 White balance 95 White balance fine97 tuning 4 Camera name 5 Histogram (RGB channel). In all histograms, horizontal axis gives pixel brightness, vertical axis number of pixels. 6 Histogram (red channel) 7 Histogram (green channel) 8 Histogram (blue channel) 9 Frame number/ total number of images 1 Displayed only if RGB histogram is selected for Display mode (pg. 163).
II Highlights * 1 2 .1....1..-----.... (~J~ 1 Protect status 139 3 Image highlights 2 Retouch indicator .209 4 Camera name * Blinking areas indicate highlights for current channel. 163 S Frame number/ total number of images II Shooting Data Page 11 3 ------;=---=l'u!: ~==tH~ 6--~;Ul 7 -----=~.:m: 8-~;--:::7~ 9--="-= 10 -----=--•• I 11 1 Protect status 139 2 Retouch indicator 209 87 3 Metering Shutter speed 81, 83 Aperture 82, 83 4 Shooti ng Mode..
II Shooting Data Page 2 1 1 2 pS~ 3 ----=.'----=: 4----;-:r. 5 1-.
II GPSData* 3-----=~11 4---=:--"5---':~:J 6--:-' 1 Protect status 139 5 Altitude 8 Folder numberframe number 2 Retouch indicator 209 6 Coordinated Universal 3 Latitude Time (UTC) 4 Longitude 7 Camera name * Displayed only if GPS device was used when photo was taken (pg. 124).
II Overview Data ====---4 16 --=--~+-:,:-:... 15 --:----:-=-,-:-....;....;,., 14---==== =----5 :----6 7 E---B 13---3 12--:J 11 ----:=== 9 _ _ _ _-10 1 Folder number/ frame number 2 Protect status 3 Camera name 4 Retouch indicator 139 209 5 Histogram showing the distribution of tones in the image (pg. 130). Horizontal axis corresponds to pixel brightness, vertical axis shows number of pixels of each brightness in image.
Thumbnail Playback To display images in "contact sheets" of four, nine, or 72 images, press the ~~ button. Full-frame playback To j Display more images •• , " •••••••••••_ ••••••• - ! • • • • • • • ••••• M M •• • ••• Display fewer :Press ~~ button to increase the number of images displayed. i i + '" .. - (.i::)' ..• • - - _................. • •. i. When four images are displayed, press to view highlighted iimage full frame. : Highlight images I ......................•.................
Calendar Playback To view images taken on a selected date, press the displayed. Full-frame playback Thumbnail playback ~~ button when 72 images are Calendar playback Press the ~~ button to toggle between the date list and the list of thumbnails for the selected date. Use the multi selector to highlight dates in the date list or to highlight pictures in the thumbnail list.
The operations can be performed depend on whether the cursor is in the date list or the thumbnail list: To ;Pre'ss-'Ei~"button'i'n'''aate-n'st'to'-prace-curso'r''·j·n··th·u·m'bn·aiI···· Toggle between date: list and thumbnail list : Exit to thumbnail playback/Zoom in on ' highlighted photo Toggle full frame playback ," "·,, ........_ .._.. 'list. Press again to return to date list. '~"m,·" • Date list: Exit to 72-frame playback. • Thumbnail list: Zoom in on highlighted picture.
Taking a Closer Look: Playback Zoom Press the ~ button to zoom in on the image displayed in full-frame playback or on the image currently highlighted in thumbnail or calendar playback. The following operations can be performed while zoom is in effect: To Use Zoom in or out ~ 1 E{~ View other areas of image i Select faces Cancel zoom ~ . . . €j . View other images Change protect status ........j....
Protecting Photographs from Deletion In full-frame, zoom, thumbnail, and calendar playback, the ?/o-.. button can be used to protect photographs from accidental deletion. Protected files can not be deleted using the iID button or the Delete option in the playback menu, and have DOS "readonly" status when viewed on a Windows computer. Note that protected images will be deleted when the memory card is formatted (pp. 30, 202). To protect a photograph: 1 Select an image.
Deleting Individual Photographs To delete the photograph displayed in full-frame playback or the photograph highlighted in the thumbnail list, press the UiJ button. Once deleted, photographs can not be recovered. 1 Select an image. Display the image or highlight it in the thumbnail list. 2 Press the Uii button. A confirmation dialog will be displayed. Full-frame playback Thumbnail playback To delete the photograph, press the UiJ button again.
Pictmotion The Pictmotion option in the playback menu (pg. 160) is used to create and view slide shows with custom transitions and background music. The following options are available: Option .... ·····r Description Start - - - View the completed Pictmotion a .. . 9 show~ PLAYBACK MENU • Delete Playback folder '1 Hide Image DIlPlay mode .,. Image re'/1eW 1!I Rotate tall Select pictures·.. :Cti·oose-plcturesfo..riFi·e"Plctrrlotfon-show... . "Backgrou'ncr"musfc! Choose·Eackg·rou·nd-musi·c:···. . ·····.
II Viewing the Pictmotion Show To view the show, highlight Start in the Pictmotion menu and press ®. The following operations can be performed while the show is in progress: :.", ........................................... To Pause slide show Use €i . ."Raisevolume" ~ . Lower volume ~~ Exit to playback menu Exit to playback mode MENU Exit to shooting mode . '-E L__ Description .............................................................. •Pause show (see below). ............................
Slide Shows The Slide show option in the playback menu (pg. 164) is used to display a slide show of the pictures in the current playback folder (pg. 162). Hidden images (pg. 162) are not displayed. Option ... " .., _" ," .. " ,....... Description . . Start Start slide show. Frame interval ···Choosehowiongeachpicturewllfbedisplayed. ....., To start the slide show, highlight Start in the slide show menu and press ®.
144
Connections This chapter describes how to copy photographs to a computer, how to print pictures, and how to view them on a television set.
Viewing Photographs on TV The supplied EG-D2 audio video cable can be used to connect the camera to a television or VCR for playback or recording. A type C mini-pin High-Definition Multimedia Interface (HDMI) cable (available separately from third-party suppliers) can be used to connect the camera to high-definition video devices. Standard Definition Devices To connect the camera to a standard television: 1 Turn the camera off.
High-Definition Devices The camera can be connected to HOMI devices using a type C mini-pin HOMI cable (available separately from third-party suppliers). 1 Turn the camera off. Always turn the camera off before connecting or disconnecting an HOMI cable. 2 Connect the HOMI cable as shown. D. Connect to camera ... 7'1 Connect to highdefinition device (choose cable with connector for connected device) 3 Tune the device to the HOMI channel. 4 Turn the camera on and press the [B button.
Connecting to a Computer This section describes how to use the supplied UC-E4 USB cable to connect the camera to a computer. Before Connecting the Camera Before connecting the camera, install the software on the supplied Software Suite CD (see the Install Guide for more information). To ensure that data transfer is not interrupted, be sure the camera battery is fully charged. If in doubt, charge the battery before use or use an EH-Sa or EH-S AC adapter (available separately).
Connecting the Camera Connect the camera using the supplied UC-E4 USB cable. 1 Turn the camera off. 2 Turn the computer on. Power switch Turn the computer on and wait for it to start up. 3 Connect the USB cable. Connect the USB cable as shown. Do not use force or attempt to insert the connectors at an angle. ~ USB Hubs Connect the camera directly to the computer; do not connect the cable via a USB hub or keyboard. 4 Turn the camera on. S Transfer photographs.
Printing Photographs JPEG photographs can be printed by any of the following methods: • Connect the camera to a printer and print photographs directly from the camera (see below). • Insert the camera memory card in a printer equipped with a card slot (see the printer manual for details). If the printer supports DPOF (pg. 274), photographs can be selected for printing using Print set (DPOF) (pg. 157). • Take the camera memory card to a developer or digital printer center. If the center supports DPOF (pg.
II Connecting the Printer Connect the camera using the supplied UC-E4 USB cable. , Turn the camera off. 2 Connect the USB cable. Turn the printer on and connect the USB cable as shown. Do not use force or attempt to insert the connectors at an angle. ~~~:c~t~~Scamera directly to the printer; do not connect the cable via a USB hub or ~"'"I keyboard. 3 Turn the camera on. A welcome screen will be displayed in the monitor, followed by a PictBridge playback display.
2 Display printing options. Press @ to display PictBridge printing options. 3 Adjust printing options. Press" or 'Y to highlight an option and press ~ to select. Option Description Menu of page sizes will be displayed (options not supported by current printer are not listed). Press ... or Page size T to choose page size (to print at default page size for current printer, select Printer default), then press @ to select and return to previous menu. MenushownairlghtwiIlbe dispTayed.press.orTto No.
4 Start printing. Select Start printing and press @ to start printing. To cancel before all copies have been printed, press @. ~ ~ II Printing Multiple Pictures 1 Display the PictBridge menu. Press the MENU button in the PictBridge playback display (see Step 3 on page 151). ,; \.. \ L /" • • ." I ..} 1( .(I ':-. ~ V : ;' MENU button (@ l 2 11 ~ CS Choose an option. Highlight one of the following options and press ~ . •Print select: Select pictures for printing.
3 Select pictures or choose a date. If you chose Print select or Print (DPOF) in Step 2, use the multi selector to scroll through the pictures on the memory card. To display the current picture full screen, press the ~ button. To select the current picture for printing, press the E{~ button and press .... The picture will be marked with a ~ icon and the number of prints will be set to 1. Keeping the E{~ button pressed, press'" or. to specify the number of prints (up to 99; to deselect the picture, press.
5 Adjust printing options. Press. or .... to highlight an option and press OptionT----~ - - . - . -- · · · . · . ·. ···········....----~·---·------------------· ~ to select. . Description -~.--- -- ..- ~ - --- _- [Menuo(pagesizeswHlbedispiayed(pg.152;optlonsnOisupporiedbycurreni Page i printer are not listed). Press .. or T to choose page size (to print at default page size size for current printer, select Printer default), then press ® to select and return to previous menu.
II (reating Index Prints To create an index print of all JPEG pictures on the memory card, select Index print in Step 2 of "Printing Multiple Pictures" (pg. 153). Note that if the memory card contains more than 256 pictures, only the first 256 images will be printed. 1 Select Index print. Selecting Index print in the PictBridge menu (pg. 153) displays the images on the memory card as shown at right. 2 Display printing options. Press Ic'V~ 3 ® to display PictBridge printing options.
II Creating aDPOF Print Order: Print Set The Print set (DPOF) option in the playback menu is used to create digital "print orders" for PictBridge-compatible printers and devices that support DPOF. Selecting Print set (DPOF) from the playback menu displays the menu shown in Step'. 1 Choose Select/set. Highlight Select/set and press 2 ~. Select pictures. Use the multi selector to scroll through the pictures on the memory card. To display the current picture in full screen, press
~ Print Set (DPOF) To print the current print order when the camera is connected to a PictBridge printer, select Print (DPOF) in the PictBridge menu and follow the steps in "Printing Multiple Pictures" to modify and print the current order (pg. 153). DPOF date and data imprint options are not supported when printing via direct USB connection; to print the date of recording on photographs in the current print order, use the PictBridge Time stamp option.
Menu Guide The current menu is displayed by pressing the MENU button; to select from the menus listed below, press ...... This chapter describes the options available in the menus below. [E] The Playback Menu: Managing Images 160 o 165 The Shooting Menu: Shooting Options {; Custom Settings: Fine-Tuning Camera Settings 171 YThe Setup Menu: Camera Setup 202 ~ The Retouch Menu: Creating Retouched Copies 209 ~ Recent Settings/'i& My Menu 224 ..
[B The Playback Menu: Managing Images The playback menu contains the options listed below. To display the playback menu, press MENU and press ..... to highlight the tab for current menu, then press'" or T to highlight the playback menu tab; for more information, see page 19. ....... _--- Option Delete Playbackfolder ......... - - " 'Displaymod'e · " " ' ' ' ' , ,. . . ., . . . . • . . .<· . .··_· __' ' __. .__ N_ " . 162 162 Hide image ,~·~· - i Seepage j . 162 '-163 , .... . ............
4 Press ® to complete the operation. A confirmation dialog will be displayed; highlight Yes and press @. II Date Selection To choose a date, select the "Select date" option and follow the steps below. 1 Highlight a date. Press ... or ... to highlight a date. To view the pictures taken on the highlighted date, press ~~. Use the multi selector to scroll through the pictures, or press ~ to view the current picture full screen. Press ~~ to return to the date list. 2
Delete The delete menu contains the following options: • . • . _., po,._,_. __ .• ~ " ,_ ..• Option Description ~BfSelected 'ilSeieteseiectedpiCtu res. 'IDATEISelectdilteiDeletealfpict u res taken on a selected date.... ALtAl1 ,Delete'all pictures inthefoTdercurrentfyseiectedforpfayback: . . ~ Protected and Hidden Images Images that are protected or hidden will not be deleted.
Display Mode Choose the information available in the playback photo information display (pg. 129). Press. or .... to highlight an option, then press ~ to select the option for the photo information display. A ~ appears next to selected items; to deselect, highlight and press ~. To return to the playback menu, highlight Done and press @. ---····_················.._··-·······..······..T········· - - - - 'I_ a ~\pIJY mode • Detailed photo info t" !i 0 Highllghtl 0 RGB tultogram o Data .
Slide Show Play pictures back one at a time in a simple automated slide show (pg. 143). Print Set (DPOF) Choose Select/set to select pictures for printing on a DPOF-compatible device (pg. 157). Choose Deselect all? to remove all pictures from the current print order.
Q The Shooting Menu: Shooting Options The shooting menu contains the options listed below. To display the shooting menu, press MENU and press ~ to highlight the tab for current menu, then press'" or T to highlight the shooting menu tab; for more information, see page 19. m._"m_m"m".m·"Opilon m". ISeepage- - _. -- ---- ."['See page' Option -- - - Set Picture Control 108 Color space . .. 167 Manage Picture Control 113 Long expo NR 167 imagequailty" . . [1.........
ISO Sensitivity Settings Adjust ISO sensitivity (pg. 74). This option is available in all modes. 11/50 Sensitivity Auto Control (~ 5, andAModes Only) If Off (the default setting) is chosen for ISO sensitivity auto control, ISO sensitivity will remain fixed at the value selected by the user (see page 74). When On is chosen, ISO sensitivity will automatically be adjusted if optimal exposure can not be achieved at the value selected by the user (flash level is adjusted appropriately).
Color Space The color space determines the gamut of colors available for color reproduction. Choose a color space according to how photographs will be processed on leaving the camera. This option is available in all modes. .._ sRGB Optlo-il" ...] . . -.... Description················_·· ..-.--t..sRGB (default) IChoose for ~~ot~graphs that will be printed or used lias is;' with no -_ . -. - w • ..-.._ ·· ..- ..-. .- - - . I further modification.
High ISO NR Photographs taken at high ISO sensitivities can be processed to reduce "noise." This option is available in all modes. ,•• .".-- Option .. _- . . ~ .._ __ ... " •• •• ". "._. . 0 •••• - . '•• _ ... .~ •••. '" _ ~ .•" •• _ _ ..• _ _ •. __ ••..••• _ ... , • • • Description .........•.. --".... . - .. ..............•.••. . HIGH High Noise reduction is performed at ISO sensitivities of ISO 800 and higher.
Active Folder Create, rename, or delete folders, or choose the folder in which subsequent photographs will be stored. This option is available in all modes. • Selectfolder: Choose the folder in which subsequent photographs will be stored. NC090 Current folder (default folder) .. ::: _ I LI!"",~ . Ne090 , OSAKA ,/ TOKYO Other folders (in alphabetical order) • New: Create a new folder and name it as described below. • Rename: Select a folder from the list and rename it as described below.
Multiple Exposure Create a single photograph from two to three exposures (pg. 121). This option is available in P, S, A, and M modes only. Movie setting Choose a frame size and sound options for movies (pg. 50). This option is available in all modes. II Quality Choose a frame size. Option Description " J:11280 1:1 720 J:1640 1:1424 Dm OA •• _ ' ~ _ . ' . Record movies at a frame rate of 24 fps. Each frame is 1280 x 720 pixels in size. Choose for higher quality.
@ Custom Settings: Fine-Tuning Camera Settings Custom Settings are used to customize camera settings to suit individual preferences. To display the Custom Settings menu, press MENU and press ... to highlightthetabforcurrent menu, then press .... or T to highlight the Custom Settings tab; for more information, see page 19. Custom Setting groups Main menu [8]: Reset custom settings (pg.
The following Custom Settings are available: Custom Setting ~ Custom Setting d Shooting/display Page ! 172 (ID Reset custom settings ... - d4 i Viewfinderwa'rnTng'd'(s'p'lay---"-'---'-'1'81 d5 iScreen tiPS .,. 182 , d6 !CCmodeshoo!illgspeed ' 182 d7 iFiienumbersequence : 182 d8 [ShootingTnfodispfay '183 d9 i LC[5TliLimination "1183 d10 t~x.pos~r.~~~i~ymode . ,183 d11 !~I~~~'I\I~r~i~9 : 183 .9_~L""'~~~~~.,?~~t:ry type ·..·..·.•. . ,184 _,--.~_.--_....
a: Autofocus a 1: AF-area Mode This option (available in all shooting modes) determines how the focus point for autofocus is selected. Choose from the following options: Description User seiecis"foc'us-pOiniu's"ing'multisei ector;camerafoc·use·s~onsub}ectTn· [[]] Single point .selected focus point only. Use with stationary subjects. Default setting Option . ~ _........,t.<:>~~~<:>?~.~...........................................................................................................................
a2: Center Focus Point This option (available in all shooting modes) determines the size of the center focus point. Option Viewfinder display Description ................•.........•................... [n] Normal zone (default) [[ l] Wide zone D D Focus on stationary subjects that can be easily framed in the focus point. Focus on moving subjects. Not available when Autoarea is selected for Custom Setting a1 (AF-area mode). See page 54 for more information on focus settings.
a4: AF Point Illumination Choose whether the active focus point is highlighted in red in the viewfinder. This option is available in all shooting modes. --Opiion-'T''''--'''--''''''''--m'''''''''-'''--'-''''''''''''''-''''''""'--"'---"""--'---Descrlption""'-''''-''-'-'-'--'''-'-,---,-,,,-,,-,,,,,-,,,-,,,, .~-,----_ •. _ ...•_ ••. ~'".j.._••._ •• ~.,.. ,,_._~.~ _._._ _ "'-.-,.__ ••_ ••_._•. _._ •.• __ ._--_._._----_._•• ~._._ _-_.- » _ - _. . _ .- - •• _ _ - _ •• _ . _ - - _ . _ •• _ - - - - _ .
a6: A.E-LIAF-L for MB-D80 Choose the function assigned to the AE-L/AF-L button on the optional MB-D80 battery pack. This option is available in all shooting modes. Option Description fi AETAFlock* Focus and exposure lock while the MB-D80 AE-L/AF-L button is pressed. (default) ~AEiockonly*:ExposurelockswhiletheMB-bSO AE~jjAF~Cbuttonispressecr· . . . .
b: Metering/Exposure bl: EV Steps for Exposure Cntrl. , ~ •• _ _ . " . h h . ¥ .,,_ . .__" .. ~ . . ,... ...• .......• ~ .<. ~ <".. ~ , ~ N _ This option (available in all shooting modes) determines whether adjustments to shutter speed, aperture, exposure compensation, flash compensation, and bracketing are made in increments equivalent to 113 EV or 112 EV. __ • __ . _ " ' ' __ - ' ' ' ' __' ' _ ' _ ' __' ' _ ' ' _ ••••••• _ •• __ •• _ _ ••••• __ "". _._.
b3: Center-Weighted Area When calculating exposure, center-weighted metering assigns the greatest weight to a circle in the center of the frame. The diameter (
c: Timers/AE Lock cl: Shutter-Release Button AE-L At the default setting of Off, exposure only locks when the AE-UAF-L button is pressed. If On is selected, exposure will also lock when the shutter-release button is pressed halfway. This option is available in all shooting modes. c2: Auto Meter-off Delay This option (available in all shooting modes) controls how long the camera continues to meter exposure when no operations are performed.
c4: Monitor off Delay This option (available in all shooting modes) controls how long the monitor remains on when no operations are performed during playback, image review, or when menus or shooting information is displayed. Choose from 4 s (the default for image review), lOs (the default for playback and shooting information), 20 s (the default for menus), 1 minute,S minutes, or 10 minutes. Choose a shorter monitor-off delay for longer battery life.
d2: Viewfinder Grid Display Choose On to display on-demand grid lines in the viewfinder for reference when composing photographs. The default setting is Off. This option is available in all shooting modes. d3: ISO Display and Adjustment Choose Show ISO sensitivity (180) or Show ISO/Easy ISO (180S) to display the current ISO sensitivity setting in the frame count displays in the control panel and viewfinder.
d5: Screen Tips Choose On (the default setting) to display tips for items selected in the shooting information display, Off to turn tip display off. This option is available in all shooting modes. d6: CL Mode Shooting Speed This option (available in all shooting modes) determines the maximum frame advance rate in Q!I L (continuous low speed) release mode. Choose from values between one and four frames per second (fps); the default setting is 3 fps.
d8: Shooting Info Display At the default setting of AUTO Auto, the color of the lettering in the information display (pg. 10) will automatically change from black to white or white to black in response to ambient lighting conditions. To always use the same color lettering, select Manual and choose B Dark on light (black lettering) or WLight on dark (white lettering). Monitor brightness will automatically be adjusted for maximum contrast with the selected text color.
d12: MB-D80 Battery Type To ensure that the camera functions as expected when AA batteries are used in the optional MB-D80 battery pack, match the option selected in this menu (available in all shooting modes) to the type of batteries inserted in the battery pack. There is no need to adjust this option when using EN-EL3e batteries. Option Description C1LR6LR6(AAalka line)(defc:!uTt), Select wilen using [R6i:lTki:lfineAAbatte ries. C1Ni:MHHR6(AANf-MHf· ··TSelectwhen usi n gHR6Ni~MH AAbi:ltteries.
e: Bracketing/Flash el: Flash Shutter Speed This option (available only in Pand A modes) determines the slowest shutter speed available when using front- or rear-curtain sync or red-eye reduction in modes Pand A (regardless of the setting chosen, shutter speeds can be as slow as 30 s in modes S and M or at flash settings of slow sync, slow rear-curtain sync, or red-eye reduction with slow sync). Options range from '/60 s (1/60 s, the default setting) to 30 s (30 s).
B Flash Control Mode The shooting information display shows the flash control mode for the built-in flash (Built-in) and for optional flash units attached to the camera accessory shoe (Optional) as follows: . . ,-, i-nC-·'·······~······Aut~;p·ert~re (AA) 1 .,..".,', i Manual ""Optional'; -Built-in···T-·Opticmal .'r'Buiii=in-- '.'.' Optional" .......... ,,:- , ••• • h . d•• · " · · . .· ". . . _.. . . ••• . .' LD n' '1 .... '.. , ~'-' ~~I ......... ,.... .. Auto FP (pg. 195) , .TTL.
II Manual Choose a flash level between Full and 1/128 (1/128 of full power). At full power, the built-in flash has a Guide Number of 18/59 (m/ft., ISO 200, 20°C/68 OF). II Repeating Flash The flash fires repeatedly while the shutter is open, producing a strobe-light effect. Press
II Commander Mode Use the built-in flash as a master flash controlling one or more remote optional 58-900, 58-800, 58-600, or 58-R200 flash units in up to two groups (A and 8) using advanced wireless lighting. Selecting this option displays the menu shown at right. Press .... or ~ to highlight the following options, • or. to change.
2 Adjust settings for group A. Choose the flash control mode and output level for the flash units in group A. 3 Adjust settings for group B. Choose the flash control mode and output level for the flash units in group B. 4 Select the channel. S Press 6 Compose the shot. ®. Compose the shot and arrange the flash units as shown below. Note that the maximum distance at which the remote flash units can be placed may vary with shooting conditions. 0 "r/, 60 or less 70 ml33 ft.
8 Raise the built-in flash. Press the ~ button to raise the built-in flash. Note that even if - - is selected for Built-in flash> Mode, the built-in flash must be raised so that monitor preflashes will be emitted. 9 Frame the photograph, focus, and shoot. After confirming that the camera flash-ready light and the flash-ready lights for all other flash units are lit, frame the photograph, focus, and shoot. FV lock (pg. 198) can be used if desired.
e3: Modeling Flash If On is selected when the camera is being used with the built-in flash or an optional 58-900,58-800,58-600, or 58-R200 flash unit, a modeling flash will be emitted when the camera depth-of-field preview button is pressed (pg. 82). The default setting is Off. This option is available in P, 5, A, and M modes only. e4: Auto Bracketing Set Choose the setting or settings bracketed when auto bracketing is in effect (P, 5, A, and M modes only).
3 Select a white balance increment. Pressing the BKT button, rotate the sub-command dial to choose the white balance adjustment. Each increment is roughly equivalent to 5 mired. 3 F (: ~.,:= Sub-command dial )1 White balance increment Control panel Choose from increments of 1 (5 mired), 2 (10 mired), or 3 (15 mired; for a definition of mired, see page 98). Higher Bvalues correspond to increased amounts of blue, higher Avalues to increased amounts of amber (pg. 97).
II (anceling Bracketing To cancel bracketing, press the BKT button and rotate the main command dial until the number of shots in the bracketing sequence is zero ([J F) and I!mJIillii is no longer displayed in the control panel. The program last in effect will be restored the next time bracketing is activated. Bracketing can also be cancelled by performing a twobutton reset (pg. 75), although in this case the bracketing program will not be restored the next time bracketing is activated.
3 Frame a photograph, focus, and shoot. The camera will vary Active D-Lighting with each shot. The first shot will be taken with Active D-Lighting off, the following shot at the value currently selected for Active D-Lighting in the shooting menu (pg. 165). ~ L While bracketing is in effect, a bracketing progress indicator will be displayed in the control panel. The. segment will disappear from the indicator when the unmodified shot is taken, the. - indicator when the shot with Active D-Lighting is taken.
e5: Auto FP " :A Selecting On for this option (available in only P, 5, A, and M modes) enables Auto FP High-Speed Sync with optional flash units that support the Nikon Creative Lighting System (CLS). Auto FP allows the flash to be used at shutter speeds '1200 S-'/4000 S (note that because the actual shutter speed may be slightly slower than displayed in Pand Amodes, Auto FP may not always be activated when the shutter speed display shows '1200 s).
f: Controls f1 : :!'!: Switch Choose the function performed by rotating the power switch to the :~'. position. This option is available in all shooting modes. Option :~: :~:1Ilm Description LCD backlight (:~'. ) (default) IControfpanel backlight illuminates for 6 s. Both Control panel backlight illuminates and shooting information is displayed in monitor. ....................•..
f3: Assign FUNC. Button Choose the role played by the Fn button. This option is available in all shooting modes. Option ..................................- , 1mI Framing grid Description ,Press the Fn button and rotate the main command dial to turn the grid i display in the viewfinder on or off (pg. 9). " .. !,. PresstheFnhuttonand':otatethemaincommanddiiiftoselecitheAF~ [+] AF-area mode '~~~' I 1 m @ ~ :area mode (pg. 173).
II FVLock This feature is used to lock flash output, preventing the flash level from changing between shots or while recomposing photographs. Flash output is adjusted automatically for any changes in ISO sensitivity or aperture. 1 Assign FV lock to the Fn button. Both the Fn and the AE-LJAF-L button can be used for FV lock. To use the Fn button as described below, select FV lock for Custom Setting f3 (Assign FUNCo button).
6 Take the photograph. Press the shutter-release button the rest of the way down to shoot. If desired, additional pictures can be taken without releasing FV lock. 7 Release FV lock. Press the Fn button to release FV lock and confirm that the displayed in viewfinder. ~ icon is no longer ~ Using FV Lock with the Built-in Flash When the built-in flash is used alone, FV lock is only available if TTL (the default setting) is selected for Custom 5etting e2 (Flash cntrl for built-in flash; pg. 185).
f4: Assign AE-LIAF-L Button Choose the role played by the AE-UAF-l button. This option is available in all shooting modes Option ~ ...~ AE/AF lock (default) AE lock only Description i Focus and exposure lock while the AE-UAF-L button is pressed. •Exposure locks while the AE-UAF-L button is pressed. rj;j AF lock only •Focus locks while the AE-UAF-L button is pressed. ................................................... Exposurelock$whenthe AE-UAF-Lhuttonispressec{andremains locked..
fS: Customize Command Dials This option (available in all shooting modes) controls the operation of the main and sub-command dials. ""'Opiion-"" . - Descri'piion ......_.................. .. I(ontroTstJl'e direction of the comma'nddi'a1S:"c'hoose'N'o(t'he default option) for Reverse .~• normal command dial operation, or Yes to reverse the rotation of the command rotation ·dials. This setting also applies to the command dials for the MB-D80.
y The Setup Menu: Camera Setup The setup menu contains the options listed below. To display the setup menu, press MENU and press
Clean Image Sensor Select this option to remove dust from the image sensor or to choose options for automatic image sensor cleaning (pg. 244). Lock Mirror up for Cleaning Lock the mirror in the up position to allow inspection or manual cleaning of the lowpass filter that protects the camera image sensor (pg. 246). Video Mode When connecting the camera to a television or VCR via the video connector, be sure the camera video mode matches the device video standard (NTSC or PAL).
World Time Change time zones, set the camera clock, choose the date display order, and turn daylight saving time on or off. Option Description """""'" Time zone ,Choose a time zone. The camera clock is automatically set to the time in the new time zone. Date andtime'Setthecameraclock(pg:ii)." formai'C Date hoosetheorderinwhiChiheday, m 0 nth;andyeara redIspfayed: Daylight •Turn daylight saving time on or off. The camera clock will automatically be saving time advanced or set back one hour.
Image Comment Add a comment to new photographs as they are taken. Comments can be viewed in ViewNX (supplied) or Capture NX 2 (available separately; pg. 240). The comment is also visible on the third page of the photo information display (pg. 132). • Done: Save changes and return to the setup menu. • Input comment: Input a comment as described on page 169. Comments can be up to 36 characters long. • Attach comment: Select this option to attach the comment to all subsequent photographs.
Image Dust off Ref Photo Acquire reference data for the Image Dust Off option in Capture NX 2 (available separately; for more information, see the Capture NX 2 manual). Image dust off ref photo is available only when a CPU lens is mounted on the camera. A lens with a focal length of at least 50 mm is recommended. When using a zoom lens, zoom all the way in. 1 Choose a start option. Highlight one of the following options and press @. To exit without acquiring image dust off data, press MENU.
3 Acquire dust off reference data. Press the shutter-release button the rest of the way down to acquire Image Dust Off reference data. The monitor turns off when the shutter-release button is pressed. Note that noise reduction will be performed ifthe subject is poorly lit, increasing recording times. If the reference object is too bright or too dark, the camera may be unable to acquire Image Dust Off reference data and the message shown at right will be displayed.
Battery Info View information on the battery currently inserted in the camera (if the camera is powered by an optional MB-D80 battery pack containing two EN-EL3e batteries, information for each battery will be listed separately; only the battery level is displayed when AA batteries are used). . . _ •• _............. , .. ~ .•. _ .. _.. ~ •. _ ... . ~ .._ .... .. _ , ~ . ~ . _ ... " ' ' ' ' ~ _ · , w _ ' ' ' ~ ' " " .. m •• " __ y . . ~ . ~ . - _ "... ·_.·. .
~ The Retouch Menu: Creating Retouched Copies The options in the retouch menu are used to create trimmed or retouched copies of the photographs on the memory card. The retouch menu is only available when a memory card containing photographs is inserted in the camera. To display the retouch menu, press MENU and press ..... to highlight the tab for current menu, then press .. or .... to highlight the retouch menu tab; for more information, see page 18. Option ·..··Fifi-·..
Creating Retouched Copies Except in the case of Image overlay (pg. 218) and Side-by-side comparison (pg. 223), the photographs to be retouched can be selected in full-frame playback as well as from the retouch menu. II Creating Retouched Copies in Full-Frame Playback 1 Choose a picture. Display the desired picture in full-frame playback (pg. 128). 2 Display the retouch menu. Press @ to display the retouch menu. 3 ~ ~ ~ Select retouch options.
II Creating Retouched Copies from the Retouch Menu 1 Select an item in the retouch menu. Press'" or'" to highlight an item, ~ to select. Depending on the option selected, a menu may be displayed; highlight an option and press ~. 2 RETOUCH MENU CI • [}-ughtlng I'i 1 . Reltty! (orrt(tlon @ ~ Tnm )t ~~ III filter tHtct\ Color balJn(e Small Picture Imag! cwtrlay ra I :) .~ ...(' r. !2J . Select a picture. The pictures on the memory card will be displayed.
D-Lighting D-lighting brightens shadows, making it ideal for dark or backlit photographs. Before After Press .. or T to choose the amount of correction performed. The effect can be previewed in the edit display. Press ® to copy the photograph. Red-Eye Correction This option is used to correct "red-eye" caused by the flash, and is available only with photographs taken using the flash. The photograph selected for red-eye correction is previewed as shown at right.
Trim Create a cropped copy of the selected photograph. The selected photograph is displayed with the selected crop shown in yellow; create a cropped copy as described in the following table. I To Use . 'Tncrea sesize-ofc-rop""---"~ ·····Reduce·sfzeofcropT··············~~· Description Lj5ress·the·~1;uttonto'in-c-reasethesizeofthe·crop:···--····-····--·····-··-······ ······rj5ressthe·~~·buttonioreduceihesfzeorthe·cr·op:· . Move crop Preview crop Create copy ~ @ f.
Monochrome Copy photographs in Black-and-white, Sepia, or Cyanotype (blue and white monochrome). Selecting Sepia or Cyanotype displays a preview of the selected image; press" to increase color saturation, ... to decrease. Press ® to create a monochrome copy. Increase saturation .... --_r--........
FiIter Effects Choose from the following color filter effects. After adjusting filter effects as described below, press @ to copy the photograph. Option Description -- .. ----.Creates the eHect'ofa's'kyTight-fifter;-making the Picture-Tess Skylight i blue. The effect can be previewed in the monitor as shown iat right. ....- - . warm!Creates a c~py ~i1:h~'~~;;'1:;~e filter effects, givingth~c;py filter a "warm" red cast. The effect can be previewed in the I monitor. I -------·-Re-cr---- .T-- -.......-..
Color Balance Use the multi selector to create a copy with modified color balance as shown below. The effect is displayed in the monitor together with red, green, and blue histograms (pg. 130) giving the distribution of tones in the copy. Increase amount of green t,J a~create retouched copy Increase amount of blue Increase amount of amber Increase amount of magenta II Zoom To zoom in on the image displayed in the monitor, press the ~ button.
2 Choose the desired size. " Highlight desired size and press @ to select and return to the previous menu. 3 II [jjj 640~480 l".A~ ~ l6Ox120 Choose Select picture. Highlight Select picture and press 4 SmJII Picture (hoole Ilze ~. Select pictures. @ ." E{18l button Highlight pictures using the multi selector and press the ~1Sl button to select or deselect (pg. 160). Selected pictures are marked by an icon. S Press ® to complete the operation. Press @.
Image Overlay Image overlay combines two existing NEF (RAW) photographs to create a single picture that is saved separately from the originals; the results, which make use of RAW data from the camera image sensor, are noticeably better than overlays created in an imaging application. The new picture is saved at current image quality and size settings; before creating an overlay, set image quality and size (pp. 62, 63; all options are available).
6 Select the second photograph. Press .... or ~ to highlight Image 2. Repeat Steps 2-5 to select the second photo and adjust gain. 7 Highlight the Preview column. Press .... or 8 ~ to highlight the Preview column. Preview the overlay. Press ... or" to highlight Overlay and press ® (to save the overlay without displaying a preview, highlight Save and press @). To return to Step 7 and select new photos or adjust gain, press E{18. 9 Save the overlay.
NEF (RAW) Processing Create JPEG copies of NEF (RAW) photographs. 1 Select NEF (RAW) processing. Highlight NEF (RAW) processing in the retouch menu and press ~ to display a picture selection dialog listing only NEF (RAW) images created with this camera (note that hidden images are not displayed and can not be selected). 2 Select a photograph. Use the multi selector to highlight a photograph (to view the highlighted photograph full frame, press and hold the tt{ button).
4 Copy the photograph. Highlight EXE and press ® to create a JPEG copy of the selected photograph. To exit without copying the photograph, press the MENU button. ~ NEF (RAW) Processing White balance and Set Picture Control options are not available with photographs taken in A~, \1), 7", ~, ~, ~, and ~ modes. Quick Retouch Create copies with enhanced saturation and contrast. D-lighting is applied as required to brighten dark or backlit subjects. Press A or 'Y to choose the amount of enhancement.
Distortion Control Create copies with reduced peripheral distortion. Select Auto to let the camera correct distortion automatically and then make fine adjustments using the multi selector, or select Manual to reduce distortion manually. Press ~ to reduce barrel distortion, .... to reduce pin-cushion distortion (note that greater amounts of distortion control result in more of the edges being cropped out). Press ® to copy the photograph, or press [B to exit to playback without creating a copy.
Side-by-Side Comparison Compare retouched copies to the original photographs. II Making aSide-by-Side Comparison ••• "n""•• ~ __•• 1 _. __•.•_. __. _ . • ~_,, ._~ """"."••"."' •. N .. ~ ••• N.~ __ • •• ~._._. ._,,_~, __ """_._~,m,~,, ~,m_', ,..."'",, ,...,..,.,.,. ,...__ .--.,._.,. •••....•..• _ .. _. . .. .______ _ .", __• Select a picture. Use the multi selector to select a picture and press @.
~ Recent Settings/~ My Menu The camera offers a choice of two custom menus: a recent settings menu consisting of the twenty most recently used settings, added to the top of the menu in the order they are used, and My Menu, a customized list of options from the playback, shooting, Custom Settings, setup, and retouch menus. To display the custom menu, press MENU and press .... to highlight the tab for current menu, then press .. or ~ to highlight the custom menu tab; for more information, see page 19.
~ My Menu: Creating a Custom Menu The My Menu option can be used to create and edit a customized list of up to 20 options from the playback, shooting, Custom Settings, setup, and retouch menus. Options can be added, deleted, and reordered as described below. II Adding Options to My Menu 1 Select Add items. • In My Menu, highlight Add items and press MY MENU D Quality ISO lensltlVlty l~thn91 y MOVIe seltln9~ t3Asl19n FUN(. bulton ~. Ima9~ r,A~ • Remove items Rank items (J ( 2 Select a menu.
3 Select Done. I.] Highlight Done and press ®. 4 R~mov.,teml .~ Ii! Image II/e n Image Quality C ISO sensitivity letlin9S [] /l.O\'1e lettln91 • U '3 All19n fUNe button Delete the selected items. A confirmation dialog will be displayed. Press ® to delete the selected items. PI Deleting Items in My Menu To delete the item currently highlighted in My Menu, press the j button. A confirmation dialog will be displayed; press j again to remove the selected item from My Menu.
Technical Notes This chapter covers the following topics: Compatible Lenses .....•...•...•..•....•....•..•.............................•...••....................•.........•..•..•.. 228 Compatible CPU Lenses ,. 229 Non-CPU Lenses Optional Fla-sh Units (Speedlights) 230 _ _ - 233 The Nikon Creative Lighting System (CLS) 233 Flash Contacts 238 Other Accessories ....••••.•.••.•........•....•....•...........•.••••.••...••.•.•..•...•••.•••...........•....•.......•.•••• 239 Caring for the Camera ..•..
Compatible Lenses CPU lenses (particularly types G and D) are recommended for use with the D90. CPU lenses can be identified by the presence of CPU contacts, type G and D lenses by a letter on the lens barrel. Type G lenses are not equipped with a lens aperture ring. CPU contacts CPU lens Aperture ring TypeG lens Type o lens Pal Calculating Picture Angle The size of the area exposed by a 35 mm camera is 36 x 24 mm. The size of the area exposed by the D90, in contrast, is 23.6 x 15.
Compatible CPU Lenses 1 ... m.mCamerasettl'ng! Lens/accessory TypeGo;:bAFNikko;:2;AF~S;AF~I"Nfkkor---'~"":L pDENiKk6Rseries 4 PC Micro 85mm f12:SDS . Focus' : AF : v , -' . "-AF='S--l'A'F:'i"iele'co-nv-e'rter6"'-'''-~.__.. ~._------~ ~._ ;1 Mode r;T" A~,«" Ill,:f~'~, - with electronic rangefinder)! !v ,1' ....(.,;t " ' ; =;;l4j~ "- ·..·,·,·""'·,··"·'~_·"lmtl'l··!'''''····,,, . · . ·. ''''·t1·r·~ . . · . .__..__LtI' . .O'ther."rn
Non-CPU Lenses 1 Non-CPU lenses include manual focus lenses and other lenses without a bUilt-in CPU. The following is a list of compatible non-CPU lenses and accessories. Camera setting Focus L e n s / a c c e s s o r y : :AF :- AI~;AI~modified,NikkororNlkonSerTesETenses Medicaf~Nikkori26mmfj4 Reflex-Nikkor ~~~~:k~~::::verter . PB~6BelTowsFocusingAttadlmenti , M(:~::~~~:;,n'i('~ M!.~~~~~:;,~'~'--;"- rf.jb~I·· ,·~Tll?'rr~3I···. V' : V' : : V' 3, 4 : ··················'.;l·'-.,;;;3! . .......
~ Red-Eye Reduction Lenses that block the subject's view of the AF-assist illuminator may interfere with red-eye reduction. ~ AF-Assist Illumination AF-assist illumination is not available with the following lenses: • AF-S NIKKOR 14-24mm f/2.8G ED • AF VR 80-400mm f/4.5-5.6D ED • AF-S VR 70-200mm f/2.8G ED • AF-S VR 200mm f/2G ED • AF-S 80-200mm f/2.8D ED • AF-S VR 200-400mm f/4G ED • AF 80-200 mm f/2.8D ED At ranges under 1 m (3 ft. 3 in.
~ The Built-in Flash The built-in flash can be used with CPU lenses with focal lengths of 18-300 mm. Remove lens hoods to prevent shadows. The flash has a minimum range of 60 cm (2 ft.) and can not be used in the macro range of macro zoom lenses. The flash may be unable to light the entire subject with the following lenses at ranges less than those given below: . .. . .~.". i Lens ..•... >. AF-S OX 12-24mm f/4G ED AF-S OX NIKKOR 16-85 mm f/3.5-5.6G ED VR ..... ~...... . .. AF-S 17-35 mm f/2.80 ED .
Optional Flash Units (Speedlights) The 090 can be used with CLS-compatible flash units. Remove the accessory shoe cover when attaching optional flash units. The builtin flash will not fire when an optional flash unit is attached. The Nikon Creative lightinmstem (ClS} Nikon's advanced Creative Lighting System (CLS) offers improved communication between the camera and compatible flash units for improved flash photography.
II CLS-Compatible Flash Units The 090 can be used with the following CL5-compatible flash units: the 58-900, 58-800,58-600,58-400, 58-R200, and 5U-800. The 58-900, 58-800, 58-600, 58-400, and 58-R200 The principal features of these flash units are listed below. ' U• • ' " " ' _'-___ Flash unit' Feature-" ' . ., ',_,,, , " '. . " " " , 58-900 1 ! ISO 200 48/157 17- 200 i , ! Head rotation 53/175 " ..,..
The following features are available with the 58-900, 58-800, 58-600, 58-400, 58-R200, and 5U-800: ~:~=~.u~---_ "-" . --.__--.-_ Flash unitf I ----;1'-'j-'---'-"'--AdvancedWlreiess Lfghti·ng--...._·~---· r--"'-Conl'miinder--' -Remote~--''''-' I !I"hmod~~~:: ~ki i-TTL i-TTL balanced fill-flash for digital SLR _.__._.. .... At·· .._....._u......u._......._..__.__. : :~: Le.~i:e.· · · · · · · · · · · · · · u ~._. i V 2uuu u.,_..uu_.__ I V2 __J.__...__... ·•• .·•• • .· .·• .
II Other Flash Units The following flash units can be used in non-TTL auto and manual modes. If they are set to TTL, the camera shutter-release button will lock and no photographs can be taken. 5peedlight 58-80DX, S8-28DX, 58-28, 58-30,58-271, 58-225, 58-23,58-29 2, Flash mode 58-26, 58-2S, 58-24 58-S0DX 58-22,58-20,58-168,58-1S 58-218 2,58-295 2 A Non-TTL auto V M Manual v G Repeating flash REAR Rear-curtain sync 1 Flash mode is automatically set to TTL and shutter-release is disabled.
~ Notes on Optional Speedlights Refer to the 5peedlight manual for detailed instructions. If the Speed light supports the Nikon Creative Lighting System, refer to the section on CL5-compatible digital 5LR cameras. The D90 is not included in the "digital 5LR" category in the 5B-80DX, 5B-28DX, and 5B-50DX manuals. If an optional flash unit is attached with the camera in modes other than \1}, the flash will fire whenever a photograph is taken.
Flash Contacts The D90 is equipped with an accessory shoe for attaching optional flash units directly to the camera and a sync terminal that allows flash units to be connected via a sync cable. II The Accessory Shoe Use the accessory shoe to mount optional flash units directly on the camera without a sync cable (pg. 234). The accessory shoe is equipped with a safety lock for 5peedlights with a locking pin, such as the 5B-900, 5B-800, 5B-600 and 5B-400.
Other Accessories At the time of writing, the following accessories were available for the D90. • Rechargeable Li-ion Battery EN-El3e (pp. 22, 23): Additional EN-EL3e batteries are available from local retailers and Nikon service representatives. The EN-EL3e can be recharged using an MH-18a or MH-18 quick charger. • Multi-PowerBatteryPackMB-D80: The MB-D80 takes one I-~~~~~'I or two rechargeable Nikon EN-EL3e Li-ion battery or six AA alkaline, NiMH, lithium, or nickel-manganese batteries.
• Nikon filters can be divided into three types: screw-in, slip-in, and rearinterchange. Use Nikon filters; filters manufactured by other makers may interfere with autofocus or electronic range finding. • The 090 can not be used with linear polarizing filters. Use the C-PL circular polarizing filter instead. Filters • The NC and L37C filters are recommended for protecting the lens.
The D90 is equipped with an accessory terminal for remote cords and GPS devices. The terminal is provided with a cap, which protects the contacts when the terminal is not in use. The following accessories can be used (all lengths are approximate): Accessory terminal accessories Accessory : Description :~;~~;2 ~~~i~~:~~~~~~y=:r~s~~~~~~~;~~~:~:;:~~e~~:o·· or :button is pressed, or to take pictures at a shutter speed of "bulb". .
II Approved Memory Cards The following SO memory cards have been tested and approved for use in the 090. All cards of the designated make and capacity can be used, regardless of speed. SanDisk IS12MB,fGi{2GB *,4GB"f,8GBt . ~-fo-s'hibi. :512MB, 1GB,'iGB*~4GBt, 8GB 16GB+,32GB t "Panasonic:"S12MB, 1GS;iGB*,' 4GB t, 8GB +,T6GB'+ ,32GB t ........... .... ... !512MB,lGB,2GB*,4GB Lexar Media: Platinum II: 512MB, 1GB, 2GB *, 4GB t .
Caring for the Camera Storagg When the camera will not be used for an extended period, replace the monitor cover, remove the battery, and store the battery in a cool, dry area with the terminal cover in place. To prevent mold or mildew, store the camera in a dry, well-ventilated area.
The Low-Pass Filter The image sensor that acts as the camera's picture element is fitted with a low-pass filter to prevent moire. If you suspect that dirt or dust on the filter is appearing in photographs, you can clean the filter using the Clean image sensor option in the setup menu. The filter can be cleaned at any time using the Clean now option, or cleaning can be performed automatically when the camera is turned on or off. II HClean Now H 1 Place the camera base down.
IIIIC/ean atStartup/Shutdown ll 1 Select Clean at startup/shutdown. 1::1 Display the Clean image sensor menu as described in Step' on the previous page. Highlight Clean at startup/shutdown and press ~. 2 Clean Image Itmor Y Clean now r·... f'~ Select an option. f\_ u Clean image senIOr .__ ~ __ • C1tan aillartup/lhutdown Highlight one of the following options and press @. Y li.'OIlCIun at startup ~.. l!J(If Cltan at shutdown lb Cleaning off Option Description ~, ••••• "".~ ......
II Manual Cleaning If foreign matter can not be removed from the low-pass filter using the Clean image sensor option in the setup menu (pg. 244), the filter can be cleaned manually as described below. Note, however, that the filter is extremely delicate and easily damaged. Nikon recommends that the filter be cleaned only by Nikon-authorized service personnel. 1 Charge the battery or connect an AC adapter. A reliable power source is required when inspecting or cleaning the low-pass filter.
7 Clean the filter. Remove any dust and lint from the filter with a blower. Do not use a blower-brush, as the bristles could damage the filter. Dirt that can not be removed with a blower can only be removed by Nikon-authorized service personnel. Under no circumstances should you touch or wipe the filter. 8 Turn the camera off. The mirror will return to the down position and the shutter curtain will close. Replace the lens or body cap.
Caring for the Camera and Battery: Cautions Do not drop: The product may malfunction if subjected to strong shocks or vibration. Keep dry: This product is not waterproof, and may malfunction if immersed in water or exposed to high levels of humidity. Rusting of the internal mechanism can cause irreparable damage. Avoid sudden changes in temperature: Sudden changes in temperature, such as occur when entering or leaving a heated building on a cold day, can cause condensation inside the device.
Storage: To prevent mold or mildew, store the Batteries: Dirt on the battery terminals can camera in a dry, well-ventilated area. If the product will not be used for an extended period, remove the battery to prevent leakage and store the camera in a plastic bag containing a desiccant. Do not, however, store the camera case in a plastic bag, as this may cause the material to deteriorate. Note that desiccant gradually loses its capacity to absorb moisture and should be replaced at regular intervals.
Troubleshooting If the camera fails to function as expected, check the list of common problems below before consulting your retailer or Nikon representative. Refer to the page numbers in the right-most column for more information. Problem Solution Viewfinder is out of focus. ........... ,.............................. : Page . !Adjust viewfinder focus or use optional eyepiece :correction lenses. 32 :Insert a fully-charged battery. 34 ............................... Viewfinder is dark.
ShootingjAIl Modesl ................................. , Shutter-release disabled. '29;35 Memory card is full or not inserted ······T~ I- CPU lens with aperture ring attached but aperture not locked at highest f-number. 25 . . ,~ ~??~ ?i~I r~)~~t~?~?S.l,tVi.~.~ ~.~. ~!~.~.~ . ~P~~? . ~.~.~. t?~,~'. t b. ..; 8 3 . Final photo is larger than !Viewfinder horizontal and vertical frame coverage is area shown in viewfinde~~i~ppr?~irl'1a.t~IX??O(o~ . Rotate focus-mode selector to AF.
Shootin9-e8.°, @,:Z,~,~,~, and [£] modesl Problem Menu item can not be selected. Solution Page Some options are not available in all modes. ShootingjP, 5, A, Ml Problem Solution Page •• Flash is charging. 40 .• Non-CPU lens is attached: rotate camera mode dial to M. 83 Shutter-release disabled. •• Mode dial rotated to Safter shutter speed of b!-I t b or 81 - selected in mode M: choose new shutter speed. :Flash in use.
Playback Solution Problem Flashing areas appear in images ' -ShootTng"dataa'p'pe'a-r'on"'- Press .. or T to choose photo information displayed, or images Ichange settings for Dis'play mode. ··A··graphappears"during······· playback. NEF (RAW) image is not IPhoto was taken at image quality of NEF + JPEG. played back. Some photos are not ! Select All for Playback folder. Note that Current is displayed during automatically selected after photograph is taken. playback. . . I. Select On for Rotate tall. j.
Miscellaneous Problem Date of recording is not correct. Menu item can not be selected. .. " ~. +- . Page .Set camera clock. 27 !Some options are not available at certain combinations of :settings or when no memory card is inserted. Note that ·Battery info option is not available when camera is powered by an optional AC adapter or by optional MB-D80 battery pack with AA batteries. ' 208 ............................. .....
Error Messages This section lists the indicators and error messages that appear in the viewfinder, control pane" and monitor. .. ..._... ~"",._,-_ ~ ~._-~.~ Indicator Control panel Viewfinder .......•...•." ,~ ...•.....•,,"- Problem Solution Lens aperture ring is not set to Set ring to minimum aperture 26 (blinks) minimum aperture. (largest f-number). .........................., ,•............... spare a Low battery. 34 battery. .. + , . • Rechargeorrepla'cebattery:;" • Battery exhausted.
Indicator Control panel! Viewfinder ~ (blinks) FuLL (blinks) [-E-J fg[- E•• Problem indicator blinks for 3 s after flash fires, photo may be underexposed. ..................................... Memory insufficient to record further photos at current settings, or camera has run out of file or folder numbers. No memory Camera malfunction. (blinks) Solution Check photo in monitor; if :underexposed, adjust settings and try again. Page 128 • Reduce quality or size. • Delete photographs.
Indicator 0···-·--·_·__·_·fControl .. 0 panel! I Solution Problem Monitor viewfinder : Page i .. .. . .. . Memory card is locked.! [HR, Memory card is locked :Slide card write-protect Slide lock to "write" [DJ 31 (write protected). ! switch to "write" position. position. (blinks) 1i ; .o..·..·-..·..-·.-.-.-··-·--,.--·---------iVle-m·o·r.ycard does'notTlma'ges'create-crwithother--';-"'-'---" " " ( " , " Cannot select this file... ' 0 .. :......................................
Appendix The Appendix covers the following topics: • Available Settings and Defaults • Memory Card Capacity • Exposure Program • Bracketing Programs • Flash Control • Shutter Speeds Available with the Built-in Flash • Aperture, Sensitivity, and Flash Range.............................................................................. Set Picture Control Image quality 1 Image size 1 White balance 1 ~ ISO sensitivity settings 1 g..: Active O-Lighting ::s ,.. ~ .Color space . . ~ Long expo NR c .
r'Auio''r'-~'r-::ii'''r'~' i 0 ,!.J .J'. ! _ ! i ,. "~-''''''!,,!II. S I.1iI "..,-v Lo;J 1! A T, -M- ,b1: EV steps for exposure cntrl.t~!~r~!' ;;'t-I':~it-l'J • '~r~ ib2: Easy exposure compensation V. V. : ~ .,. +. .. " fb3: Center-weighted area V' V ,1 .... ,,......,:',..·,· !b4: Fine tune optimal exposure V! V I V V ! V V i V! V' V 'c1 :Shutter~rejeasebuttan AE_L,L lI't V V··tj V ;ttll".....;tll1'i V "" . ......; , 1 " " ,..;,,,·,.... ,··:.. , · · ....,,; ..
The following defaults are restored with Custom Setting (B) (Reset; the following table lists the defaults for P, 5, A, and M modes). For a list ofthe settings restored with a two-button reset, see page 172. .
Option eT:'Fra'sh~shiJtter ~ _ " .. ... = , ~ _~,~~ .. ,,_.. ~ . Default 1/60·s·-·-·-------····.··----·--· speed_. __........ _.....,_.. ... _...._..... __ ... .. _ _ ~ _ ~ ~ ~ «. _ m ...... . ~.~ ~ ••_ .. _..... ' .... " M. . e2: Flash cntrl for built-in flash ~ · ....'. . ,~ . . , _. . ~ ... ...................................... e6: Bracketing order ...' _ .. ,,,.. « _._................. ,,,, •.• " ~ c . . ._ . . .·. . . " ' , " '. . . ,.w••• AE&fiash---~ .
Memory Card Capacity The following table shows the approximate number of pictures that can be stored on a 2 GB Panasonic Pro HIGH SPEED card at different image quality and size settings. Image quality Image size File size 1 NEF + JPEG fine 3 L M 5 NEF + JPEG normal 3 M NEF + JPEG basic 3 L M 5 16.9 MB 14.4 MB 12.4 MB 13.9 MB 12.6 MB 11.6 MB 12.3 MB 11.7 MB 11.2 MB 10.8 MB 6.0 MB 3.4 MB 1.6 MB 3.0 MB 5 NEF (RAW) L JPEG fine M 5 L JPEG normal JPEG basic M 1.7 MB 5 0.8 MB L 1.5 MB M 0.
~osure Program The exposure program for programmed auto is shown in the following graph: F (lens foeallength) :::; 55 mm --55mm
Bracketing Programs The number of shots and bracketing increment are shown in the control panel as follows: Number of frames ----+====,~-I l..d.l:...J ,.-, I~ f. Lf G2----;-..- Bracketing increment Bracketing progress indicator II The Bracketing Progress Indicator and Number ofFrames Number offrames Progress indicator .:: F + 4••- +2 F -- 2 F Description .:3 frames: unmodified, negative, positive' +...
Flash Control The following types of flash control are supported when a CPU lens is used in combination with the built-in flash or optional 5B-900, 5B-800, or 5B-600 flash units (pp. 73, 234). • i-TTL Balanced Fill-Flash for Digital SLR: Flash output is adjusted for a natural balance between the main subject and the background. • Standard i-TTL Fill-Flash for Digital SLR: Flash output is adjusted for the main subject; the brightness of the background is not taken into account.
Aperture, Sensitivity, and Flash Ran~ ········2····0····0 ,........ _ , ••• , __ , ~ " , _ . ". . _ ,_ ~ Flash range varies with sensitivity (ISO equivalency) and aperture. ____ • N'" , , _ . ., ,_" _" Aperture at ISO equivalent of 400 800 1600 . " ' . " _. . " ' " ,_ Range r· ....m·_· 3200 .... 1.4 2 2.8 4 2 2.8 4 5.6 5.6 8 11 16 8 11 16 22 2.8 4 5.6 8 .................................., 11 16 22 32 4, 5.6 8 11 , ...... ~ , 16 22 32 5.6 8 11 16 .. ~-..ft.....- .~.
Specifications II Nikon 090 Digital Camera .............................................................. _~---- Type Type Single-lens reflex digital camera Lens mount ·············································j\jl·konFmou'ni(wiihAF'coupllngand··AF···contacis)····· ~_.- _ _ _.........•..... . ~ Effective picture angle Effective pixels Effective pixels ---- - --- ---'Image sensor : Image sensor · TotaTpixels- Approx. 1.5 x lens focal length (Nikon DX format) . . . . .;,. . ;,. . ;,. ..;, :. ., ..
Lens Compatible lenses • OX AF Nikkor: All functions supported • Type Gor 0 AF Nikkor: All functions supported (PC Micro-Nikkor does not support some functions). IX Nikkor lenses not supported. • Other AF Nikkor: All functions supported except 3D color matrix metering II. Lenses for F3AF not supported. • AI-P Nikkor: All functions supported except 3D color matrix metering II • Non-CPU: Autofocus not supported. Can be used in exposure mode M, but exposure meter does not function.
-_ . Exposure ISO sensitivity (Recommended Exposure Index) Actj'veO·:Lighiing····· Focus Autofocus ~ ~ Detection range Lens servo Focus point AF-area mode ............... .... .Focus lock , ,,, ISO 200 - 3200 in steps of 1/3 EV. Can also be set to approx. 0.3, 0.7, or 1 EV (ISO 100 equivalent) below ISO 200 or to approx. 0.3, 0.7, or 1 EV (ISO 6400 equivalent) above ISO 3200. . . ·Canl>es·eleciecHromAl.
Flash· Built-in flash _ " . Guide Number (m/ft) at 20 °(/(68 OF) Flash control '&0, : Auto with auto pop-up P, S, A, M: Manual pop-up with button release • At ISO 200: Approx. 17/56, 18/59 with manual flash • At ISO 100: Approx.
~MOYie~' Image size (pixels) Fife'f(i"rm~ai""'-"""'W"""" . Compression • 1,280 x 720/24 fps • ........................ 320x216/24fps . AVI Motion-JPEG - - ................................... -. Monitor Monitor • 640 x 424/24 fps _ -- . 3-in., approx. 920k-dot (VGA), low-temperature polysilicon TFT LCD with 170 0 viewing angle, approx. 100% frame coverage, and brightness adjustment ....................................................................................................................
Power source . IBattery····· ...•...~ ;....•. "., ~..=.... .•....- ;;:.;..;.-.- -.-.:.. --.. -..-;-::." -;'".. -,;~< -,-." -.....• - , ...•....•.....•<••••• ~ . One rechargeable Li-ion EN-EL3e battery Optional MB-D80 multi-power battery pack with one or two rechargeable Nikon EN-EL3e batteries or six AA alkaline, NiMH, lithium, or nickel-manganese batteries; AA batteries (available separately); optional MS-D200 battery holder is required when using AA batteries.
AF=S DX NIKKOR'1 s=iosmm173.5=5.66 EDVR lens .~ G-type AF-S OX Zoom-NIKKOR VR lens with built-in CPU and Nikon I bayonet mount . Supporte-d cameras Nikon digital SLR cameras (DX format) Focallength 18-105 mm Maiimumape'rture--fi3.5-5.6 .,. . -----,- .__ -_-_._ .. - - _-.«---.---~, ~.~ .. ~ ~ " _ . ...............~- Construction·-'-.-·....
II Supported Standards • OCF Version 2.0: The Design Rule for Camera File Systems (DCF) is a standard widely used in the digital camera industry to ensure compatibility among different makes of camera. • OPOF: Digital Print Order Format (DPOF) is an industry-wide standard that allows pictures to be printed from print orders stored on the memory card. • Exifversion 2.21: The D90 supports Exif (Exchangeable Image File Format for Digital Still Cameras) version 2.
~ Battery Life The number of shots that can be taken with fully-charged batteries varies with the condition of the battery, temperature, and how the camera is used. In the case of AA batteries, capacity also varies with make and storage conditions; some batteries can not be used. Sample figures for the camera and optional MB-D80 multi-power battery pack are given below.
Index Menu items and options in the camera monitor are shown in bold. Symbols :~.. switch, 196 '2.° (Auto mode). 34 \l) (Auto (flash off) mode). 34 :i (Portrait), 41 Iii (Landscape). 41 ~ (Close up), 42 ~ (Sports),42 IZ:J (Night portrait), 42 P (Programmed auto), 80 S (Shutter-priority auto). 81 A (Aperture-priority auto). 82 M (Manual). 83 ri3 (flexible program). 80 lID (Single frame). 64 ~L (Continuous low speed), 64, 65, 182 ~H (Continuous high speed).
shutter-priority auto, 81 program, 263 Exposure bracketing, 92, 191, 195 Exposure compensation, 90, 177 Exposure delay mode, 183 F File information, 129 File number sequence, 182 Filter effects, 215 Blue intensifier, 215 Cross screen, 215 Green intensifier, 215 Red intensifier, 215 Skylight, 215 Warm filter, 215 Fine tune optimal exposure, 178 Firmware version, 208 Fisheye, 222 Flash, 40, 70, 71,233 bracketing, 92 compensation, 91 control, 233, 265 i-TTL balanced-fill flash for digital SLR, 265 standard i-
Menu items and options in the camera monitor are shown in bold. Remove items, 225 N NEF,62 NEF (RAW), 62,148,220 NEF (RAW) processing, 220 Nikon Transfer, 148, 149 No memory card?, 201 o OK button (shooting mode), 196 Optional flash, 185 Overview data, 134 p Photo info, 129, 163 PictBridge, 150,274 Pictmotion, 141 Picture angle, 228 Picture Controls, 108 Playback, 48, 128 calendar, 136 folder, 162 full-frame, 128 information, 129, 163 menu, 160 Pictmotion, 141 slide show, 143 .
Nikon No reproduction in any form of this manual, in whole or in part (except for brief quotation in critical articles or reviews), may be made without written authorization from NIKON CORPORATION. NIKON CORPORATION CE Fuji Bldg.
Nikon
Table of Contents Qu ick Start Guide Connecting a Printer Copying Pictures to a Computer ViewNX Buttons and Dials The Quick Settings Display The Command Dials Using the Built-in Flash Live View Picture Controls Custom Picture Controls The Fn Button Guides and Tips Help Formatting Memory Cards Two-Button Reset: Restoring Default Settings Menu Guide (MENU button) [B PLAYBACK MEN U CI SHOOTING MENU @ CUSTOM SETIING MENU YSETUP MENU ~ RETOUCH MENU ~ RECENT SETIINGS rn MY MENU 2 3 10 13 17 18 22 24 31 32 36 38
Quick Start Guide Follow these steps for a quick start with your camera. D Attach the strap. fJ Charge the battery. IJ Insert the battery. Attach a lens. Rotate the lens until it clicks into place.
Quick Start Guide Insert a Secure Digital (SD) memory card. Holding the memory card as shown at right, slide it in until it clicks into place. The memory card access lamp will light for a few seconds. Close the memory ca rd slot cover. Front Access lamp Turn the camera on. Choose a language and set the clock. A language-selection dialog will be displayed the first time the camera is turned on. Follow the steps below to choose a language and set the camera clock. Press. or ..
Press'" or ~ to highlight your local time zone, ® to select. Press. or T to highlight a date format, ® to select. If dayl ig ht sa vi ng ti me is in effect, highlight On and press ®; select Off if standard time is in effect. Press'" or ~ to highlight items, • or T to change. Press § to set the clock and exit to shooting mode.
Quick Start Guide Format the memory card. Hold the FO~ (i and :.:) buttons down simultaneously for approximately two seconds. A blinking Fa ,- will appear in the shutter-speed displays in the control panel and viewfinder; press the FO~ buttons again while the display is blinking to format the memory card. ,--_\ \ I /_' _ .-,-c.,-11\ i \ / rt- -, -" "-'l:':' 'JI I I , ! I ---_-.:'-, ill! button \ \! \ \! For 15311 \ \ :.: button Adjust viewfinder focus.
m Select A~ mode. Mode dial II] Select autofocus. Rotate the focus-mode selector to AF (autofocus). Ready the camera. When framing photographs in the viewfinder, hold the handgrip in your right hand and cradle the camera body or lens with your left. Keep your elbows propped lightly against your torso for support and place one foot half a pace ahead of the other to keep your upper body stable.
Quick Start Guide Frame the photograph. Frame a photograph in the viewfinder with the main subject in at least one of the eleven focus points. • Ie? 5 f5.b ~r IS] Focus point Focus and shoot. Press the shutter-release button halfway to focus, then press it the rest of the way down to take the photograph. -- t' ...
1m View pictures. .' At default settings, photos are displayed for about 4 s after shooting (if no photograph is displayed, the monitor, the most recent picture can be viewed by pressing the [B button). Additional pictures can be displayed by pressing ~ or ~. To view additional photo information as described on page 129 of the User's Manual, press" and T. To end playback and return to shooting mode, press the shutter-release button halfway. 1m Delete photographs.
Connecting a Printer The camera can be connected to a PictBridge-compatible printer and JPEG images printed directly from the camera. Follow the steps below to print selected pictures one at a time. For more information, see page 150 of User's Manual. D EJ Turn the camera off. Connect the USB cable. Turn the printer on and connect the USB cable as shown. Do not use force or attempt to insert the connectors at an angle.
o Turn the camera on. A welcome screen will be displayed in the monitor, followed by a PictBridge playback display. Select a picture. Press .... or ~ to view additional pictures, or press the
Connecting a Printer Start printing. Select Start printing and press ® to start printing. The PictBridge playback screen shown in Step 4 will be displayed when printing is complete. To cancel before all copies have been printed, press ®.
Copying Pictures to a Computer The camera can be connected to a computer and pictures copied using the supplied software. Before Connecting the Camera Before connecting the camera, install the software on the supplied Software Suite CD (see the Install Guide for more information).
Copying Pictures to a Computer o Click Start Transfer. At default settings, all new pictures on the camera memory card will be transferred. When transfer is complete, pictures will be displayed in ViewNX. Q Start Transfer button ViewNX ViewNX is used to view photographs after they have been transferred to the computer. ViewNX can also be started by: · Windows: Doub Ie-clicking the ViewNX shortcut on the desktop. · Macintosh: Clicking the ViewNX icon in the Dock.
ViewNX ViewNX can be used to sort photographs, convert images to different file formats, and perform simple editing on NEF (RAW) photographs. 1-- ~f------2 "IWI 1 Menu bar: Displays the menus available in each mode. 2 Toolbar: The customizable toolbar provides quick access to frequently-used tools. 3 Navigation Tab: The navigation tab contains the following palettes. • Folders: Navigate the folder tree.
Buttons and Dials P, S, A, and MModes -~~ ---..,;,.;;-..;..;.;.~--- Auto modes Scene modes --~ p s A M Auto Modes AUTO Auto: Camera adjusts settings automatically to produce ~ optimal results with "point-and-shoot" simplicity. ® Auto (flash off) : As above, except that the flash will not fire even when lighting is poor. Scene Modes :l Portrait: Shoot portraits with background in soft focus. r.-i Landscape: Preserve details in landscape shots.
Fn button Can be used for FV lock (pg. 40). .... . . . Depth-of-field preview button Preview depth of field. Focus-mode selector Modes Sand ((autofocus) The camera focuses using autofocus (AF) when shutter-release button is pressed halfway. Mode M(manual) Focus is adjusted manually using the lens focusing ring.
Buttons and Dials iID (delete) button Delete unwanted images (pg. 9). [B (playback) button View photographs in the monitor (pg. 9) . .... MENU button Display the camera menus, where adjustments can be made to most shooting, playback, and setup options (pg. 42). ?/o-n (protect) button Protect images, or remove protection from protected images. .
Diopter adjustment control Rotate until the display in the viewfinder is in focus (pg. 6). (bY) (Live view) button Press the ~ button to frame pictures in the monitor (pg. 32).
The Quick Settings Display To change settings for the items listed below, press the Iflm button in the shooting information display. Highlight items using the multi selector and press ® to view the menu for the selected item.
1 Long exposure noise reduction: Reduce noise at slow shutter speeds. 2 High ISO noise reduction: Reduce noise at high sensitivities. 3 Active D-Lighting: Prevent loss of detail in highlights and shadows. 4 Picture Control: Choose how photographs are processed after shooting. S Fn button assignment: Choose the fu nction performed by the Fn button either by itself or in combination with the command dials (pg. 40).
The Command Dials The settings that can be adjusted by pressing a button and rotating a command dial are listed below. Sub-command dial
Adjust flash compensation' Choose flash mode 2 Select bracketing exposure increment' Activate or cancel bracketi~g/select ~umber • of shots In bracketing sequence' V\',e;,,,,,",At 1 Available in P, S, A, and M modes only. 2 Not available in c}),~, and ~ modes.
The Command Dials , .. ,. Fine-tune white balance *ISet color temperature *IChoose a white balance preset * 0. ~ t Choose a white balance setting* • • • Set ISO sensitivity , ~ _ _...J * ISO ( Choose an image size* ~ Q=) NORMI Set image quality* * Can also be adjusted from the shooting menu (pg. 43). 26 [t:-, c-, c.c, ..
27
The Command Dials Choose a metering method * 28 It·~ 3D color matrix II Recommended in most situations; selected automatically in auto and scene modes. [}D Centerweighted Camera meters entire frame but assigns greatest weight to center area (defaults to 8-mm circle in center of frame). 8 Spot Camera meters circle 3.5mm (O.14in.) in diameter (approximately 2.5% of frame).
_,- r, :' , L'._' Set exposure -_. compensation * ~ Choose a release . mode -----, [§] ~ Single frame ~ L Continuous low speed ~H Self-timer a~ Delayed remote a Quick-response .............. Continuous high speed Choose an autofocus mode AF-A Auto select Camera automatically selects singleservo autofocus when subject is stationary, continuous-servo autofocus when subject is moving. AF-S Single-servo AF For stationary subjects. AF-( Continuousservo AF For moving subjects.
The Command Dials In P, S, A, and M modes, the following settings can be adjusted by rotating the command dials (pg. 24). \~ .Choos~a p combination of aperture and shutter speed S Choose a shutter speed A Choose an aperture M Choose an aperture Choose a shutter speed 30 ~~ Fl' 's' ~_-,_= ~ ~.
Using the Built-in Flash If additional lighting is required for correct exposure in A~, 7', ~~, and ~ modes, the built-in flash will pop up automatically when the shutterrelease button is pressed halfway. In P, S, A, and M modes, press the ~ button to raise the flash. Remove lens hoods when the flash is raised. If the flash is raised, pictures can only be taken when the flash-ready ind ica to r (~) is disPIayed.
Live View D Press the ~ button. The mirror will be raised and the view through the lens will be displayed in the camera monitor. The subject will no longer be visible in the viewfinder. ~ button Choose an autofocus mode.
IJ Check the view in the monitor. To magnify the view in the monitor and check focus, press the
Live View Face-priorityautofocus: A double yellow border will be displayed when the camera detects a portrait subject facing the camera (if multiple faces, up to a maximum of five, are detected, the camera will focus on the closest subject). The camera automatically sets focus and exposure for the subject indicated by the double yellow border. If the camera can no longer detect the subject (because, for example, the subject has looked away), borders will no longer be displayed. - Focus.
m Take the picture. Press the shutter-release button the rest of the way down to take pictures in the current release mode. The monitor will turn off. When shooting is complete, the photograph will be displayed in the monitor for 4 s or until the shutter-release button is pressed halfway. Exit live view mode. Press the (Q button to exit live view mode.
Picture Controls In P, 5, A, and M modes, you can quickly select the final look for your photographs by choosing a pre-existing Nikon Picture Control from the Picture Control menu, or make separate detailed adjustments to individual Picture Control settings. Press the MENU button and select Picture Control in the shooting menu. Nikon Picture Controls 36 rBSD Standard Standard processing for balanced results. BNL Neutral Minimal processing for natural results.
The Picture Control Grid Shows contrast and saturation for the selected Picture Control. €1Sl) Thumbnail/playback zoom out button BSD Standard Choose a preset variation on the selected picture control for balanced sharpening, contrast, and saturation. Adjust individual settings manually. BMC Monochrome Create the effect of monochrome photographs taken with a color filter. Choose the tint used in monochrome photographs.
Picture Controls Custom Picture Controls a SHOOTING MENU '0 Set Picture Control # Manage Picture Control ?'!; Image quality ¥ He Image size . :!; White balance .'.~'. ISO sensitivity settings Active D-Lighting Color space EJSD· -- I NORM fbi AUTO ~ t6~ ® ---~ Save/edit Edit an existing Picture Control and save it as a new, custom Picture Control. Rename Rename existing custom Picture Controls. Delete Delete custom Picture Controls.
® ~. - -- ;.-- --~~ Choose an existing Picture Control. Adjust Picture Control settings. ",/---~,--_.,~-,." @ " ·G~.-~· . -,,', , ~, , , . -, -...::::---:. __ .';/ irn o '- - :- -'" @~" -, -, < . The new Picture Control appears in the Picture Control list. . . ~••.' ., .' . . .._,._.~_ .... / . Manage Picture Control Save as . , Unused w EJt-2 Unused r fBC-3 Unused -~ , .•. EJt-4 Unused .
The Fn Button Custom Setting f3 (Assign FUNC. button; pg. 51) controls the function performed by the Fn button.* Press the MENU button and select Custom Setti ng f3 (Assign FU Ne. button) in the custom setting menu. m Framing grid L..I It·~ Matrix metering [+] AF-area mode ~ Center-weighted metering Center focus point GJ Spot metering m FV lock (default) ® Flash off rn Access top item in MYMENU n~ t J +IRAwl * Available in P, S, A, and M modes only.
Guides and Tips Help If a ? icon is displayed at the bottom left corner of the monitor, help can be displayed by pressing the ?/~ button. Formatting Memory Cards Hold the fO~ and iID) buttons until a blinking;: c.,appears in the viewfinder and control panel. Pressing the fO~ buttons again while the:= c. ,- indicator is blinking will format the memory card. Be sure to copy any photographs and other data you wish to keep to a computer before proceeding.
Menu Guide (MENU button) White balance WB r8+ ~ _ Auto (default) Incandescent ~ ",;:"~"",,,<,,'/' (pg.26) Fluorescent Direct sunlight Flash Cloudy Shade Choose color temp. Preset manual ISO sensitivity settings ISO _ ISO sensitivity ISO sensitivity auto control CD+ ~ (pg.
High ISO NR High Normal (default) Low Off Active folder Select folder New Rename Delete * Multiple exposure Done Number of shots Movie settings Auto gain Quality Sound * Only available when the memory card contains empty folders.
Menu Guide (MENU button) f) CUSTOM SETTING MENU Reset custom settings Yes No (default) a Autofocus al AF-area mode Single point Dynamic area Auto-area (default) 3D-tracking (11 points) a2 Center focus point Normal zone (default) Wide zone a3 Built-in AF-assist illuminator On a4 AF point illumination Auto (default) Off (default) On Off as Focus point wrap-around Wrap No wrap (default) a6 AE-L/AF-L for MB-D80 AE/AF lock (default) AE lock only AF lock only AE lock (Hold) AF-ON FVlock Focu
tne Menu Guide flsts the options i~ the top two levels ofth~ menus. " ................................,.......... ···········v,,····w'······ ~ b Metering/exposure b 1 EV steps for 1/3 step exposu re cntrl. 1/2 step b2 Easy exposure On compensation Off ···,.·W.··-.·.·.-'.-••·-.-.·-·-.·-.-·-·-·-...-••-·-'d.•. .•.,...... -.~,-.. • "'_~~W w.·.·."N.·~~",.·,.Y ................_ ••. .v~·, .-.- -.- - - -•.... ,".w· • (default) (default) ~8mm ~ 10mm Yes No w·····.. , .• ,w.·.·· ................
Menu Guide (MENU button) c Timers/AE lock c4 Monitor off delay Playback Menus Shooting info display Image review c5 Remote on duration 1 min (defau It) 5 min 10 min 15 min d Shooting/display dl Beep On (defau It) Off d2 Viewfinder grid display d3 ISO display and adjustment On Off (defau It) Show ISO sensitivity Show ISO/Easy ISO Show frame count (default) On (defau It) d4 Viewfinder warning display Off d5 Screen tips On (defau It) Off d6 CL mode shooting speed 4 fps 3 fps (default)
d Shooting/display d8 .
Menu Guide (MENU button) e Bracketing/flash e2 Flash cntrl for built-in flash TIL (default) Manual Repeating flash Commander mode e2 Optional flash* TIL (default) Manual e3 Modeling flash e4 Auto bracketing set On Off (defau It) AE & flash (default) AE only Flash only WB bracketi ng ADL bracketing eS Auto FP e6 Bracketing order On Off (default) MTR> under> over (default) Under> MTR > over * Changes to Optional flash when an optional 5B-400 flash unit is attached and turned on.
f Controls f3 Assig'n""'F"'U"NC. Framing grid button (pg. 40) AF-area mode Center focus point FVlock (default) Flash off Matrix metering Center-weighted metering Spot metering Access top item in MY MENU + NEF (RAW) " " " " , 'h',' f4 '",h''' Assign AE-L/AF-L button (default) AE/AF lock AE lock only AF lock only AE lock (hold) AF-ON FVlock fS Customize command dials Reverse rotation Change main/sub Menus and playback (default) Release locked Enable release Reverse i icators + •..•..
Menu Guide (MENU button) YSETUP MENU Format memory card Yes No LCD brightness Clean image sensor -3 - +3 Lock mirror up for Video mode HOMI World time Language Clean now Clean at startup/shutdown Start NTSC PAL Auto 480p (progressive) 576p (progressive) 720p (progressive) 1080i (interlaced) Time zone Date and time Date format Daylight saving tim~ Dansk Deutsch English Espanol Suomi Franc;ais Italiano Nederlands Norsk Polski Portugues PYCCK\I1~ Svenska !=px (~~) ~)[ ( 7§]ilt ) E3*~g 52 YSETUP
Image comment Done Input comment Attach comment Auto image rotation On Image Dust Off ref photo Off Start (default) Clean sensor and then start Battery info , " " GPS , ' Auto meter off Position Eye-Fi upload * Enable (defau It) Disable Firmware version * Only available when compatible Eye-Fi memory card is inserted.
Menu Guide (MENU button) @j RETOUCH MENU D-Lighting Red-eye correction Trim Monochrome Black-and-white (default) Sepia Cyanotype Filter effects Skylight (default) Warm filter Red intensifier Green intensifier Blue intensifier Cross screen Color balance Small picture Image overlay NEF (RAW) processing Qu ick retouch Straighten Distortion control Fisheye Side-by-side comparison * * Available only if the ® button is pressed to display the retouch menu during full-frame playback.
lID RECENT SETTINGS Choose tab My Menu (default) Recent settings _" ~MY MENU v .. 1 ., Add items '-'." (default) Playback menu Shooting menu Custom setting menu Setup menu Retouch men u Remove items 2 Rank items ..-•• _ d ...,'......., ...' •.--.·... "'. . " .W~-'-'.·,·-.-.-.-.-.- " Choose tab My Menu (default) Recent settings •• , . ,y '" .",... yy'" 1 Displayed when My Menu is selected for RECENT SETIINGS > Choose tab.
Nikon Printed in Thailand © 2008 Nikon Corporation 6MB0327 7-07
Nikon pg.163 [!II Errata Please note the following corrections to the D90 User's Manual. pg.30 Incorrect Highlights for master RGB channel and for individual red, green, and blue channels are shown in photo information display. Very bright areas blink on and off. Highlights Incorrect ~_I_' l Correct -ForI I \ \ I I I I -'oF 0 Highlights r}-I I I \ ~ - ~- ~ IL --_ • .... 7 -I -'i - Correct II I I 'i ---~ pg.
5 The Software Suite CD -Sy.stem Reguirements Madntosh Windows OS RAM . Windows Vista: 1GB or more . OthervorsionsofWindows: S12MB or more (1 GB or more recommended) Hard-disk spaco Vidoo resolution as x Mac version 10.3.9, 10.4.11, or 105.3 512 MB or more (1 GB or more recommended) A minimum of 1GB free hard disk space required when Software Suite applications are running Remove the installer CD from the CD-ROM drive, [Z) Onli..
AC cord requirements (for MH-18a) • • • • • M90051T Rating: 125V, 2A min. Cord length: min. 1.8m (6 max. 2.4m (8·)~ Type: UL LISTED SPT-2 or NISPT-2, 18AWGx2. AC cord inlet: Specified EN60320 or equivalent. Employ a plug in shape and ratings matched with AC outlet to be used. 1 ), Plug configuration Usage North American (NEMA1-15P) UL LISTED AC cord Nominal voltage & current rating . 120V, 60Hz, 2A min.
NO PURCHASE NECESSARY TO ENTER OR WIN. Sweepstakes starts 8:00 a.m. (ET) on 1/1/08 and ends 8:00 a.m. (ET) on 4/30/09. Open to legal residents of the 50 United States and D.C., 18 yt:!dt~ of age or older as of the date of entry. Enter by registering Nikon product purchase at Nikonusa.com/registration or by postal mail. One winner will be chosen for each calendar month during the Sweepstakes period.
NIKON DIGITAL IMAGING LIMITED WARRANTY THIS IS YOUR NIKON INC. ONE YEAR LIMITED WARRANTY (VALID IN THE CONTINENTAL UNITED STATES, ALASKA, HAWAII AND THE CARIBBEAN ISLANDS). YOU MUST PRESENT THIS FORM TOGETHER WITH PROOF OF PURCHASE AND PROOF OF PURCHASE DATE (BILL OF SALE) TO OBTAIN WARRANTY SERVICE. This Nikon Digital Imaging Product is warranted by Nikon Inc. to be free from defects in material and workmanship for one (1) year from the date of purchase.