AF-S Zoom-Nikkor ED 17–35mm f/2.8D IF 使用説明書 Instruction Manual Bedienungsanleitung Manuel d'utilisation Manual de instrucciones Manuale di istruzioni (P.2–11) (PP.12–17) (S. 18–23) (P. 24–29) (PP. 30–35) (PP. 36–41) (P. 42–46) (P.
安全上のご注意 ご使用の前に「安全上のご注意」をよくお読みのうえ、正しくお使いください。 この「安全上のご注意」は、製品を安全に正しく使用していただき、あなたや他の 人々への危害や財産への損害を未然に防止するために、重要な内容を記載して います。お読みになった後は、お使いになる方がいつでも見られる所に必ず保管 してください。 表示について 表示と意味は次のようになっています。 警告 この表示を無視して、誤った取り扱いをすると、人が死亡または重傷 を負う可能性が想定される内容を示しています。 注意 この表示を無視して、誤った取り扱いをすると人が傷害を負う可能性 が想定される内容および物的損害の発生が想定される内容を示してい ます。 お守りいただく内容の種類を、次の絵表示で区分し、説明しています。 絵表示の例 △記号は、注意(警告を含む)を促す内容を告げるものです。図の中や近 くに具体的な注意内容(左図の場合は感電注意)が描かれています。 記号は、禁止(してはいけないこと)の行為を告げるものです。図の中 や近くに具体的な禁止内容(左図の場合は分解禁止)が描かれています。 ●記号は、行為を強制すること
警告 熱くなる、煙が出る、こげ臭いなどの異常時は、速やか にカメラの電池を取り出すこと 電池を取る すぐに修理依頼を そのまま使用すると火災、やけどの原因となります。電池を取 り出す際、やけどに十分注意してください。電池を抜いて、販 売店または当社サービス機関に修理を依頼してください。 水につけたり水をかけたり、雨にぬらしたりしないこと 水かけ禁止 発火したり感電の原因となります。 引火・爆発のおそれのある場所では使用しないこと 禁 止 禁 止 プロパンガス・ガソリンなど引火性ガスや粉塵の発生する場所 で使用すると、爆発や火災の原因となります。 レンズまたはカメラで直接太陽や強い光を見ないこと 失明や視力障害の原因となります。 注意 ぬれた手でさわらないこと 感電注意 感電の原因になることがあります。 製品は幼児の手の届かないところに置くこと ケガの原因になることがあります。 放置禁止 使用しないときは、レンズにキャップをつけるか太陽光 のあたらない所に保管すること 保管注意 太陽光が焦点を結び、火災の原因になることがあります。 三脚にカメラやレンズを取り付けたまま移動しないこ
1 4
2 5
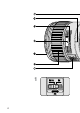
各部の名称 Jp 1 2 3 4 5 6 7 8 9 焦点距離目盛 焦点距離目盛基準線 距離目盛基準線 距離目盛 フード取り付け指標 距離リング フォーカスモード切換えスイッチ 絞り指標/着脱指標 最小絞りロックレバー ! " # $ % & ( ) 絞り目盛 ファインダー内直読用絞り目盛 最小絞り信号ガイド(EE連動ガイド) 開放F値連動ガイド CPU信号接点 露出計連動ガイド 絞りリング ズーミングリング はじめに このたびはニッコールレンズをお買い上げいただき、ありがとうござい ます。 このレンズは、高速で静かなAF(オートフォーカス)撮影を可能にするレン ズ内超音波モーター(サイレント・ウェーブ・モーター)駆動方式を採用し た高性能なズームレンズです。特に、F5、F4、F100、F90X/F90/F80 各シリーズ、F70D、ニコン 、プロネア600i、プロネアSカメラ、およ びニコンデジタルカメラD2H、D1シリーズ、D100、D70との組み合わせ では、AF撮影が可能なばかりでなく、AF撮影中にも瞬時にマニュアルフォ ーカスモードに切り換えることのできる「マニュアル優先オートフォーカス
デジタルカメラとの組み合わせ このレンズは、ニコンデジタルカメラの標準ズームとして使用できます。 このとき、対角線画角は79°― 44°となり、35mm判で焦点距離約25.5mm ― 52.
■M/A(マニュアル優先オートフォーカス)モードの使い方 Jp En フォーカスモード切換えスイッチをM/Aにセットしますと、AF(オート フォーカス)撮影時、シャッターボタンの半押しやAF作動ボタンを保持し たまま、距離リングを回転させるとオートフォーカスがマニュアルに切り 換わり、マニュアルフォーカス撮影が行えます。半押しやAF作動ボタンか ら指をはなすと、マニュアルフォーカスモードは解除されます。 (図1) ■オートフォーカスが苦手な被写体について 「広角・超広角レンズのオートフォーカス撮影について」(52ページ)をご 覧ください。 De 撮影距離と倍率について このレンズの撮影距離は、無限遠(∞)から0.28mまでとなっております。 撮影倍率は17mmで1/8.9、35mmで最大撮影倍率1/4.
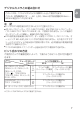
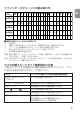
ファインダースクリーンとの組み合わせ スクリーン カメラ EC-B A EC-E F5+DP-30 ◎ ◎ B C D E F G1 G2 G3 G4 H1 H2 H3 J H4 K L M P R S U T ◎ ─ ─ ─ ◎ ─ ◎ ─ ─ ─ ─ ◎ ─ ─ ─ ─ ◎ ─ ◎ ─ ─ ─ ◎ ─ ◎ ─ ─ ─ ◎ ◎ ◎ ─ ◎ ─ ─ ─ ◎ ◎ ◎ ◎ F5+DA-30 ◎ (+0.5) (+0.5) F4+DP-20 ─ ─ F4+DA-20 ─ ─ F3 ─ ◎ (+0.5) ─ ◎ ─ ○ (+0.5) ◎ ○ (+0.5) (+0.5) (+0.5) (+0.5) (+0.5) ◎ ─ (+0.5) ○ ○ ◎ ◎ ─ ─ Jp En ◎ ─ ─ (+0.5) ◎ ─ ─ (+0.
バヨネットフードHB-23取り付けの際のご注意 Jp En フードを取り付けるときは、レンズ先端のフード取り付け指標とフードの 指標( )を合わせ、カメラ側から見て左回りにクリックが入る位置( ) まで回転させ確実に取り付けます。 また、フードの着脱はフード先端を強く掴みますと、着脱が困難になりま すので着脱の際は、フードの根本(取り付け部分)付近を持って行ってく ださい。収納時はフードをレンズに逆向きに取り付けることができます。 レンズのお手入れと取り扱い上のご注意 レンズ面の清掃は、ホコリを拭う程度にしてください。指紋がついたときは、 柔らかい清潔な木綿の布に無水アルコール(エタノール)または市販のレンズ クリーナーを少量湿らせ、レンズの中心から外周へ渦巻状に、拭きムラ、拭き 残りのないように注意して拭いてください。 ● シンナーやベンジンなどの有機溶剤は絶対に使用しないでください。 ● レンズ表面の汚れや傷を防ぐために、L37Cフィルターを常用することをおす すめします。また、レンズフードも役立ちます。 ● レンズをケースに入れるときは、必ず、レンズキャップを前後に取り付けてく ださい。 ● レ
付属アクセサリー 77mmスプリング式前キャップ 裏ぶたLF-1 バヨネットフードHB-23 ハードケースCL-76 Jp 別売アクセサリー En 77mmねじ込み式フィルター(円偏光フィルター*を含む) テレコンバーターTC-14AS、TC-201S * 円偏光フィルターでは焦点距離17mmでケラレを生じます。また、円偏光フィ ルター専用フードHN-29、HN-34は、焦点距離35mmでのみ使用可能です。 仕 De 様 型式: 焦点距離: 最大口径比: レンズ構成: ニコンFマウントCPU内蔵Dタイプ、AF-Sズームレンズ 17mm ― 35mm 1 : 2.
Nomenclature Jp En 1 Focal length scale 2 Focal length scale index line 3 Distance index line 4 Distance scale 5 Hood mounting index 6 Focus ring 7 Focus mode switch 8 Aperture index/Mounting index 9 Minimum aperture lock lever ! Aperture scale " Aperture-direct-readout scale # Minimum aperture signal post (EE servo coupling post) $ Aperture indexing post % CPU contacts & Meter coupling ridge ( Aperture ring ) Zoom ring De Introduction The AF-S Zoom-Nikkor ED 17-35mm f/2.
Important! •Be careful not to soil or damage the CPU contacts. •Do not use the AF-I Teleconverters TC-14E/TC-20E or the AF-S Teleconverters TC-14EII/TC-17EII/TC-20EII. (The rear elements of the lens will touch the elements in the teleconverter.) •Do not attach the following accessories to the lens, as they might damage the lens CPU contacts: Auto Extension Ring PK-1, PK-11/11A, Auto Ring BR-4 and K1 Ring. Other accessories may not be suitable when this lens is used with certain camera bodies.
Reproduction Ratio and Shooting Distance Jp Normal focusing extends from infinity to 0.28m (approx. 0.9 ft.). A maximum reproduction ratio of approx. 1:8.9 is obtained at the 17mm setting, while a reproduction ratio of 1:4.6 is possible at 35mm. Focusing, Zooming and Depth of Field En De (Refer to Quick reference charts 1 and 2 on page 57.) In the M/A (autofocus with manual override) mode, first turn the zoom ring until the desired composition is framed in the viewfindr before autofocusing.
Screen EC-B A Camera EC-E F5+DP-30 ◎ ◎ B C D E F G1 G2 G3 G4 H1 H2 H3 J H4 K L M P R S U T ◎ ─ ─ ─ ◎ ─ ◎ ─ ─ ─ ─ ─ ─ ◎ ─ ◎ ─ ─ ─ ─ ─ ─ ◎ ◎ ─ ─ ─ ◎ ◎ ─ ◎ ─ ◎ ◎ F5+DA-30 ◎ (+0.5) (+0.5) ─ ◎ ─ F4+DP-20 ─ ─ ◎ ─ ◎ F4+DA-20 ─ ─ ◎ ─ ◎ F3 ─ (+0.5) ◎ ◎ ○ (+0.5) ○ (+0.5) (+0.5) (+0.5) (+0.5) (+0.5) ◎ ─ (+0.5) ○ ○ ◎ ◎ ─ ─ ◎ Jp ◎ ─ ─ (+0.5) En ◎ ─ ─ (+0.
Attaching Bayonet Hood HB-23 Jp Align the index ( ) on the hood with the lens hood mounting index on the lens, and turn the hood counterclockwise (as viewed from the camera) until it click stops at the index ( ). To facilitate attachment or removal of the hood, hold it by its base rather than its outer edge. To store the lens hood, you can attach it in the reverse position. En Lens Care De Fr Es •Clean the lens surface with a blower brush.
Specifications Type of lens: Focal length: Maximum aperture: Lens construction: Picture angle: Focal length scale: Distance information: Zooming: Focusing: Shooting distance scale: Aperture scale: Minimum aperture lock: Diaphragm: Exposure measurement: Attachment size: Dimensions: Weight: D-type AF-S Zoom-Nikkor lens having built-in CPU and Nikon bayonet mount 17mm – 35mm f/2.
Nomenklatur Jp En De Fr Es It 1 Brennweitenskala 2 Brennweitenskala-Indexlinie 3 Entfernungs Indexlinie 4 Entfernungsskala 5 Gegenlichtblende-Montageindex 6 Entfernungseinstellring 7 Fokussierschalter 8 Blendenindex/Objektivindex 9 Verriegelung für kleinste Blende ! Blendenskala " Skala für Blendendirekteinspiegelung # Signalstift für kleinste Blende (Kupplungsstift für automatische Blendensteuerung) $ Anschlag für Blendenkupplung % CPU-Kontakte & Steuerkurve ( Blendenring ) Zoomring Einführung Der
Achtung! •Halten Sie die CPU-Kontakte peinlich sauber, und schützen Sie sie vor Beschädigung! •Die AF-I-Telekonverter TC-14E/TC-20E und AF-S-Telekonverter TC-14EII/ TC-17EII/TC-20EII können nicht verwendet werden. (Die Hinterglieder des Objektivs berühren den Telekonverter.) •Folgendes Zubehör darf nicht an das Objektiv angesetzt werden, da es die CPUKontakte beschädigen könnte: Automatik-Zwischenring PK-1, PK-11/PK-11A, Automatikring BR-4 und Zwischenring K1.
Abbildungsmaßstab und Aufnahmeentfernung Jp Die normale Scharfeinstellung erstreckt sich von unendlich bis 0,28 m. Bei 17 mm ist da größtes Abbildungsverhältnis 1:8,9, bei 35 mm ist es 1:4,6. Scharfeinstellung, Zoomen und Schärfentiefe En De (Siehe Übersichtstabellen 1 und 2 auf Seite 57.) Im M/A-Modus (Autofokus mit manueller Beeinflussung) drehen Sie zuerst den Zoomring, bis die gewünschte Bildkomposition im Sucher zu sehen ist, bevor Sie mit der automatischen Scharfeinstellung beginnen.
Einstellscheibe Kamera EC-B A EC-E F5+DP-30 ◎ ◎ B C D E F G1 G2 G3 G4 H1 H2 H3 J H4 K L M P R S U T ◎ ─ ─ ─ ◎ ─ ◎ ─ ─ ─ ─ ─ ─ ◎ ─ ◎ ─ ─ ─ ─ ─ ─ ◎ ◎ ─ ─ ─ ◎ ◎ ◎ ◎ F5+DA-30 ◎ (+0.5) (+0.5) F4+DP-20 ─ ─ F4+DA-20 ─ ─ F3 ─ ○ ─ ◎ ─ (+0.5) ◎ ─ ◎ ◎ ─ ◎ (+0.5) ◎ ─ ◎ ─ ○ ◎ ─ (+0.5) (+0.5) (+0.5) (+0.5) (+0.5) ◎ (+0.5) ○ ○ ◎ ◎ ─ ─ ◎ ◎ ─ ─ (+0.5) Jp En ◎ ─ ─ (+0.
Anbringen der Bajonett-Gegenlichtblende HB-23 Jp En De Fr Es It Fluchten Sie den Index ( ) der Gegenlichtblende mit dem Montageindex vorn am Objektiv, und drehen Sie die Gegenlichtblende im Gegenuhrzeigersinn (von der Kamera aus betrachtet), bis sie am Index ( ) einrastet. Zum Anbringen und Abnehmen der Gegenlichtblende halten Sie diese an ihrer Basis, nicht am Außenrand. Zum Verstauen der Gegenlichtblende, können Sie diese in Umkehrstellung anbringen.
Technische Daten Objektivtyp: AF-S-Zoom-Nikkor mit D-Charakteristik eingebauter CPU und Nikon-Bajonett Brennweite: 17 – 35 mm Maximale Blendenöffnung: f/2,8 Optischer Aufbau: 13 Linsen in 10 Gruppen (2 Glasform-asphärische, 1 Verbund-asphärische und 2 ED-Linsenelemente) Bildwinkel: 104° – 62° (91° – 52° mit IX240-Kameras, 79° – 44° mit Nikons digitalen Spiegelreflexkameras D2H, Serie D1, D100 und D70) Brennweitenskala: 17, 20, 24, 28, 35 mm Entfernungsdaten: Ausgabe an die Kamera Zoomen: Manuell über separ
Nomenclature Jp En 1 Echelle de focale 2 Ligne d’index d’échelle de focale 3 Ligne de repère des distance 4 Echelle des distances 5 Index de montage de pare-soleil 6 Bague de mise au point 7 Commutateur de mode de mise au point 8 Index d’ouverture/index de montage 9 Levier de verrouillage d’ouverture minimale ! Echelle des ouvertures " Echelle de lecture directe de l’ouverture # Levier de signal d’ouverture minimale (levier de servo couplage EE) $ Douille d’indexation d’ouverture % Contacts CPU & Index
Important •Veiller à ne pas salir ni endommager les contacts électroniques. •N’utilisez pas les téléconvertisseurs AF-I TC-14E/TC-20E ou les téléconvertisseurs AF-S TC-14EII/TC-17EII/TC-20EII. (Les éléments arrière de l’objectif toucheront ceux du téléconvertisseur.) •Ne pas essayer de monter les accessoires suivants, car ils risquent d’abimer les contacts: Bague d’auto-rallonge PK-1, PK-11/PK-11A, Bague auto BR-4 et Bague K1.
Taux de reproduction et distance de prise de vue Jp La mise au point macro va de l’infini á 0,28 m. Un taux de reproduction maximum d’environ 1:8,9 est obtenu au réglage 17 mm, alors qu’un taux de reproduction de 1:4,6 est possible à 35 mm. Mise au point, cadrage au zoom et profondeur de champ En De (Consultez les tableaux 1 et 2 de référence rapide en page 57.
Verre EC-B Appareil EC-E F5+DP-30 ◎ A B C D E F G1 G2 G3 G4 H1 H2 H3 J H4 K L M P R S U T ◎ ◎ ─ ─ ─ ◎ ─ ◎ ─ ─ ─ ─ ─ ─ ◎ ─ ◎ ─ ─ ─ ─ ─ ─ ◎ ◎ ─ ─ ─ ◎ ◎ ◎ ◎ F5+DA-30 ◎ (+0.5) (+0.5) F4+DP-20 ─ ─ F4+DA-20 ─ ─ F3 ─ (+0.5) ─ ◎ ◎ ─ ◎ ◎ ○ ─ ◎ ─ ◎ (+0.5) ◎ ─ ◎ ─ ○ (+0.5) (+0.5) (+0.5) (+0.5) (+0.5) ◎ ─ (+0.5) ○ ○ ◎ ◎ ─ ─ ◎ ─ ─ (+0.5) Jp En ◎ ─ ─ (+0.5) ◎ ◎ △ ◎ ◎ Mise au point excellente ○ Mise au point passable De Un vignetage affecte l’image du verre.
Fixation du pare-soleil baïonnette HB-23 Jp Aligner l’index ( ) sur le pare-soleil sur l’index de montage de pare-soleil sur l’objectif, et tourner le bouchon dans le sens anti-horaire (vu de l’appareil) jusqu’au déclic de mise en place à l’index ( ). Pour faciliter le montage ou le retrait du pare-soleil, saisissez-le par sa base plutôt que par son bord extérieur. Pour ranger le pare-soleil de l’objectif, vous pouvez l’attacher en position retournée.
Caractéristiques Type d’objectif: Focale: Ouverture maximale: Construction optique : Champ angulaire: Echelle de focale: Informations sur la distance: Zooming: Mise au point: Echelle des distances de prise de vue: Echelle des ouvertures: Verrouillage d’ouverture minimale: Diaphragme: Mesure de l’exposition: Taille des accessoires: Dimensions: Poids: Zoom-Nikkor AF-S de type D avec processeur et monture baïonnette Nikon 17 – 35 mm f/2,8 13 éléments en 10 groupes (2 éléments asphériques moulés, 1 élément asp
Nomenclatura Jp En 1 Escala de distancias focales 2 Línea de índice de escala de distancia focal 3 Línea indicadora de distancias 4 Escala de distancias 5 Indice de montura de parasol 6 Anillo de enfoque 7 Interruptor de modo de enfoque 8 Indice de aberturas/índice de monturas 9 Palanca de fijación de apertura mínima ! Escala de apertura " Escala de lectura directa de apertura # Borne de señal de abertura mínima (Borne de acoplador EE) $ Poste de índice de apertura % Contactos CPU & Protuberancia de aco
¡Importante! •Tener cuidado de no manchar o dañar los contactos de la CPU. •No utilice los teleconvertidores AF-I TC-14E/TC-20E ni los teleconvertidores AF-S TC-14EII/TC-17EII/TC-20EII. (Las lentes traseras del objetivo tocarán las lentes del teleconvertidor.) •No montar en el objetivo los siguientes accesorios, ya que podrían dañar los contactos de la CPU: Anillo de Autoextensión PK-1, PK-11/PK-11A, Anillo Auto BR-4 o Anillo K1.
Relación de reproducción y distancia de la toma Jp El enfoque normal va de infinito a 0,28 m (0,9 pies). Se obtiene una máxima relación de reproducción de aprox. 1:8,9 con un ajuste de 17 mm mientras que es posible una relación de reproducción de 1:4,6 a 35 mm. Enfoque, zoom y profundidad de campo En De (Consulte los cuadros de referencia rápida 1 y 2 en la página 57.
Pantalla EC-B Cámara EC-E F5+DP-30 ◎ A B C D E F G1 G2 G3 G4 H1 H2 H3 J H4 K L M P R S U T ◎ ◎ ─ ─ ─ ◎ ─ ◎ ─ ─ ─ ─ ─ ─ ◎ ─ ◎ ─ ─ ─ ─ ─ ─ ◎ ◎ ─ ─ ─ ◎ ◎ ◎ ◎ F5+DA-30 ◎ (+0.5) (+0.5) F4+DP-20 ─ ─ F4+DA-20 ─ ─ F3 ─ (+0.5) ─ ◎ ◎ ─ ◎ ◎ ○ ─ ◎ ─ ◎ (+0.5) ◎ ─ ◎ ─ ○ (+0.5) (+0.5) (+0.5) (+0.5) (+0.5) ◎ ─ (+0.5) ○ ○ ◎ ◎ ─ ─ ◎ ─ ─ Jp En (+0.5) ◎ ─ ─ (+0.
Instalación de la visera de la bayoneta HB-23 Jp Alinee el índice ( ) en la visera con el índice de montaje de visera en el objetivo y gire la visera hacia la izquierda (vista desde al cámara) hasta que se cierre con un chasquido en el índice ( ). Para facilitar la instalación o desmontaje de la visera, sujétela por su base y no por el borde exterior. Para guardar la visera del objetivo, puede enroscarlo al revés.
Especificaciones Tipo de objetivo: AF-S Zoom-Nikkor tipo D con CPU incorporado y montura de bayoneta Nikon Distancia focal; 17 mm – 35 mm Abertura máxima: f/2,8 Estructura del objetivo: 13 lentes en 10 grupos (2 molduras de cristal asférico, 1 compuesto asférico y 2 lentes ED) Angulo de imagen: 104° – 62° (91° – 52° con las cámaras del sistema IX240, 79° – 44° con las cámaras digitales D2H, de la serie D1, D100 y D70) Escala de distancias focales: 17, 20, 24, 28, 35 mm Información de distancia: Salida al c
Nomenclatura Jp En 1 Scala della lunghezza focale 2 Linea indice della scala della lunghezza focale 3 Contrassegno distanza 4 Scala delle distanze 5 Indice di montaggio del paraluce 6 Anello di messa a fuoco 7 Interruttore del modo di messa a fuoco 8 Indice delle aperture/Indice di montaggio 9 Leva di blocco di apertura minima ! Scala delle aperture " Scala di lettura diretta delle aperture # Attacco di segnale di apertura minima (attacco per accoppiamento EE servo) $ Perno per misurazione dell’apertura
Importante! • Fate attenzione a non sporcare o danneggiare i contatti CPU. •Non usare i teleconvertitori AF-I TC-14E/TC-20E o i teleconvertitori AF-S TC-14EII/TC-17EII/TC-20EII. (Gli elementi posteriori dell’obbiettivo verrebbero a contatto con gli elementi del teleconvertitore.) Jp • Gli accessori elencati non vanno montati su questo obiettivo, in quanto potrebbero danneggiarne i contatti CPU: Anello di Prolunga Automatico PK-1, PK-11/PK-11A, Anello Auto BR-4, Anello K1.
Rapporto di riproduzione e distanza di ripresa Jp La messa a fuoco normale va dall’infinito a 0,28m. Il rapporto massimo di riproduzione, pari a circa 1:8,9, è ottenible con impostanzione sui 17 mm, mentre un rapporto di riproduzione pari a 1:4,6 è possibile a 35 mm. Messa a fuoco, zoom e profondità di campo En De (Far riferimento alle tabelle di Riferimento Rapido 1 e 2, a pag. 57.
Schermo Fotocamera EC-B A EC-E F5+DP-30 ◎ B C D E F G1 G2 G3 G4 H1 H2 H3 J H4 K L M P R S U T ◎ ◎ ─ ◎ ─ ─ ◎ ─ ─ ─ ◎ ◎ ─ ◎ ─ ─ ─ ─ ◎ ─ ◎ ─ ─ ─ ◎ ─ ◎ ─ ─ ─ ◎ ◎ ◎ ─ ◎ ─ ─ ─ ◎ ◎ F5+DA-30 ◎ (+0.5) (+0.5) F4+DP-20 ─ ─ F4+DA-20 ─ ─ F3 ─ (+0.5) (+0.5) ◎ ○ ○ ◎ ─ (+0.5) (+0.5) (+0.5) (+0.5) (+0.5) (+0.5) ◎ ─ ─ ─ ◎ ○ ○ ◎ ◎ ─ ─ Jp ◎ ─ ─ (+0.5) En ◎ ─ ─ (+0.
Montaggio del paraluce a baionetta HB-23 Jp Allineare l’indice ( ) sul paraluce all’indice di montaggio del paraluce che si trova sull’obiettivo, ruotare il paraluce in senso antiorario (guardandolo dalla fotocamera) fino a sentire un clic che indica che è bloccato sulla posizione d’indice ( ). Per agevolare il montaggio e lo smontaggio, tenere il paraluce per la base anziché per il bordo esterno. Per riporre il paraluce, potete fissarlo in posizione inversa.
Caratteristiche tecniche Tipo di obiettivo: Obiettivo AF-S Zoom-Nikkor tipo D con CPU incorporata e attacco a baionetta Nikon Lunghezza focale: 17 mm – 35 mm Apertura massima: f/2.
名稱 q 焦距刻度 w 焦距刻度線 e 距離標線 r 距離刻度 t 遮光罩安裝標誌 y 對焦環 u 對焦模式開關 i 光圈標誌/安裝標誌 o 最小光圈鎖定桿 !0 光圈刻度 !1 光圈直接讀取刻度 !2 最小光圈確認位 (EE伺服耦合位) !3 光圈指示位 !4 CPU觸點 !5 測光表耦合脊 !6 光圈環 !7 變焦環 前言 AF-S變焦鏡尼克爾ED17-35mm f/2.8D IF的鏡頭內裝有靜噪波導馬達﹐以傳動對 焦裝置﹐我們把它稱作為“S”設計-該裝置可使自動對焦順利﹑靜噪和瞬時完 畢-而且﹐本鏡頭的特徵是內對焦(IF) ﹐無需改變從無限遠至0.28米(0.9ft.
對焦 按下表設定相機對焦模式: 鏡頭聚焦模式 相機聚焦模式 相機 M/A M F5﹑F4系列﹑F100﹑ 自動對焦和手控先決 手控聚焦 C (有輔助聚焦功能) F90X/N90s*﹑F90系列/N90*﹑ S F80系列/N80系列*﹑F70系列/N70*﹑ AF F65系列/N65系列*﹑ Pronea 600i/6i*﹑Pronea S及D2H﹑ 手控聚焦(有輔助聚焦功能) M D1系列﹑D100﹑D70 C 尼康AF相機(F3AF除外) 手控聚焦(有輔助聚焦功能) S AF M 其他尼康相機(F3AF除外) 手控聚焦 *僅在美國出售- ■自動對焦和手控補償 將對焦模式開關設定在M/A(圖1)時﹐仍有自動對焦﹐但可通過操作獨立的手 控對焦環﹐來手控補償對焦﹐此時﹐應輕壓快門釋放鈕或相機上備有的AF起始 鈕(AF-ON)-放鬆按在快門釋放鈕或AF起始鈕上的手指﹐即可解除手控補償- ■使用自動聚焦功能以取得良好效果 請參閱“有關使用寬角或超寬角AF Nikkor鏡頭的注意事項” (第52頁)- 成像比例和拍攝距離 普通聚焦的聚焦距離是從無限大至0.28米(約0.
如何使用景深刻度 1 沿指示線把刻度指示尺剪下2 把刻度2蓋在刻度1上﹐並把2上端對準所使用的焦距上﹐以及把距離指 示對準刻度1上的中央指示線3 讀取相對使用中光圈的刻度2數字-例如﹐焦距為28mm﹐攝影對象的距 離為1m﹐而光圈為f/22時﹐則景深範圍大約從0.
使用內藏閃燈相機拍攝閃光照片 在拍攝閃光照片之前﹐應確認焦距和拍攝距離﹐以免產生暈映相機 適用焦距/拍攝距離 F60系列/N60*﹑F50系列/N50*﹑ F-601/N6006*﹑Pronea S 在任何焦距長度下都不能使用- F70系列/N70*﹑Pronea 600i/6i* 35mm/3m以上 F80系列/N80系列* 35mm/1.5m以上 F65系列/N65系列*﹑F55系列/N55系列* 在任何焦距長度下都不能使用- D100 24mm/0.8m以上 D70 20至24mm/2.
選購附件 77mm旋入式濾鏡﹐包括圓振濾鏡* 遙控轉換器TC-14A 遙控轉換器TC-201 *使用圓形偏振濾鏡﹐在焦距為17mm時會產生暈映-鏡頭遮光罩HN-29和HN34只能在35毫米焦距時使用- 規格 鏡頭類型: Ck D型AF-S變焦尼克爾鏡頭﹐具有內置CPU(中央處理器)和 尼康卡口座 焦 距: 17mm∼35mm 最 大 光 圈: f/2.8 鏡 頭 構 造: 13個組群中有10個元件(兩片玻璃模非球面鏡片﹐和一片複 合非球面鏡片及兩片ED鏡片單元) 圖 象 角 度: 104°∼62°(使用IX240系列相機時為91°∼52°﹑用於尼康 D2H﹑D1系列﹑D100和D70數字式相機時為 79°∼44°) 焦 距 刻 度: 17﹑20﹑24﹑28和35mm 刻 度 數 據: 在相機上 變 焦: 手控用獨立變焦環 對 焦: 尼康內聚焦(IF)系列(使用內裝靜噪波導馬達) 手控則用獨立變焦環 拍攝距離刻度: 刻度自0.28m(1 ft.)至無限遠(∞) 光 圈 刻 度: f/2.
名稱 q 焦距刻度 w 焦距刻度標線 e 距離標線 r 距離刻度 t 遮光罩安裝標誌 y 對焦環 u 對焦模式開關 i 光圈標誌/安裝標誌 o 最小光圈鎖定桿 !0 光圈刻度 !1 光圈直接讀取刻度 !2 最小光圈確認位 (EE伺服耦合位) !3光圈指示位 !4 CPU觸點 !5 測光表耦合脊 !6 光圈環 !7 變焦環 前言 AF-S變焦鏡尼克爾ED17-35mm f/2.8D IF的鏡頭內裝有靜噪波導馬達,以傳 動對焦裝置,我們把它稱作為“S”設計。該裝置可使自動對焦順利、靜噪和瞬 時完畢。而且,本鏡頭的特徵是內對焦(IF) ,無需改變從無限遠至0.28米 (0.9ft.
對焦 按下表設定相機對焦模式: 相機聚焦模式 相機 F5、F4系列、F100、 F90X/ N90s*、F90系列 / N90*、 F80系列/N80系列*、F70系列/N70*、 F65系列/N65系列*﹑ Pronea 600i/6i*﹑Pronea S及D2H﹑ D1系列﹑D100﹑D70 尼康AF相機(F3AF除外) C S AF 鏡頭聚焦模式 M/A M 自動對焦和手控先決 手控聚焦 (有輔助聚焦功能) M C S AF M 其他尼康相機(F3AF除外) 手控聚焦(有輔助聚焦功能) 手控聚焦(有輔助聚焦功能) 手控聚焦 *僅在美國出售。 ■自動對焦和手控補償 將對焦模式開關設定在M/A(圖1)時,仍有自動對焦,但可通過操作獨立的手控 對焦環,來手控補償對焦,此時,應輕壓快門釋放鈕或相機上備有的AF起始鈕 (AF-ON) 。放鬆按在快門釋放鈕或AF起始鈕上的手指,即可解除手控補償。 ■使用自動聚焦功能以取得良好效果 請參閱“有關使用寬角或超寬角AF Nikkor鏡頭的注意事項” (第52頁) 。 成像比例和拍攝距離 普通聚焦的聚焦距離是從無限大至0.28米(約0.
如何使用景深刻度 1 沿指示線把刻度指示尺剪下。 2 把刻度2蓋在刻度1上,並把2上端對準所使用的焦距上,以及把距離指 示對準刻度1上的中央指示線。 3 讀取相對使用中光圈的刻度2數字。例如,焦距為28mm,攝影對象的距 離為1m,而光圈為f/22時,則景深範圍大約從0.
使用內藏閃燈相機拍攝閃光照片 在拍攝閃光照片之前,應確認焦距和拍攝距離,以免產生暈映。 相機 適用焦距/拍攝距離 F60系列/N60*、F50系列/N50*、 F-601/N6006*、Pronea S 在任何焦距長度下都不能使用。 F70系列/N70*、Pronea 600i/6i* 35mm/3m以上 F80系列/N80系列* 35mm/1.5m以上 F65系列/N65系列*、F55系列/ N55系列* 在任何焦距長度下都不能使用。 D100 24mm/0.8m以上 D70 20至24mm/2.
附件 77mm按扣式前鏡蓋鏡蓋鏡蓋LF-1鏡蓋卡口座HB-23鏡蓋硬皮套CL-76 選購附件 77mm旋入式濾鏡,包括圓振濾鏡* 遙控轉換器TC-14A 遙控轉換器TC-201 *使用圓形偏振濾鏡,在焦距為17mm時會產生暈映。鏡頭遮光罩HN-29和 HN-34只能在35毫米焦距時使用。 規格 鏡 頭 類 型: 焦 距: 最 大 光 圈: 鏡 頭 構 造: 圖 象 角 度: 焦 距 刻 度: 刻 度 數 據: 變 焦: 對 焦: 拍攝距離刻度: 光 圈 刻 度: 最小光圈鎖定: 光 闌: 曝 光 測 量: 安 裝 尺 寸: 尺 寸: 重 量: D型AF-S變焦尼克爾鏡頭,具有內置CPU(中央處理器) 和尼康卡口座 17mm∼35mm f/2.
A 〈人物〉 A person standing in front of a distant background Eine Person vor einem weit entfernten Hintergrund Une personne debout sur un fond éloigné Una persona se encuentra delante de un fondo distante Una persona ferma davanti ad uno sfondo distante B 〈花畑〉 A field covered with flowers Eine blumenübersäte Wiese Un champ couvert de fleurs 52 Un campo cubierto de flores Un prato fiorito
広角・超広角レンズのオートフォーカス撮影について 広角・超広角レンズでは、標準クラスのレンズと比べ、下記のような撮影条件になりやす く、 オートフォーカス撮影時には注意が必要です。 以下をお読みになって、 オートフォーカス撮影にお役立てください。 1. フォーカスフレームに対して主要な被写体が小さい場合 52ページ図Aのように、フォーカスフレーム内に遠くの建物と近くの人物が混在す るような被写体になると、背景にピントが合い、人物のピント精度が低下する場合が あります。 2.
Hinweise zum Gebrauch von AF Nikkor-Weitwinkel- oder SuperWeitwinkelobjektiven In den folgenden Fällen arbeitet der Autofokus bei der Aufnahme von Bildern mit AF Nikkor-Weitwinkel- oder Super-Weitwinkelobjektiven u.U. nicht einwandfrei. 1. Hauptmotiv in den Fokusklammern relativ klein Wie Abb. A (S.
Notas sobre el uso de objetivos AF Nikkor de gran o súper-gran angular En las siguientes situaciones, el enfoque automático pudiera no funcionar adecuadamente cuando se toman fotografías usando objetivos AF Nikkor de gran o súper-gran angular. 1. Cuando el sujeto en los corchetes de enfoque es relativamente pequeño. Como se muestra en la Fig. A (p.
Depth-of-field quick reference chart Schärfentiefentabelle Tableau synoptique des profondeurs de champ Tabla de profundidades de campo para consulta rápida Tabella di consultazione rapida per la profondità di campo 被写界深度早見表 16 22 8 11 4 5.6 4 2.8 2.8 8 5.
使用説明書の内容が破損などによって判読できなくなったときは、当社サービス機関にて 新しい使用説明書をお求めください(有料)。 No reproduction in any form of this manual, in whole or in part (except for brief quotation in critical articles or reviews), may be made without written authorization from NIKON CORPORATION. NIKON CORPORATION FUJI BLDG.