
Owner's Manual


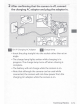
Table Of Contents
- D780 User's Manual
- Manuals
- Package Contents
- About This Manual
- Menu List
- For Your Safety
- Notices
- Getting to Know the Camera
- Camera Controls
- Index
- D780 Reference Manual
- Package Contents
- About This Manual
- Table of Contents
- Menu List
- For Your Safety
- Notices
- Getting to Know the Camera
- First Steps
- Basic Photography and Playback
- Camera Controls
- The MENU Button
- The i Button (the i Menu)
- The info Button
- The Mode Dial
- The Release Mode Dial
- The Focus-Mode Selector
- The AF-Mode Button
- The AF-ON Button
- The AE-L/AF-L Button
- The Help/Protect (WB) Button
- The ISO (Format) Button
- The Exposure Compensation Button
- The Playback Zoom (QUAL) Button
- The Thumbnail (Metering) Button
- The Flash Mode (Flash Compensation) Button
- The BKT Button
- The Pv Button
- The Fn Button
- Shooting Settings
- Choosing a Shooting Mode
- Image Recording Options (Image Area, Quality, and Size)
- Choosing How the Camera Focuses (Focus)
- Exposure-Related Settings (Metering and Exposure Compensation)
- Choosing the Operation Performed When the Shutter Is Released (Release Mode)
- Adjusting the Camera’s Sensitivity to Light (ISO Sensitivity)
- Achieving Natural Colors with Different Light Sources (White Balance)
- Varying Exposure or White Balance over a Series of Photographs (Bracketing)
- Image Processing (Picture Controls)
- Preserving Detail in Highlights and Shadows (Active D-Lighting and HDR)
- Options for Movie Recording and Editing
- Other Shooting Options
- Using Two Memory Cards
- Two-Button Reset: Restoring Default Settings
- Combining Multiple Exposures in a Single Photo (Multiple Exposure)
- Taking Photos at a Set Interval (Interval Timer Shooting)
- Creating a Movie from Photos (Time- Lapse Movie)
- Varying Focus over a Series of Photos (Focus Shift Shooting)
- The Electronic Shutter (Silent Live View Photography)
- Photographing Film Negatives (Negative Digitizer)
- Customizing the i Menu: Customize i Menu
- Using Non-CPU Lenses (Non-CPU Lens Data)
- Playback
- Connecting to Computers and TVs
- Network Connections
- On-Camera Flash Photography
- Remote Flash Photography
- Menu Guide
- Defaults
- The Playback Menu: Managing Images
- The Photo Shooting Menu: Shooting Options
- Reset Photo Shooting Menu
- Storage Folder
- File Naming
- Role Played by Card in Slot 2
- Image Area
- Image Quality
- Image Size
- NEF (RAW) Recording
- ISO Sensitivity Settings
- White Balance
- Set Picture Control
- Manage Picture Control
- Color Space
- Active D-Lighting
- Long Exposure NR
- High ISO NR
- Vignette Control
- Diffraction Compensation
- Auto Distortion Control
- Flicker Reduction
- Flash Control
- Auto Bracketing
- Multiple Exposure
- HDR (High Dynamic Range)
- Interval Timer Shooting
- Time-Lapse Movie
- Focus Shift Shooting
- Silent Live View Photography
- The Movie Shooting Menu: Movie Shooting Options
- Reset Movie Shooting Menu
- File Naming
- Destination
- Image Area
- Frame Size/Frame Rate
- Movie Quality
- Movie File Type
- ISO Sensitivity Settings
- White Balance
- Set Picture Control
- Manage Picture Control
- Active D-Lighting
- High ISO NR
- Diffraction Compensation
- Flicker Reduction
- Electronic VR
- Microphone Sensitivity
- Attenuator
- Frequency Response
- Wind Noise Reduction
- Headphone Volume
- Timecode
- Custom Settings: Fine-Tuning Camera Settings
- Reset Custom Settings
- a: Autofocus
- a1: AF-C Priority Selection
- a2: AF-S Priority Selection
- a3: Focus Tracking with Lock-On
- a4: 3D-Tracking Face-Detection
- a5: Auto-Area AF Face/Eye Detection
- a6: Focus Points Used
- a7: Store Points by Orientation
- a8: AF Activation
- a9: Focus Point Wrap-Around
- a10: Focus Point Options
- a11: Low-Light AF
- a12: Manual Focus Ring in AF Mode
- b: Metering/Exposure
- c: Timers/AE Lock
- d: Shooting/Display
- d1: CL Mode Shooting Speed
- d2: Max. Continuous Release
- d3: Sync. Release Mode Options
- d4: Exposure Delay Mode
- d5: Electronic Front-Curtain Shutter
- d6: Extended Shutter Speeds (M)
- d7: File Number Sequence
- d8: Save Original (EFFECTS)
- d9: Exposure Preview (Lv)
- d10: Framing Grid Display
- d11: Peaking Highlights
- d12: LCD Illumination
- d13: Live View in Continuous Mode
- d14: Optical VR
- e: Bracketing/Flash
- f: Controls
- g: Movie
- The Setup Menu: Camera Setup
- Format Memory Card
- Save User Settings
- Reset User Settings
- Language
- Time Zone and Date
- Monitor Brightness
- Monitor Color Balance
- Virtual Horizon
- Information Display
- AF Fine-Tuning Options
- Non-CPU Lens Data
- Clean Image Sensor
- Lock Mirror Up for Cleaning
- Image Dust Off Ref Photo
- Pixel Mapping
- Image Comment
- Copyright Information
- Beep Options
- Touch Controls
- HDMI
- Location Data
- Wireless Remote (WR) Options
- Assign Remote (WR) Fn Button
- Airplane Mode
- Connect to Smart Device
- Connect to PC
- Wireless Transmitter (WT-7)
- Conformity Marking
- Battery Info
- Slot Empty Release Lock
- Save/Load Menu Settings
- Reset All Settings
- Firmware Version
- The Retouch Menu: Creating Retouched Copies
- MY MENU/RECENT SETTINGS
- Troubleshooting
- Technical Notes
- Kit Lens Manual
- Index
- AF-S NIKKOR 24-120mm f/4G ED VR User Manual
- Notes on Safety Operations
- Nomenclature
- Major features
- Usable cameras and available functions
- Focusing
- Vibration reduction mode (VRⅡ)
- Focusing, zooming, and depth of field
- Using the lens hood
- The built-in flash and vignetting
- Recommended focusing screens
- Lens care
- Standard accessories
- Optional accessories
- Specifications
- Depth of Field
- Warranty

• Wireless Remote Controllers
• WR-R10 Wireless Remote Controller/WR-T10 Wireless Remote
Controller: When a WR-Rl 0 wireless
remote
controller
is
attached
to
accessory terminal,
the
camera can
be
controlled remotely using a
WR-T10 wireless remote controller.
- The
WR-R10
can also
be
used
to
control
radio-controlled flash units.
- For synchronized release
involving
more
than
one
camera, ready
multiple
cameras
with
paired WR-Rl 0
units
attached.
* When connecting
the
WR-R10,
be
sure
the
covers
for
the
accessory
terminal and
the
USB
and HDMI connectors are
fully
open.
•
WR-1
Wireless Remote Controller:
WR-1
units are used
with
WR
-
R10
or
WR-Tl 0 wireless remote controllers
or
with
other
WR-1
remote
controllers,
with
the
WR-1
units
functioning
as
either
transmitters
or
receivers. When a
WR
-Rl 0
or
a
WR-1
configured
as
a receiver
is
connected
to
the
camera accessory terminal, a
WR
-
Tl
0
or
a second
WR-1
configured
as
a
transmitter
can
be
used
to
take pictures remotely.
Camera settings can also be adjusted using a
WR-1
configured
as
a
transmitter.
*
Be
sure
the
firmware
for
the
WR
-Rl 0 and
WR-1
has been updated
to
the
latest versions
(WR-R10
firmware version 3.0
or
later and
WR-1
firmware
version 1.0.1
or
later). For
information
on
firmware updates,
see
the
Nikon website
for
your
area. Consult a Nikon-authorized service
representative
when
updating
the
firmware
for
the
WR
-
R10
from
versions
prior
to
version 2.0
to
version 3.0
or
later.
Technical Notes 167