
Owner's Manual


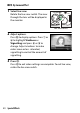


Table Of Contents
- Reference Manual
- Camera Manuals
- Table of Contents
- Getting to Know the Camera
- First Steps
- Tutorial
- Basic Photography and Playback
- Guide Mode
- Matching Settings to the Subject or Situation (Scene Mode)
- Special Effects
- More on Photography
- P, S, A, and M Modes
- Recording and Viewing Movies
- More on Playback
- Connections
- Camera Menus
- The Playback Menu: Managing Images
- The Shooting Menu: Shooting Options
- The Setup Menu: Camera Setup
- Setup Menu Options
- Reset Setup Options
- Format Memory Card
- Date Stamp
- Time Zone and Date
- Language
- Monitor Brightness
- Info Display Format
- Auto Info Display
- Auto off Timers
- Self-Timer
- Image Dust Off Ref Photo
- Image Comment
- Copyright Information
- Beep
- Flicker Reduction
- Buttons
- Rangefinder
- Manual Focus Ring in AF Mode
- File Number Sequence
- Storage Folder
- File Naming
- Location Data
- Airplane Mode
- Send to Smart Device (Auto)
- Bluetooth
- Eye-Fi Upload
- Conformity Marking
- Slot Empty Release Lock
- Reset All Settings
- Firmware Version
- Setup Menu Options
- The Retouch Menu: Creating Retouched Copies
- Recent Settings
- Troubleshooting
- Technical Notes
- Specs
- Kit Lenses
- Index
- User Manual
- Warranty

50 Special Effects
❚❚ ' Toy Camera Effect
1 Select live view.
Rotate the live view switch. The view
through the lens will be displayed in
the monitor.
2 Adjust options.
Press J to display options. Press 1 or
3 to highlight Vividness or
Vignetting and press 4 or 2 to
change. Adjust vividness to make
colors more or less saturated,
vignetting to control the amount of
vignetting.
3 Press J.
Press J to exit when settings are complete. To exit live view,
rotate the live view switch.
Live view switch