
Owner's Manual
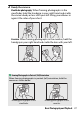
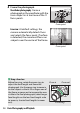

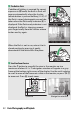


Table Of Contents
- Reference Manual
- Camera Manuals
- Table of Contents
- Getting to Know the Camera
- First Steps
- Tutorial
- Basic Photography and Playback
- Guide Mode
- Matching Settings to the Subject or Situation (Scene Mode)
- Special Effects
- More on Photography
- P, S, A, and M Modes
- Recording and Viewing Movies
- More on Playback
- Connections
- Camera Menus
- The Playback Menu: Managing Images
- The Shooting Menu: Shooting Options
- The Setup Menu: Camera Setup
- Setup Menu Options
- Reset Setup Options
- Format Memory Card
- Date Stamp
- Time Zone and Date
- Language
- Monitor Brightness
- Info Display Format
- Auto Info Display
- Auto off Timers
- Self-Timer
- Image Dust Off Ref Photo
- Image Comment
- Copyright Information
- Beep
- Flicker Reduction
- Buttons
- Rangefinder
- Manual Focus Ring in AF Mode
- File Number Sequence
- Storage Folder
- File Naming
- Location Data
- Airplane Mode
- Send to Smart Device (Auto)
- Bluetooth
- Eye-Fi Upload
- Conformity Marking
- Slot Empty Release Lock
- Reset All Settings
- Firmware Version
- Setup Menu Options
- The Retouch Menu: Creating Retouched Copies
- Recent Settings
- Troubleshooting
- Technical Notes
- Specs
- Kit Lenses
- Index
- User Manual
- Warranty

27Basic Photography and Playback
2 Ready the camera.
Viewfinder photography: When framing photographs in the
viewfinder, hold the handgrip in your right hand and cradle
the camera body or lens with your left. Bring your elbows in
against the sides of your chest.
Live view: When framing photographs in the monitor, hold the
handgrip in your right hand and cradle the lens with your left.
A Framing Photographs in Portrait (Tall) Orientation
When framing photographs in portrait (tall) orientation, hold the
camera as shown below.
Framing photographs in the
viewfinder
Framing photographs in the
monitor