
Owner's Manual


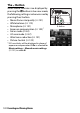


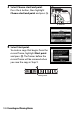
Table Of Contents
- Reference Manual
- Camera Manuals
- Table of Contents
- Getting to Know the Camera
- First Steps
- Tutorial
- Basic Photography and Playback
- Guide Mode
- Matching Settings to the Subject or Situation (Scene Mode)
- Special Effects
- More on Photography
- P, S, A, and M Modes
- Recording and Viewing Movies
- More on Playback
- Connections
- Camera Menus
- The Playback Menu: Managing Images
- The Shooting Menu: Shooting Options
- The Setup Menu: Camera Setup
- Setup Menu Options
- Reset Setup Options
- Format Memory Card
- Date Stamp
- Time Zone and Date
- Language
- Monitor Brightness
- Info Display Format
- Auto Info Display
- Auto off Timers
- Self-Timer
- Image Dust Off Ref Photo
- Image Comment
- Copyright Information
- Beep
- Flicker Reduction
- Buttons
- Rangefinder
- Manual Focus Ring in AF Mode
- File Number Sequence
- Storage Folder
- File Naming
- Location Data
- Airplane Mode
- Send to Smart Device (Auto)
- Bluetooth
- Eye-Fi Upload
- Conformity Marking
- Slot Empty Release Lock
- Reset All Settings
- Firmware Version
- Setup Menu Options
- The Retouch Menu: Creating Retouched Copies
- Recent Settings
- Troubleshooting
- Technical Notes
- Specs
- Kit Lenses
- Index
- User Manual
- Warranty

128 Recording and Viewing Movies
3 Start recording.
Press the movie-record button to start
recording. A recording indicator and
the time available are displayed in the
monitor. Sound is recorded via the
built-in microphone; be careful not to
obstruct the microphone during
recording. Except in i and j modes,
exposure can be locked by pressing
the A (L) button (0 102) or (in
scene, P, S, A, and % modes) altered by
up to ±3 EV in steps of
1
/
3 EV by
pressing the E (N) button and
rotating the command dial (0 104;
note that depending on the
brightness of the subject, changes to
exposure may have no visible effect).
4 End recording.
Press the movie-record button again
to end recording. Recording will end
automatically when the maximum
length is reached, the memory card is
full, or another mode is selected.
5 End live view.
Rotate the live view switch to end live
view.
A Viewing the Movie Crop
To view the movie crop in live view, press R to select the “show movie
indicators”, “hide movie indicators”, or “framing grid” display (0 8).
Movie-record button
Time remaining
Recording indicator