
Manual


Safety Reference
.
Owner's Manual
All
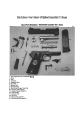
Nighthawk Custom Model
191
1 Firearms
Safety goggles
Lint-free cloths
Hollow ground gunsmith screwdrivers
HANDGUN MAINTENANCE
-
DISASSEMBLY
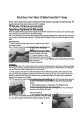
Outer Guide Rod Removal
1.
Insert
5/32"
Hex wrench into the hex head of Outer Guide Rod below the muzzle. Loosen the Guide Rod
by turning counter-clockwise.
2.
Remove Outer Guide Rod from the handgun by pulling the Rod out of the handgun towards the muzzle
end.
Note: Most NIGHTHAWK CUSTOM models have a one piece guide rod assembly. When holding the slide to
the rear, place a pin in the small hole in the guide rod. Allow the slide to slowly move forward until the spring
cap catches on the pin. The guide rod assembly will be captured and will remove as one unit. Be careful
when handling the unit as it is under spring tension.
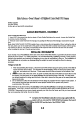
INSTALLING
A
RECOILMASTER
Upon receipt of your RecoilMaster, there are a few checks which the shooter or gunsmith should do to insure
proper life of the system. For safety purposes, it is recommended that a qualified gunsmith or other persons
trained in the assembly and
teardown of weaponry do any type of modification to the gun. The installation of
the RecoilMaster is as painless as disassembling the weapon as would normally be done for cleaning
purposes.
Things
to
look for
1.
Afler disassembling the weapon, check the back of the reverse plug and spring tunnel on the slide to
insure that there are no steps. This includes the small vestiges, which are above the bottom of the
slide rails, and extend
UD
to the bore. These areas should be flat and sauare to the bottom of the
rails.
2.
Check the back wall of the dust cover, or guide rod head seat area on the frame to insure that it is flat
and square, and that there are no steps between this wall and the front of the rails. If a step exists.
you should machine this ledge and the front of the rails to insure that they are on the same plane and
square to the rails.
3.
Do not attempt to utilize the old standard reverse plugs as supplied with the original recoil system. A
new reverse plug has been provided lo insure proper function of the system and prevent
overstressing of the spring.
Afler checking for the above items, the installation of the new RecoilMaster is as simple as installing any
recoil spring. CAUTION: ALWAYS USE SAFETY GLASSES WHEN INSTALLING SPRINGS INTO ANY
FIREARM. Assuming that you have already removed your slide from the frame, and that you have removed
the recoil assembly and barrel, the rest is simple.
'7
Compress the RecoilMaster using the reverse plug supplied with the
system until you can insert the TAKE DOWN tool between the head of
the GUIDE ROD and the front of the SPRING TUBE.
14