
Installation & Assembly

Carefully unpack the Under Cabinet and hardware from its packaging.
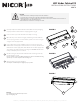
Inspect product for defects due to shipping (refer to Fig. A).
Insert connector (1) in the desired knockout (2) in housing.
Open the top cover of the housing (3). Install the green wire with the
close-loop ring over the connector barrel (1) and secure to housing by
using the lock nut (4) provided.
Insert supply wires (not provided) through connector (1) and secure
with the two screws (6) pre-installed on the connector (1). Attach black
xture wire to black supply wire, white xture wire to white supply wire,
green xture grounding lead to grounding lead. DO NOT MIX! Use wire
nuts (provided) to splice connections.
Mount housing to desired surface with the two mounting screws (5)
provided (refer to Fig. C).
Note: For 40” xtures, there is an additional mounting screw hole in the middle of housing.
Open the top cover and securely fasten the mounting screw.
Restore power and check installation
Note: Requires 120VAC/60Hz power supply for proper operation.
LED Under Cabinet V3
INSTALLATION INSTRUCTIONS
NUC-3
CAUTION
1. Read all instructions carefully for safe operation and installation
2. To avoid possible electrical shock, shut o electricity before the installation.
3. All wiring must be in accordance with national and local electrical codes. Installation work and electrical
wiring must be done by a qualied electrician
4. Do not install over a heat source or directly over water.
1
2
3
4
5
6
NICOR, Inc. | 2200 Midtown Place NE, Albuquerque, NM 87107 | 800.821.6283 | www.nicorlighting.com | rev10242014
Warranty
For complete warranty information please visit :
http://nicorlighting.com
7
3
2
3
5
7
6
1
4
FIGURE B
FIGURE C
FIGURE A
5