
Installation Guide

joint cannot be made. If the tube
segment is too long, system strain
may be introduced which could affect
service life.
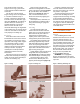
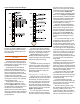
Cut the tube to the measured
length. Cutting can be accomplished
in a number of different ways to
produce a satisfactory squared end.
The tube can be cut with a disc-type
tube cutter (Figure 1), a hacksaw, an
abrasive wheel, or a stationary or
portable bandsaw. Care must be
taken to ensure the tube is not
deformed while being cut. Regardless
of the method, the cut must be square
to the run of the tube so the tube will
seat properly in the fitting cup.
Reaming
Ream all cut tube ends to the full
inside diameter of the tube to remove
the small burr created by the cutting
operation. If this rough, inside edge is
not removed by reaming, erosion-
corrosion may occur due to local
turbulence and increased local flow
velocity in the tube. A properly
reamed piece of tube provides an
undisturbed surface for smooth,
laminar flow.
Remove any burrs on the outside of
the tube ends created by the cutting op-
eration to ensure proper assembly of
the tube into the fitting cup.
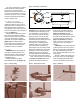
Tools used to ream tube ends
include the reaming blade on the tube
cutter, half-round or round files (Figure
2), a pocket knife, and a suitable
deburring tool (Figure 3). With soft
tube, care must be taken not to
deform the tube end by applying too
much pressure.
Soft temper tube, if deformed, can
be brought back to roundness with a
sizing tool consisting of a plug and
sizing ring.
Cleaning
The removal of all oxides and
surface soil from the tube ends and
fitting cups is crucial to proper flow of
filler metal into the joint. Failure to
remove them can interfere with
capillary action and may lessen the
strength of the joint and cause failure.
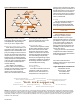
The capillary space between tube
and fitting is approximately 0.004 in.
Filler metal fills this gap by capillary
action. This spacing is critical be-
cause it determines whether there is a
proper flow of the filler metal into the
gap ensuring a strong joint.
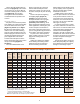
Lightly abrade (clean) the tube ends
using sand cloth or nylon abrasive
pads (Figure 4) for a distance slightly
more than the depth of the fitting cup.
Clean the fitting cups by using
abrasive cloth, abrasive pads, or a
properly sized fitting brush (Figure 5).
Copper is a relatively soft metal. If
too much material is removed from
the tube end or fitting cup, a loose fit
may result in a poor joint.
Chemical cleaning may be used if
the tube ends and fittings are thor-
oughly rinsed after cleaning according
to the procedure furnished by the
chemical manufacturer. Do not touch
the cleaned surface with bare hands
or oily gloves. Skin oils, lubricating
oils and grease impair the adherence
of the filler metal.
SOLDERED JOINTS
Fluxing
Use a soldering flux that will
dissolve and remove traces of oxide
from the cleaned surfaces to be
joined, protect the cleaned surfaces
from reoxidation during heating, and
promote wetting of the surfaces by
the solder metal, as recommended in
the general requirements of ASTM
B 813. Apply a thin, even coating of
flux with a brush to both tube and
fitting as soon as possible after
cleaning (Figures 6 and 7).
WARNING: Do not apply with
fingers. Chemicals in the flux can be
harmful if carried to the eyes, mouth or
open cuts.
Figure 1. Cutting Figure 3. Reaming: Deburring ToolFigure 2. Reaming: File
Figure 4. Cleaning: Abrasive Pad
Figure 5. Cleaning: Fitting Brush
2
Figure 6. Fluxing: Tube