������� ���������������������� ����������
SAFETY INFORMATION The light flash with an arrowhead symbol, within an equilateral triangle, is intended to alert the user to the presence of uninsulated “dangerous voltage” within the product’s enclosure that may be of sufficient magnitude to constitute a risk of electric shock to persons. The exclamation point within the equilateral triangle is intended to alert the user to the presence of important operating and maintenance (servicing) instructions in the literature accompanying the appliance.
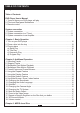
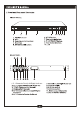
TABLE OF CONTENTS Safety Information Table of Contents DVD Player User’s Manual 1. Types of discs your DVD player will play ............................................................... 3 2. Front and Rear panel illustrations ......................................................................... 4 3. Remote control ...................................................................................................... 5 System connection 1. System connection ..............................................
TABLE OF CONTENTS Chapter 4: The Setup Menu System 1. General Steps of Setup Menu ............................................................................... 21 2. Setup Items Introduction ....................................................................................... 21 a) System Setup .................................................................................................... 21 b) Language Setup ..........................................................................................
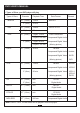
DVD USER’S MANUAL 1. Types of Discs your DVD player will play Types of Discs MPEG-4 Divx DVD Diameter Playback Time 4.7” (12cm) 74 min. 3” (8cm) 20 min. 4.7” (12cm) 74 min. 3” (8cm) 20 min. 4.7” (12cm) Data Format Remark MPEG-4 Divx 3.11-5.11 1 layer: 12 min. DVD Format Disc: 2 layers: 240 min. Compressed Digital Audio 3” (8cm) 1 layer: 80 min. 2 layers: 180 min. SVCD 4.7” (12cm) 45 min.
1. 5.
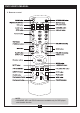
DVD USER’S MANUAL DV NUAL 3. Remote control NOTE: • KARAOKE, KEY and ECHO buttons are available only for DVD player with Karaoke function.
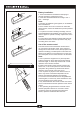
Battery Installation: 1. Push downward and outward the leaf spring to remove the battery compartment cover. 2. Insert two size AAA batteries according to the “+” and “-” markings. Note: A. Do NOT mix different types together, or old batteries with new batteries. B. If the remote control is not used for an extended period of time, remove the batteries to prevent possible corrosion. C. To prevent corrosion resulting in damage, remove exhausted batteries immediately.
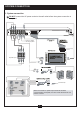
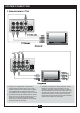
SYSTEM CONNECTION 1. System connection DO NOT connect the AC power socket to the wall outlet before the system connection is completed. Connect to Digital decoding amplifier To TV(scart input ) connector Amplifier input L C �� �� �� � �� �� � �� ���������� � � � � � �� � � � ���� � R To Coaxial input Center SL SR When the coaxial or optical output terminal has been connected with an amplifier, the other audio terminals do not need to connect.
SYSTEM CONNECTION 1. The player is equipped with composite A/V outputs at the rear of the player. Your TV will require at least one set of A/V inputs. The patch cord supplied with the player will connect the A/V output jack of your player to your TV’s inputs. 2. To view the DVD signal, please press the “AV/TV” button on the TV or remote control of your TV to switch TV’s mode from broadcast reception mode to one of the A/V signals. Your TV should have more than one A/V input. 3.
BASIC OPERATION Chapter 1: Basic Operation 1. Turn on the TV and your DVD player Press the Power button on the player or the remote control and “Read” appears on the TV screen. If there is no disc in the DVD player, “No disc” will be displayed on both the screen and the VFD. 2. Place a Disc into the tray Press the Open/Close button located on the remote control or the front of the DVD player and “Open” appears on the screen.
BASIC OPERATION b) Title Play (compatible with DVD discs only) I. During DVD playback, press the Title button to display the DVD title content. II. Press the Arrow buttons to highlight the title you want to select and press Enter. You can also press the Numeric buttons to select. III. The DVD player begins with the chapter 1 of the chosen title. c) Sequence Play (compatible with DVD, SVCD, VCD, CD-G, DTS-CD, HD-CD, MP3/JPEG discs) I.
ADDITIONAL OPERATION Chapter 2: Additional Operation 1. Selecting Tracks (compatible with DVD, SVCD, VCD, CD, CD-G, DTS-CD, HD-CD, MP3/ JPEG discs) a) When playing a DVD disc, press the Numeric buttons on the menu or title page to select tracks; During DVD playback, you can input the desired title number directly. b) As a SVCD or VCD disc, during sequence playback, press the Numeric buttons to select tracks. (During Program Playback and PBC is on, you can only press Prev/Next button to select).
ADDITIONAL OPERATION During DVD playback, when Fast Reverse Playback returns to the beginning of the playing title/ chapter, it resumes normal playback; During SVCD or VCD playback with PBC on when Fast Reverse Playback returns to the beginning of the playing track, it resumes normal playback. • Press the Play button to resume normal playback. • During CD, HD-CD, MP3 playback with the speed F.R X 2, the player has audio output. 4.
ADDITIONAL OPERATION • Press the button again to show the second page: “Language */* (the serial number of playing language / the amount of optional languages) or Off, Language Type, Audio Type, Subtitle */* (the serial number of playing subtitle / the amount of optional subtitles) or Off, Angle */* (the serial number of playing angle / the amount of optional angles) or Off”. • Press the button for the third time, the display menu fades out.
ADDITIONAL OPERATION • To exit the menu and resume normal playback from the current track, press the Play button. • Each thumbnail has a number in the corner. You can select and play a track by pressing that number on the remote. II. When a CD, CD-G, DTS-CD, or HD-CD disc is loaded, according to the tracks’ sequence on the disc, each track plays 15 secs. • You can select a track to start Scan Playback by pressing the Numeric buttons on the remote.
ADDITIONAL OPERATION When a DVD or SVCD is recorded with multiple soundtracks, you can use the Language feature to temporarily change the audio language (the language of the soundtrack). There are 8 supported languages: Chinese, English, Japanese, French, Spanish, Portuguese, Germany and Latin. With each consecutive press of the Language button, the audio language switches and the corresponding serial number appears on the screen.
ADDITIONAL OPERATION Notes: • When muted, the microphone also has no audio output. • If a disc has no sound, please try to press the Mute button to resume. 16. Zoom In the Video Image (compatible with DVD, MPEG-4, Divx, SVCD, VCD, JPEG discs) a) The Zoom Function allows you to enlarge or zoom out the video image and to pan through the image. Press Zoom repeatedly to activate the function and choose the required zoom factor: Zoom 1, Zoom 2, Zoom 3, Zoom 1/2, Zoom 1/3, Zoom 1/4, Zoom Off.
ADDITIONAL OPERATION • “EQ: [POP]” is highlighted, as shown below. • “EQ: [STANDARD]” is highlighted, as shown below. • “EQ: [USER]” is highlighted, as shown below. The graph can vary according to your settings: Press the Left/Right arrow buttons to high light the band you want to tune; Then press the Up/Down arrow buttons to increase or decrease the value. • “EQ: [CLASSIC]” is highlighted, as shown below. • “EQ: [ROCK]” is highlighted, as shown below.
IDENTIFICATION OF CONTROLS Notes: • When setting SRND, EQ is auto setup to STANDARD. • When setting EQ, SRND is auto setup to OFF. 19. Volume control (compatible with DVD, MPEG-4, Divx, SVCD, VCD, CD, CD-G, DTS-CD, HD-CD, MP3/JPEG discs) • You can press the Volume button on the front of the TV set or the amplifier to control the sound level. • Pressing the Vol+ button on the remote allow you to amplify the sound level; Pressing Vol- will reduce the sound level.
MPEG-4 and Divx Chapter 3: MPEG-4 and Divx MPEG-4 is a graphics and video lossy compression algorithm standard. It is based on MPEG-1 and MPEG-2 and Apple Quicktime technology. Wavelet based MPEG-4 files are smaller than JPEG or Quicktime files, so they are designed to transmit video with text, graphics and 2-D and 3-D animation layers. Wavelet technology can compress color images at rates of 20:1 up to 300:1 and grayscale images at 2 to 50:1 DIVX is based on the MPEG-4 compression format.
SETUP MENU SYSTEM Chapter 4: SETUP MENU SYSTEM 1. General Steps of Setup Menu a) Press the Setup button, the main setup menu appears. • When the main menu is displayed, the DVD system will auto pause. d) Press the Arrow buttons to highlight the Exit Setup option, then press Enter or Setup again to exit Setup Menu. Notes: • When setup is complete, pressing the following buttons will turn off the setup menu, while the choices that have been changed will be saved: P/N, Subtitle, F.F, F.
SETUP MENU SYSTEM Notes: • When your DVD player output is composite video, these settings have no effect. • Choose TV-RGB/P-SCAN if your DVD player is connected to a progressive scan TV. The default setting is TV-RGB. * SCREEN SAVER If the screen saver is on, when your DVD player is in Stop, Open or No Disc state, or there is a frame frozen for more than 60 sec, the screen saver will be displayed. This feature can protect the screen from damage. • ON: Choose this setting to activate the screen saver.
SETUP MENU SYSTEM b) LANGUAGE SETUP The language setup options are illustrated below: * PASSWORD The password option is initially locked, and you cannot set the ratings limit or change the password. In order for the Ratings feature to work, the password mode must be turned on. If you want to set the ratings limit, you will need to enter the default password, which is 0000, then press Enter to confirm. To change the password, you will be prompted for the old password, then be prompted for a new password.
SETUP MENU SYSTEM Highlight the AUDIO OUT option and press the Arrow buttons to choose the audio output mode you prefer. Press Enter to confirm; There are 3 optional audio output modes: ANALOG, SPDIF/RAW and SPDIF/ PCM. • ANALOG: From the Coaxial Output jack and the Optical Output jack, no signal is output.
SETUP MENU SYSTEM * CONTRAST * DOWNMIX Use the Up and Down arrow button to move the scroll indicator and adjust the contrast. Use the Up and Down arrow button to move the scroll and adjust the saturation. • LT/RT: Choose this setting and it will sound like in a movie theatre if the original movie the disc was recorded from was encoded in the Pro Logic Dolby Digital format. • STEREO: Choose this setting, when 5.
SETUP MENU SYSTEM f) DIGITAL SETUP The video setup options are illustrated below: OP MODE • LINE OUT: Choose this setting to line out the input signal. It will be more suitable for playing in the night time when the output volume is low. • RF REMOD: It will be more suitable to choose this setting for playing in the day time when the output volume is high. * BASS MODE There are three settings in this option: ALL LG SPK, ALL SM SPK, MIXED SPK. You can adjust subwoofer volume in this option.
SETUP MENU SYSTEM REFERENCE: • To protect your DVD player, the interval between two consecutive Power Button operations must be above 30 seconds. • If not using for an extended period or time, please pull out the plug from the power outlet. • The player should be operated only on the appropriate type of power supply. Otherwise, it doesn’t work or may even be damaged. • The player may not be compatible with some encrypted discs. • If the player stops playback by accident, please power it on again.
TROUBLE SHOOTING If your DVD player developed a problem, please check below situations before requesting service. PROBLEM N o Power CHECK and ACTION • Check if the power cord has been properly connected to the power outlet. • Check if the main power has been switched on. Does not play • No disc, load a disc. • Disc has been loaded upside down. Place the disc with the label side up. • Disc’s region code does not match to the player. • Disc’s rating level is higher than the player’s rating level setting.
TROUBLE SHOOTING Symptom Check and Action Cannot SKIP or SEARCH • Some discs are programmed that do not allow users to SKIP or SEARCH at some sections, especially at the beginning WARNING section. • Single Chapter disc cannot apply SKIP function. No sound or sound output not complete • Check if the TV and Amplifier have been switched on and correctly set. • Check if the TV and Amplifier system connection is secured. • Press the AUDIO button to select other audio tracks output of disc.
SPECIFICATIONS Video Format Divx3.11, Divx4.12, Divx5.05, MPEG-4, DVD Video, DVD Audio, Super Video CD, Video CD, CD-DA, HDCD, OKO, CD-ROM. Audio Format MPEG 1, LAYER 1, LAYER 2, LAYER 3 Signal Output Color System: PAL/NTSC Audio System: DOLBY DIGITAL down mix stereo DOLBY DIGITAL digital output Audio DAC 24bit/96KHz Video Output: 1 Vpp (at 75 ohm) Audio Output (Stereo): 2 Vpp Frequency Response CD: 20Hz-20KHz (EIAT) DVD: 20Hz-22KHz (48K) 20Hz-44KHz (96K) S/N ratio > 90 dB THD < 0.
WARRANTY LIMITED WARRANTY Who is Providing This Warranty? • Orbyx Electronics, LLC (“Orbyx"), as the distributor of this NexxtechTM product (your “Product”). What Does This Warranty Cover? • This warranty covers defects in materials or workmanship in your Product under normal use and conditions. What is the Period of Coverage? • This warranty covers your Product for 12 months from the original purchase date. Who Is Covered? • This warranty covers the original consumer purchaser.