
Manual


www.nexusrobot.com Robot Kits manual
5
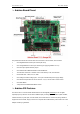
4. Supporting Bluetooth module, APC220 module;
5. Auto Switch between external and onboard power supply;
6. Supporting SD card (read&write - our SD card module is needed);
7. Supporting IIC/I2C/TWI connection
See:
http://www.nexusrobot.com/product.php?id_product=51
¾ Software
The open-source Arduino environment makes it easy to write code and upload it to the i/o board. It runs
on Windows, Mac OS X, and Linux. The environment is written in Java and based on Processing, avr-gcc,
and other open source software.
¾ Before you start
Before you start there are somethings you will to attention.
¾ Applying Power
This is one of the most important steps in getting the controller up and communicating with your host
controller. You must make sure that you apply power to the Power Terminal using the correct polarity.
Reverse Polarity will damage the controller. We are not responsible for such damage, nor do we
warranty against such damage. Make sure you take time to apply power correctly. Otherwise, it could get
costly for you!
Power from USB: Simply plug USB cable, and the controller is able to work. Please notice that the USB
can only supply 500 mA current. It should be able to meet the most requirements for LED lit application.
However it is not enough to power DC motors or servo.
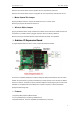
Power from Motor Power Input: Simply connect the ground wire from your supply to the screw terminal
labeled “GND”, and then connect the positive wire from your supply to the screw terminal labeled “VIN".
NOTE: Maximum supply voltage cannot exceed 14V DC.
¾ Getting Started
This document explains how to connect your Arduino board to the computer and upload your first sketch.
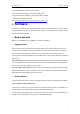
1 | Get an Arduino board and USB cable
In this tutorial, we assume you're using an Arduino Uno, Arduino Duemilanove, Nano, or Diecimila. If you
have another board, read the corresponding page in this getting started guide.
You also need a standard USB cable (A plug to B plug): the kind you would connect to a USB printer, for
example. (For the Arduino Nano, you'll need an A to Mini-B cable instead.)