
Manual


www.nexusrobot.com Robot Kits manual
33
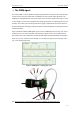
¾ PID Control
¾ What Is PID
From Wikipedia: "A PID controller calculates an 'error' value as the difference between a measured [Input]
and a desired setpoint. The controller attempts to minimize the error by adjusting [an Output]."
So, you tell the PID what to measure (the "Input",) Where you want that measurement to be (the
"Setpoint",) and the variable to adjust that can make that happen (the "Output".) The PID then adjusts the
output trying to make the input equal the setpoint.
For reference, in a car, the Input, Setpoint, and Output would be the speed, desired speed, and gas pedal
angle respectively.
Tuning Parameters
The black magic of PID comes in when we talk about HOW it adjusts the Output to drive the Input
towards Setpoint. There are 3 Tuning Parameters (or "Tunings"): Kp, Ki & Kd. Adjusting these values will
change the way the output is adjusted. Fast? Slow? God-awful? All of these can be achieved depending
on the values of Kp, Ki, and Kd.
So what are the "right" tuning values to use? There isn't one right answer. The values that work for one
application may not work for another, just as the driving style that works for a truck may not work for a
race car. With each new application you will need to try Several Tuning values until you find a set that
gives you what you want.
¾ The Library
Using The PID Library has two benefits in my mind
1. There are many ways to write the PID algorithm. A lot of time was spent making the algorithm in this
library as solid as any found in industry. If you want read more about this, check out this detailed
explanation.
2. When using the library all the PID code is self-contained. This makes your code easier to understand.
It also lets you do more complex stuff, like say having 8 PIDs in the same program.
See: http://www.arduino.cc/playground/Code/PIDLibrary
See: http://brettbeauregard.com/blog/2011/04/improving-the-beginners-pid-introduction/
Sample code
/********************************************************
* PID Basic Example Reading analog input 0 to control analog PWM output 3
********************************************************/
#include <PID_v1.h>
double Setpoint, Input, Output; //Define Variables we'll be connecting to
PID myPID(&Input, &Output, &Setpoint,2,5,1, DIRECT); //Specify the links and initial tuning parameters
void setup() {