
Manual

www.nexusrobot.com Robot Kits manual
9
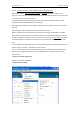
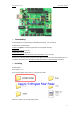
in the status bar. (Note: If you have an Arduino Mini, NG, or other board, you'll need to physically present
the reset button on the board immediately before pressing the upload button.)
A few seconds after the upload finishes, you should see the pin 13 (L) LED on the board start to blink (in
orange). If it does, congratulations! You've gotten Arduino up-and-running.
If you have problems, please see the troubleshooting suggestions.
You might also want to look at:
the examples for using various sensors and actuators
the reference for the Arduino language
The text of the Arduino getting started guide is licensed under a Creative Commons
Attribution-ShareAlike 3.0 License. Code samples in the guide are released into the public domain.
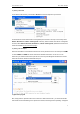
See: http://arduino.cc/en/Guide/Windows
¾ Language Reference
Arduino programs can be divided in three main parts: structure, values (variables and constants), and
functions.If you want to understand more, please See: http://www.arduino.cc/en/Reference/HomePage
¾ Programming structure
This section describes the two important structures in the basic Arduino: setup () and loop ().They are
indispensable.
The setup() function is called when a sketch starts. Use it to initialize variables, pin modes, start using
libraries, etc. The setup function will only run once, after each power up or reset of the Arduino board.
After creating a setup() function, which initializes and sets the initial values, the loop() function does
precisely what its name suggests, and loops consecutively, allowing your program to change and
respond. Use it to actively control the Arduino board.
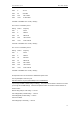
Sample code
int buttonPin = 3;
// setup initializes serial and the button pin
void setup()
{
beginSerial(9600);
pinMode(buttonPin, INPUT);
}
// loop checks the button pin each time,
// and will send serial if it is pressed
void loop()