
Manual

www.nexusrobot.com Robot Kits manual
7
See also: step-by-step screenshots for installing the Uno under Windows XP
.
Installing drivers for the Arduino Duemilanove, Nano, or Diecimila with Windows7, Vista, or XP:
When you connect the board, Windows should initiate the driver installation process (if you haven't used
the computer with an Arduino board before).
On Windows Vista, the driver should be automatically downloaded and installed. (Really, it works!)
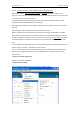
On Windows XP, the Add New Hardware wizard will open:
When asked Can Windows connect to Windows Update to search for software? select No, not this time.
Click next.
Select Install from a list or specified location (Advanced) and click next.
Make sure that Search for the best driver in these locations is checked; uncheck Search removable
media; check Include this location in the search and browse to the drivers/FTDI USB Drivers directory of
the Arduino distribution. (The latest version of the drivers can be found on the FTDI website.) Click next.
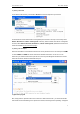
The wizard will search for the driver and then tell you that a "USB Serial Converter" was found. Click
finish.
The new hardware wizard will appear again. Go through the same steps and select the same options and
location to search. This time, a "USB Serial Port" will be found.
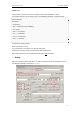
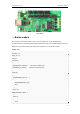
You can check that the drivers have been installed by opening the Windows Device Mananger (in the
Hardware tab of System control panel). Look for a "USB Serial Port" in the Ports section; that's the
Arduino board.
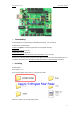
5 | Launch the Arduino application
Double-click the Arduino application.
6 | Open the blink example
Open the LED blink example sketch: File > Examples > 1.Basics > Blink.