
Installation Guide


15
CORNER INSTALLATION
All products must be allowed to acclimate; removed from boxes and stored flat at the
installation site for a minimum of 48 hours or until properly acclimated prior to installation.
Heat and moisture cause expansion. Best results are obtained by installing cool, dry product.
NextStone does not warrant against gapping caused by expansion and contraction.
CASTLE ROCK OUTSIDE CORNER
Step 1-Start the 1st course from the outside corner of the wall. Place starter strip top
2 ¾" above the desired starting height of the wall, recess the strip 2" from each side
of the corner edge.
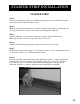
Step 2-Set the Castle Rock outside corner piece against the
corner and down into the starter strip. Use the screw guides
and place at least 3 screws along the tongue. Place 2 screws in
the right lap side of the panel where indicated. (Fig. 7)
Step 3-Attach the panels working in from each corner
as previously described. (Fig. 8)
Figure 7
Figure 8
Note: There are 4 patterns of the Castle Rock Outside Corner. 2 Left patterns and 2
Right patterns. Check for the number on the inside of each corner. Corners are
numbered 1 through 4. Alternate left and right corners with each course preventing
pattern repetition.