
Installation Guide


31
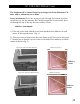
1) Fir out the desired column to 13 ⅞" x 13 ⅞" .
2) Starter Strip- Determine the height above ground the
bottom of the column should be. Measure up 2 3/4" from
this point and strike a level line. Attach the top of the starter
strip on this line. Level and attach starter strip on each face, stopping
2" from each corner. (Fig. 1)
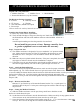
Optional: The panels can be face screwed at the bottom to eliminate
the need for a starter strip. The screw heads will need to be caulked
and painted for finished results. Paint Kit and caulk are sold separately.
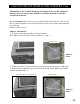
3) Each box contains 4 PIECES, MARKED 1-4. Attach the male
panel (number 1). Slide down and seat panel 1 onto the starter strip
and attach on the screw hem guide points. (Fig. 2) Next, place the side
pieces, (number 2 and 3) into the dovetail joints and check for
tightness. From panel 1, panel 2 is on the right side, and panel 3 is on
the left side. Make sure to place all panels with the top arrow pointing
up. (fig. 3) Attach panel number 4 at the base, then slide into panels 2
and 3. Make sure joints are tight, then screw at the top using the screw
hem guide points. (Fig. 4)
4) To make columns higher than 30”, simply stack the next course
using the tongue and groove attachment for the
bottom, and the screw hem at the top. (Fig. 5)
30” COLUMN WRAP INSTALLATION
Fig. 1
Fig. 2
Fig. 2