
User's Guide
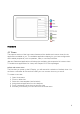


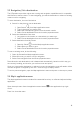

Table Of Contents
- Welcome to the Q Experience 2.0.
- Important information
- Introduction
- 1 Sidebar
- 2 View
- 3 Application
- 4 Home menu
- 5 Map
- 5.1 Map basics
- 5.2 Location properties
- 5.3 Navigation/ Set a destination
- 5.4 Map’s application menu
- Widgets
- 5.5 Chart settings
- Chart orientation
- Heading line
- Show trail
- Autocenter
- Autozoom speed limit
- Low speed zoom level
- Easy view™
- SonarChart™
- 2D shading
- Community edits
- Chart details
- Satellite overlay
- Satellite overlay opacity
- Default zoom level
- Safe water depth
- Shallow water depth
- Spot soundings
- Depth contours
- Minimum fishing range
- Maximum fishing range
- Reset chart settings
- 5.6 Location and route properties
- 6 Dashboard application
- 7 Compact dashboard widget
- 8 Fishfinder
- 9 Radar
- 10 Music
- 11 Weather
- 12 Info
- 13 Settings
- 14 Q Mobile App
- 15 Glossary

11
Home menu
4.1 Views
The topmost section of the home menu features all the default and custom views for the
applications available to you. The available applications depend on your boat configuration
and installed peripherals, such as speakers, radar, or sounder/Fishfinder.
Map
and
Dashboard
applications will always be available, with respective full-screen views.
To enable more applications for views, see Chapter 13.8.5
Extra packages
.
Default and custom views
The first time you power up the Q Display, you will start with a selection of default views. You
are free to customize all of them and create your own custom views as you see fit.
To create a new view:
1. Open Home menu
2. Press on
New view
3. Select the view template (see list below)
4. Assign desired applications to the viewports
5. Press “checkmark” when done to save the view
6. Activate, pin and edit your new view from the Home menu.