
Car Stereo System User Manual


10
Radio Operation
Choose Radio Band
Press the BND•ID3 Button anytime to
access the radio function.
The unit comes with five bands- three
FM Bands (FM1, FM2, and FM3)
and two AM Bands (AM1, and AM2)
selects. Each of the five bands can
store up to six preset stations, for a
total of 30 preset memory stations.
NOTE: To change the receiving range
from USA to Europe, remove the face-
plate and then move switch marked
"A-E" to the appriate region.
Radio Tune / Seek Function
In Radio Mode, press Seek +/- But-
ton to manually adjust the radio fre-
quency.
SEEK 1 & SEEK 2
Press and hold the SEL Button until
"DSP OFF" is shown on the LCD, then
press the SEL Button to cycle through
the menu selections until "SEEK 1" is
shown. Use the VOL +/- Button to se-
lect either "SEEK 1" or "SEEK 2".
A. Seek 1
Press and hold the SEEK |<< or >>|
Button for more than 1 second. The
radio will seek the next strong and
clear frequency station. Repeat to
seek more stations in your listening
area with a strong signal.
B. Seek 2 Press and hold the SEEK
|<< or >>| Button for station search.
The search will not cease until you re-
lease the button.
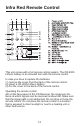
Mono/Stereo Reception Control
In FM radio mode, press MONO but-
ton on the remote control to toggle
between mono reception or ste-
reo reception. The display will show
"MONO" or "STEREO". Improvement
of reception of distant stations can be
done by selecting “MONO” operation
which may cut down some reception
noise.
Save Your Preset Stations
There are six numbered preset but-
tons which can store and recall sta-
tions for each band. While listening to
a radio station you would like to save
as a pre-set, press and hold one of the
buttons numbered 1-6 until you hear a
beep. The button you pressed is now
the pre-set button for that station.
Automatic Store/Preset Scan
A. Automatic Scan & Store
While listening to the FM Radio, press
and hold the F/PS Button for more
than 3 seconds. The receiver will au-
tomatically scan the saved stations of
that FM Band.
While listening to the AM Radio, press
and hold the F/PS Button for more
than 3 seconds. The receiver will au-
tomatically scan and save stations for
that AM Bands.
B. Scan Saved Stations
Press the F/PS button once to perform
the scanning functions. In FM mode,
press the F/PS button and the sta-
tions in that FM band will be scanned;
press this button in AM mode and
scan that AM Band Stations.
CD Operation
Electronic Skip Protection - 12 or 45
seconds
Electronic Skip Protection is ideal for driv-
ing on rough roads. Press the SEL Button
for 2 seconds. The display will show
“DSP OFF”. Press the SEL Button again,
“ESP12” will be displayed indicating that
Electric Skip Protection will be activated
for 12 seconds. With “ESP 12” on the
display, use the VOL +/- Button to change
the setting to “ESP 45”, indicating that
Electronic Skip Protection for 45 seconds
is activated. Leave the unit idle for the
new setting to take effect.