
User's Guide

17
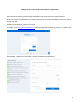
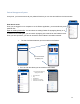
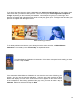
If the colors still need to be improved make a tap on the following button :
- WB for White Balance : Tint/Temperature.
- EX for Exposure : Compensation, Duration and ISO.
- AF for the Focus.
Unlock auto and choose your best settings
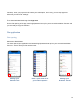
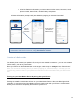
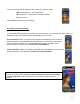
Third step : patient positioning:
To ensure that patient positioning is perfect from face and profile, on the “before” and “after” videos, it is
important to match your patient with the mask displayed on the screen.
Facial calibration: Match your patient’s face with the mask displayed on the screen to
obtain the result you need. Machine will automatically move to the right profile cross by
only moving back and forth his / her head (without changing the orientation of the
Patient’s face) then make a tap on confirm the facial calibration.
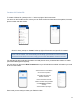
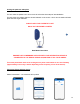
Profile calibration : Match your patient’s profile with the mask displayed on the screen to
obtain the result you need and tap on Confirm the profile calibration.
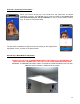
TIP : if you want to focus your video on a specific area, for example the lips, try to set
this area (lips of the patient) onto the vertical red marking line while you are doing
the profile calibration : it will be easier for you to zoom on the lips on the final
mounting