NewTek SpeedEDIT™ Quick Start Guide Essential information to get started editing
NewTek SpeedEDIT™ QuickStart Guide INTRODUCTION ..................................................................................................4 System Specifications ..............................................................................................................4 Minimum:.................................................................................................................................4 Recommended: ..............................................................................
Introduction SpeedEDIT is the World’s Fastest Video Editor, and we’re delighted you have chosen it as your non-linear editor! SpeedEDIT represents the culmination of many years of development by NewTek, the recognized creators of Desktop Video. If you have previously used NewTek’s VTEdit you will feel right at home; those who honed their editing skills on other systems will quickly appreciate SpeedEDIT’s streamlined workflow.
IDE or SATA system drive with 6 Gigabytes of free disk space DVD Drive Windows® XP (Service Pack 2) Operating System DirectX 9.0c or higher Recommended: (For Hi Definition or HDV format editing, dual CPUs or dual dual-core CPUs are suggested for the smoothest, fastest operation.) IEEE1394 FireWire™ card required for DV or HDV format capture PCI Express-based graphics card with 256MB RAM and minimum 1280x1024 screen resolution. (NVIDIA or ATI graphics chipset recommended) DirectX 9.
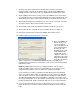
7. The Start menu panel determines the link that will be created in your Start > Programs listing. Leave this at the default setting so NewTek SpeedEDIT will be available from the Start menus for all users logged into the machine. Click “Next” 8. On the additional tasks panel, you may create a SpeedEDIT icon on your desktop (recommended for more convenient launching) and also create a Quick Launch icon, which will be placed on the task tray. Decide which you would like and click “Next” 9.
16. If this is the first NewTek product you’ve registered, thank you! You will need to follow the instructions under the New Registration field. 17. After your account is set up (or you have logged in) you will see the “Product Registration” screen. 18. Enter the 15-digit SpeedEDIT serial number found on the Program CD. 19. If you are performing online registration from your SpeedEDIT machine, your Product ID will be entered for you automatically.
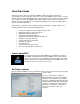
Quick Start Guide Now that you have registered, launch SpeedEDIT by double-clicking the desktop icon. The following section is designed to orient you to some of SpeedEDIT’s unique features. Veteran NewTek editors are likely familiar with many of the following concepts and can review the detailed user manual online in the SpeedEDIT Documentation folder.
Click on the New Project > HDV 720p setting, as we’ll work on some HDV clips. Output Monitor We need to monitor our video, so open a preview monitor from SpeedEDIT’s Menu Window > Video Output. Drag it to the side and size it as you’d like. Note how the Output window indicates both project size and the pixel size of the current monitor. [OutputMonitor.
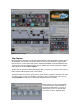
[WindowLayout1.bmp] Clip Capture While NewTek has provided you with both standard definition and high definition sample clips on the SpeedEDIT Content DVD, the logical workflow for new projects would be to ingest footage from the camera, so let’s explore that. Keep in mind that SpeedEDIT is format independent, and can work with most clips straight from the camera, whether they are AVI, QuickTime or MPEG-2. Access this from the menu File > Capture.
Press the Refresh button above the preview window to see your device listed. Now, the play button lights up and lets you know that SpeedEDIT recognizes the device and is ready to copy clips to the chosen folder. Under the Record section, type in a file base-name (where it says ‘Untitled’) and also select the Auto Chop checkbox. This simplifies video captures by separating clips at every point that the Start/Stop button was pressed during recording.
Add Media Now that you’ve acquired content (or just want to use NewTek’s sample clips), from the SpeedEDIT menu, you can launch the Add Media window, which allows a constant location to locate your assets. The Ctrl-I shortcut also opens this window.
Building a project Let’s get to the fun stuff and start building a project, shall we? Set your SpeedEDIT windows to Storyboard at the top and Timeline on the bottom. With a project setting of HDV 720p, navigate to the QuickStart Folder that was installed from the Content DVD in the Add Media panel. Start by adding the opening music and narration in the \Footage\Audio folder.
The clip was treated as a cut, in SpeedEDIT’s top-down ordering of images. If you drag this clip left or right on the timeline, you will notice the video above it is ‘shaded’ on the timeline, indicating that the shaded assets are not visible during playback. Next, let’s add more video to the project by navigating to \QuickStart\Footage\Clips\ and dragging two files into the storyboard: Clip-02.m2t and then Clip-01.m2t. Notice how both Storyboard and timeline views immediately reflect project change.
To adjust the clip in and out points, hold down the Alt key and move the cursor over the Clip-04 storyboard icon. Notice that with the Alt key pressed, the cursor changes. Mousing over the left side of any icon shows the first frame of the clip, and the cursor says ‘IN’ If you mouse over the right side of the icon, the icon displays the last frame in the clip and the icon changes to ‘OUT’. Continuing to hold the Alt key, left-click on the left side of the icon and drag it to the right.
will reappear with the new information. Drag the cursor in the left window to adjust the clip inpoint and in the right window to modify the outpoint. SpeedEDIT offers several means to accomplish the same goal, based on your working preference. If you wish, you can save this project out as your own by going to the File menu and choosing Save As… (or pressing Shift+Ctrl+S). This is helpful to save different versions under distinct names.
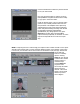
Our Edit Line is where we want to insert our first picture-in-picture, so go to the Add Media window and navigate to \QuickStart\Footage\Overlays\ and highlight Over1-Left.m2t and click Add at the bottom of the Add Media window. Press the SpeedEDIT Stop and then Play buttons to see this clip play back full frame. To fly this clip in, it must be seen by SpeedEDIT as an overlay. In the Timeline, Over1-Left.m2t has a video portion (top) and an audio portion(waveform below it).
Left-clicking will now crop in all four sides of the clip. Go ahead and try it, I’ll wait. Ok, now hit Ctrl-z to undo that. We just want to crop the right edge, so this time, when the tooltop changes to ‘crop’ use the right mouse button and align the right edge with center frame. This right-mouse action can be used for all the quick moves you can easily perform in this window: size, crop, rotate, and smooth. [PositionTab3.
him down out of frame, and for the end, move him up out of frame. When you’re finished, you should have both these clips mirror each other with them speaking in synch. If the two actors are not speaking in unison, then you can Offset or ‘nudge’ by holding the Alt key and using the right and left arrows on the keyboard. Clip Inherit NewTek realizes much of your daily editing work can involve re-using or modifying what you already have in the project with different source clips.
Real-time Chroma Keying SpeedEDIT allows you to key out selected clip colors in real-time. This means you can see the results without the need to render first. To illustrate, go to File > Open and open \QuickStart\Projects\Proj-08-Keying.vtp. Let’s Goto 01:33:04 in the project where we have a NewTek logo as our base image. In the Timeline view underneath NewTek BG-B.jpg, let’s add the clip \QuickStart\Footage\Overlays\HandShake.m2t.
Color Correction Selective Color Correction In addition to keying out color (chroma keys) or brightness (luma keys) SpeedEDIT allows a very sophisticated means of changing up to four color regions within any clip. To examine this powerful feature, expand the control for Color Correction (Selective). Expanding this control reveals adjustments for masking, notably the Luma mask. Beneath that, Aux 1, Aux 2 and Aux 3 offer the same controls, with the ability to apply each to its own color.
Once the color is selected, check the Chroma Mask box under Main to activate, and now adjust the Hue control to something orange, say a value around 580.0. If this just changes the color within the bottle’s highlight, this can be adjusted by raising key tolerance to a value of about 75.0 Keep in mind that this can now be repeated on differing color regions in the clip by performing the same steps in Aux 1 through 3.
Tool Shed presets can be applied globally across any number of selected clips. The greatest flexibility, however, comes in the option of User Splines. (You can read more about splines on page 144 of the User manual). The User Splines window is empty, since we have not created any, so let’s begin by clicking on the User Splines selection in the left column. We can now highlight a clip in our project, and remember its attributes for re-use.
Tool Shed makes the process of fast-paced highlights, cutting to narration and more quite easy with the use of clip markers. Begin with a new project and load in a fast-paced music clip. If you don’t have one on the drive, you can use \QuickStart\Footage\Audio\30_HeyOh.wav. Double-click the file in the timeline, and as the music plays, tap the ‘m’ key to the beat of the music. Every time you tap m, a clip marker is placed on the file. Drag in the video clips you wish to use for your highlights.
Additional Resources NewTek Online Community Again, to learn more about any feature within SpeedEDIT, consult the online User Manual in the SpeedEDIT Documentation folder. If you have questions, or wish to discuss techniques you can join NewTek’s vibrant video production community on the online forums at http://www.newtek.com/forums/ NewTek FAQ NewTek also offers an online FAQ to quickly find answers of frequently asked questions, which is available at http://www.newtek.