
Installation Guide

U
8
SPC Indoor Flooring Installation Guide / v20220213US
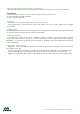
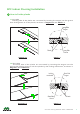
2.7 Use the remainder of the cut plank
that used to nish the rst row to be
the first piece of the second row, as
shown in
Diagram 2-7
.
=GRR
2GYZ6RGTQ
8OVKJVOKIKULZNKRGYZVRGTQ
9[H,RUUX
Diagram 2-7
2.8 Finish the second and the third
row's plank following
Step 2-4
to
Step 2-7
, as shown in
Diagram 2-8
.
9ZGMMKXKJ0UOTZ=OJZN
SSSOT
6RGTQY
Diagram 2-8
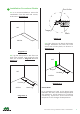
2.9 Pull out the floor panel then
put the 1/4" (6mm) thickness
wedges along the wall, as shown in
Diagram 2-9
.
=GRR
9[H,RUUX
6RGTQY
=KJMK
6[RR5[Z
Diagram 2-9
2.10 Push the floor panel against
the wall, as shown in
Diagram 2-10
.
Then continue the installation for the
remainder.
6[YN
Diagram 2-10
Please Note:
It is necessary to have a 1/4" (6mm) gap
between the wall, other xed objects and
the planks to avoid warping or buckling
caused by expansion and contraction
response to the change of temperature.