
User manual


5
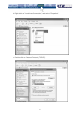
d. Click “Advanced…” , then click “Add…” to add up the IP address of
“192.168.1.124
”, and the Subnet mask of “255.255.255.0”.
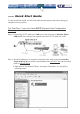
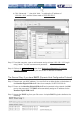
Step 3. From that computer, open a web browser and go to https://192.168.1.123
. Login
using "admin" for both username and password.
Step 4. Click on the Admin/Setup button then Network configuration (IP address,
netmask, gateway). From here you can set the IP address as needed.
The Second Way: If you have DHCP (Dynamic Host Configuration Protocol)
Step 1. Please have your MAC address. You can find it on a white sticker on the bottom of
the NewStar Digital KVM via IP. Here is an example, 00-0E-C5-00-08-1A.
Step 2. Power on the NewStar Digital KVM via IP and connected to the network via LAN
port on the rear panel. The DHCP will automatically assign an IP address for the
NewStar Digital KVM via IP.
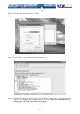
Step 3. Access the DHCP log from your file server. A simple DHCP log looks similar to the
following: