
User manual


25
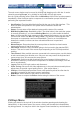
Pressing the Advanced button will open the Advanced Video Tuning menu. While the
vast majority of users will not need to adjust these settings, it offers a high-degree of
control of the video settings of your VNC sessions. See Appendix B for more information
on this feature.
Sampling Phase does not normally need to be used since our system tunes the sampling
phase whenever the video mode changes. This button does not require a test pattern, but
will perform optimally when used with our standard test pattern. For your reference, the
sampling phase number is shown to the right of the Filtering button.
Noise Filter controls the advanced video filtering of our system. Unlike other filtering
algorithms, our noise filter will only remove noise. It does not degrade the signal quality or
readability of small text. You may turn it on and off using the indicated button, or set it to
other values using the arrows. Higher numbers cause more filtering and may cause
artifacts when moving windows. The most common visual artifact is a vertical line dropping
when moving windows horizontally. You may use the Redraw button to correct these, or
use a lower filter number. At minimum, these values must be greater than two.
----- Accessing KVM Features
Once you can access and configure the networking component of the NewStar Digital
KVM via IP, you can use it to select and control the managed computers connected to it.
This section describes how to add additional KVM switches to the master unit for greater
flexibility, and how to use the on-screen display (OSD) system to manage your computers.
Once you have established a VNC session with the NewStar Digital KVM via IP, you can
access the KVM features as though you were at a local console.
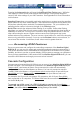
Cascade Configuration
You can connect a second level of KVMs to one or more of your NewStar Digital KVM via
IP’s PC 1~8 ports. The KVM switches connected to the NewStar Digital KVM via IP (the
“Master switch
”) are known as Slaves. Once connected, the units will automatically
configure themselves as either Masters or Slaves. You can only connect an equal or
“smaller” KVM to the Master: a 16-port Master switch
can have both 16-port and 8-port
slave KVMs
, an 8 port Master switch can have 8-port and 4-port Slaves, and so on.
For example, the 16-port unit can support 136 computers, with 8 16-port Slave KVMs
,
each connected to 16 computers. The Slave KVMs
must be connected to the PC 1~8 ports,
not the PC A~H ports.
To cascade your KVMs, use a 3-in-1 PS/2 KVM cable to connect one of your Master
switch’s PC 1-8 ports to the Slave KVM’s console port. When turning on your cascaded
switches, turn on the Master switch
before turning on any of the others.