, 8 & 16 PORT DIGITAL IP KVM SWITCH User Manual NS-1105IPEXT NS-841HDI NS-1641HDI www.newstar.
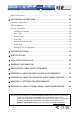
Table of Content INTRODUCTION .............................................................................................. 2 FEATURES....................................................................................................... 2 BEFORE YOU BEGIN...................................................................................... 2 Package Contents.......................................................................................................... 2 Required Cables and Hardware ......
Video Tuning Menu...................................................................................................... 24 ACCESSING KVM FEATURES ..................................................................... 25 Cascade Configuration ................................................................................................ 25 OSD Operations........................................................................................................... 26 Hot Key Commands...........................
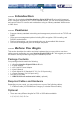
----- Introduction Thank you for purchasing NewStar NewStar Digital KVM via IP series with integrated KVM. Using the Internet or your TCP/IP enabled network, you can now remotely monitor and control critical PC servers and workstations using an industry-standard Web browser or VNC client.
----- Quick Start Guide For this Quick Start Guide, we offer three different easy step-by-step ways, letting you setup this unit very quickly. The First Way : If you don’t have DHCP (Dynamic Host Configuration Protocol) Step 1. Connect the CAT-5 cable to the LAN port on the rear panel of NewStar Digital KVM via IP. And, connects the opposite end of the CAT-5 cable to the hub. Step 2.
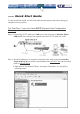
b. Right click on "Local Area Connection", and select "Properties" . c. Double click on "Internet Protocol (TCP/IP)".
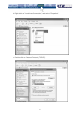
d. Click “Advanced…” , then click “Add…” to add up the IP address of “192.168.1.124”, and the Subnet mask of “255.255.255.0”. Step 3. From that computer, open a web browser and go to https://192.168.1.123. Login using "admin" for both username and password. Step 4. Click on the Admin/Setup button then Network configuration (IP address, netmask, gateway). From here you can set the IP address as needed. The Second Way: If you have DHCP (Dynamic Host Configuration Protocol) Step 1.
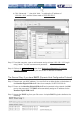
Step 4. From the above DHCP log, you can easily find the DHCP assigned an IP to the NewStar Digital KVM via IP, 192.168.22.4. Once you have located this IP address, do NOT power off the NewStar Digital KVM via IP or your DHCP server since it might lease a different IP address. Step 5. Simply open a web browser and type https://192.168.22.4 to access your NewStar Digital KVM via IP. Login using “admin” for both username and password. The Third Way: Using the HyperTerminal via Serial Port Step 1.
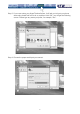
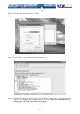
Step 3. If you never setup your HyperTerminal before, it will ask you to input your phone area code, please feel free to do so, and then click “OK”, you will get the following screen. Please type any name you prefer, for example, “abc”. Step 4. Choose the proper serial port you connect.
Step 5. Change “Bits per second” to 115200. Step 6. Press “Enter”, you will get the following screen. Step 7. Follow the instruction on the screen. For example, simply type “I” for setting your IP, type “M” for changing the machine name, and so on. Here is a reminder for you, please type “W” after you made any change.
----- Installing the NewStar Digital KVM via IP DC 12V (Power) Serial VGA Out LAN Keybd/Mouse Managed Computer (Non-Cascadable) Managed Computer (Cascadable) NOTE: The instructions here and elsewhere in the manual refer to port designations of the NS1641HDI, the 16-port version of the NewStar Digital KVM via IP.
NOTE: You can choose to mix managed computers connected via PS/2 and USB connections as necessary with no impact on features or functionality. NOTE: Steps 5 and 6 are necessary only if you wish to have the ability to manage the KVM and its computers locally (i.e. not over the Internet or LAN). While not required, adding these devices is highly recommended for ease of administration. NOTE: The KVM also has the ability to “cascade” multiple KVMs to increase the total number of possible managed computers.
unit is powered on and connected to the network via LAN port on the rear panel, it will automatically attempt to lease an IP address using DHCP. Before you can begin the configuration process, you will need to access the DHCP log from your file server or other device that acts as the DHCP server on the network.
Connection speed: 115200 bps No. of bits: 8 Parity: None Stop bits: 1 Flow Control: None ----- Configuring the KVM for Your Network NOTE: As firmware for this product evolves, some of the menu options may change and therefore these screenshots and instructions may differ slightly from the options displayed on your screen. Using the LAN Port The LAN port of the NewStar Digital KVM via IP has a default IP address of 192.168.1.123 and a netmask of 255.255.255.0.
The Home Screen The Home screen serves two functions. First, it is a place to check the status of the unit, view essential system information, and capture screen shots from the managed computers. Second, it is where you can start the integrated Java VNC client to interact with the managed computers by clicking on the large screen shot or choosing one of the VNC client links.
Commit Network Changes Clicking the Commit button applies any changes made on the page to the configuration, but leaves the old settings active until the next time the unit restarts. Clicking Make changes effective now applies the changes and restarts the unit so the new settings take effect immediately. User accounts: add, delete and change passwords This menu will allow you to add accounts other than admin to the system.
Setup compatibility with host system, external power bar. This menu allows you to configure the unit for use with products such as the Serial Control Power Switch and locale-specific items such as a nonEnglish keyboard. When the 8-outlet Serial Power Console Switch is selected as the external power bar, additional menu choices will appear on the main page of the Web interface. Port numbers to be used for different services. Takes you to the Ports menu (see below). Debug network setup values and routing.
given at the RADIUS prompt, the system will use “name”; check the password locally, and skip RADIUS authentication. Delete all local accounts to avoid this behavior. When connecting via VNC, a login screen is generated that asks for a RADIUS username and password. Additional RADIUS challenges may be demanded depending on the RADIUS server in use. This allows operation with hardware tokens and other advanced authentication devices. External Serial consoles setup and control.
If you have multiple units to upgrade, you may choose the Get latest version button that will not attempt to upgrade the unit directly, but will instead fetch the required file. This file can be uploaded to multiple units manually. You may also choose Reboot Myself at the bottom of the screen to restart the unit without powering on and off. Manual Upload Enter the name of the firmware file that you received from NewStar into the field provided (or use the Browse... button).
to use the settings the next time the unit restarts. To force the unit to restart immediately, click Restart Servers. Help! Menu Provides a FAQ (Frequently Asked Questions) listing to assist you with the features and operation of the NewStar Digital KVM via IP. Copyright Menu Provides the Terms of Use and other information related to the firmware and software on the unit. Site map Menu This menu provides a hyperlinked directory of each setting available on the Web configurator.
This program has a simple menu-based interface. Type the one letter command and press Enter. You will be prompted for the required values. NOTE: y Using DHCP is mutually exclusive to using static IP addresses and routing. y You must save your changes using the “W” command. This applies the new values and saves them permanently. y The master administration password may be changed from this interface (press “S”). The default password is “admin”.
connection is a standard SSL (Secure Socket Layer) encrypted link that encrypts all data from the session, including the actual video pictures. Because Java is considered a “safe” programming language, the Java VNC client has some limitations. Certain special keystrokes cannot be sent, such as Scroll Lock on the keyboard. This client software requires the use of Java 2 (JRE 1.4) to enable features like wheel mouse support. Sun Microsystems’s Java site, www.java.
----- Using the VNC Menu One of the unique features of this product is the VNC menu system. Whenever you see a window with a dark blue background and grey edges, this window has been inserted into the VNC datastream so that it is effectively laid over the existing video. These menus allow you to control the many features of the KVM without using the Web interface or a custom client. The commands you send through this interface (i.e.
PS/2 Reset: Resets the PS/2 keyboard and mouse emulation. Useful to recover failed mouse and/or keyboard connections. ÷4, ÷8: Switches to thumbnail mode, at indicated size. Ctrl-Alt-Del: Sends this key sequence to the host. Works immediately. Alt-F4: Sends the key sequence to host (closes windows). 1~8, A~H: Switches the current view to the specified KVM port. This function works for the master unit only. Use the KVM menu (see below) to access KVM functions on a slaved unit.
The main menu window may be moved by clicking and dragging on the title bar. It can be closed by pressing Escape, or by clicking on the red X in the top right corner. Here is a guide outlining various fields from the Main Menu. Most of the functions operate immediately. Other functions require a response to a confirmation prompt first before performing the requested function. x x x x x x x x x x x x Identification: Fixed text label that is defined by the user in the Web interface.
key at the same time. Alternatively, you may move the mouse outside this window, press the regular key, and then choose -RESET- to release all depressed keys. The VirtKeys menu can be left open while using the host system. You can then click the required button at the suitable time, and still interact with the host in a normal fashion. Examples: y Ctrl - Alt - F4 : Use L-Ctrl then L-Alt in the Toggles area. Then click F4 .
Pressing the Advanced button will open the Advanced Video Tuning menu. While the vast majority of users will not need to adjust these settings, it offers a high-degree of control of the video settings of your VNC sessions. See Appendix B for more information on this feature. Sampling Phase does not normally need to be used since our system tunes the sampling phase whenever the video mode changes.
OSD Operations (For NS431D, NS831D, NS1631D AND IP units only) OSD screen illustration y NS431D / NS831D / NS1631D models offer “F5”, see Function key F5 y NS841HDI and NS1641HDI models do not offer “F5” function By hitting the left Ctrl key twice within two seconds, you may see the 'Hotkey Menu' if it is enabled (an OSD option).
the Enter key to select it. Or, you may press Esc to exit OSD and remove the OSD menu from the display; the status window returns to the display and indicates the currently selected computer or operating status. A triangle mark ( ) to the right of a name indicates the port is cascaded to a Slave; the number at the left of the triangle mark shows the number of ports the Slave has, i.e. 8 for an 8-port Switch.
Auto Scan In this mode, the KVM switch automatically switches from one power-on computer to the next sequentially in a fixed interval. During Auto Scan mode, the OSD displays the name of the selected computer. When Auto Scan detects any keyboard or mouse activity, it suspends the scanning till activity stops; it then resumes with the next computer in sequence. To abort the Auto Scan mode, press the left Ctrl twice, or, press any front button. Scan Type and Scan Rate set the scan pattern.
CH Display Auto Off: After you select a computer, the port number and name of the computer will appear on the screen for 3 seconds then disappear automatically. Always On: The port number and name of a selected computer and/or OSD status displayed on the screen all the time. The non-volatile memory stores the CH Display setting. Position The position of the selected computer and/or OSD status displays on screen during the operation.
Hot Key Commands A hot key command is a short keyboard sequence to select a computer, activate a computer scan, etc. A hot-key sequence starts with two Left Control keystrokes followed by one or two more keystrokes. The short form hot-key menu can be turned on as an OSD function ( F4 : More\Hotkey Menu) every time the left Ctrl key is pressed twice. Left Ctrl refers to the Ctrl key located at the left side of the keyboard.
left Ctrl + left Ctrl + F3 1 The unit switches between scan intervals of 3, 8, 15 and 30 seconds. Keyboard Typematic Rate You can adjust the keyboard typematic rate (given in characters/sec). This setting overrides the keyboard typematic rate of your BIOS and any operating system. left Ctrl + left Ctrl + F4 1 The unit switches between rates of 10, 15, 20 and 30 characters/sec.
----- Troubleshooting If you are experiencing trouble with your devices, first make sure that all cables are connected to their proper ports and are firmly seated. I can’t connect to the NewStar Digital KVM via IP. Check if the network connection is working (ping the IP address of NewStar Digital KVM via IP). If not, check network hardware.
VGA image is not clear. You may be using poor quality VGA cables. Make sure you are using UL-2919 rated, double-shielded VGA cables. The quality of video is bad or the picture is grainy. a. Use the brightness and contrast settings. b. Use the auto adjustment feature to correct a flickering video. c. Read and use the manual section "APPENDIX B: USING THE ADVANCED VIDEO TUNING FEATURE" on page 33. d. Also, try the "Auto everything" button on the “Video Tuning” menu refers to the diagram on page 18. e.
Cannot select a computer connected to a Slave. Make sure that the Slave’s Console port is connected to one of the Master’s PC ports. Only ports PC 1 to PC 8 can be connected to Slaves, even if the Master switch has 16 PC ports. Keyboard strokes are shifted. Press both Shift keys. Certificate warning shown while connecting via HTTPS. It is normal for a warning dialog to be shown when connecting via HTTPS. The SSL certificate we use is created when the unit is first produced.
----- Specifications Maximum supported video mode 1600x1200 @ 85Hz Standard video modes 640x400 @ 85Hz supported 720x400 @ 85Hz 640x480 @ 60Hz 640x480 @ 72Hz 640x480 @ 75Hz 640x480 @ 85Hz 800x600 @ 56Hz 800x600 @ 60Hz 800x600 @ 72Hz 800x600 @ 75Hz 800x600 @ 85Hz 1024x768 @ 60Hz 1024x768 @ 70Hz 1024x768 @ 75Hz 1024x768 @ 85Hz 1152x864 @ 75Hz 1280x960 @ 60Hz 1280x960 @ 85Hz 1280x1024 @ 60Hz 1280x1024 @ 75Hz 1280x1024 @ 85Hz 1600x1200 @ 60Hz 1600x1200 @ 65Hz 1600x1200 @ 70Hz 1600x1200 @ 75Hz 1600x1200 @ 85Hz M
----- Supported Protocols Service Description SSH Secure Shell May be used to securely “tunnel” VNC and HTTP protocols. HTTP Web redirector (to HTTPS) Convenience server to redirect all web traffic to encrypted port. Clear-text HTTP is not supported. SNMP SNMP Agent (UDP) HTTPS SSLTLS Encrypted web control VNC VNC/RFB Protocol Server VNCS SSL-tunneled VNC DHCP Dynamic IP Setup Config DNS Allows integration with existing SNMP network management systems.
----- Warranty Information This product is backed by a one-year warranty. In addition NewStar warrants its products against defects in materials and workmanship for the periods noted, following the initial date of purchase. During this period, the products may be returned for repair, or replacement with equivalent products at our discretion. The warranty covers parts and labor costs only.
Appendix A: About Security Certificate Warnings What is a security certificate? Sites that employ secure TCP/IP (Internet) connections include a certificate that confirms that users are connecting to a legitimate site and are not being redirected without their knowledge. Certificates are issued by trusted third parties called Certificate Authorities (CAs) and contain essential details about a site that must match the information supplied to your Web browser.
Appendix B: Using the Advanced Video Tuning Feature The Advanced Video Tuning menu allows you to adjust the qualities of the video in your VNC sessions, and can be accessed by clicking the Advanced button on the Video Tuning VNC menu. While many users will probably allow the NewStar Digital KVM via IP to automatically configure the video properties, you can use this menu to exercise a great deal of control over the settings if you wish.
Use the Show Diffs button to learn which parts of the screen are being sent over the Internet. When you click this button, the screen is cleared to a medium grey color. All blocks that are sent from that point on will show up on the screen as they are sent. Click the button again to reset the screen to grey. To return to normal operation, click the Regrab button. It is very easy to visually identify the effect of noise on the signal processing using this feature.
Appendix C: Getting Peak Performance Choose the best video mode y We recommend using 60Hz refresh rate and 1024x768 resolution. Using a smaller resolution like this allows you to fit multiple windows on your remote desktop. Higher refresh rates stress the video card's quality and do not provide any additional information or benefit. Noisy video cards y A NewStar Digital KVM works by converting the analog video signals emitted by your video card into digital data.
Appendix D: Using Optional Serial Supervisors Background The NewStar Digital KVM via IP offers a unique way to expand the functionality of the base product. Using R-Port on the rear panel of NewStar Digital KVM via IP, you can add up to 16 Serial Supervisors serial devices using a specialized daisy-chain technology. The NewStar Digital KVM via IP includes integrated control functionality that allows you to monitor and configure the devices with the RS-232 serial port using the interactive Web interface.
able to configure your Serial Supervisor, you must be logged in as admin. Other users will be able to view which devices are active but cannot configure them. Once you are logged in, choose the Admin/Setup option from the menu at the top of the Home screen in the Web interface. Click External Serial consoles setup and control. You will be presented with the Serial Consoles Attached menu, and a table with the following headings: #: You can assign a value (1 ~ 99) to each attached serial device.
Advanced Configuration Using the Integrated SSH Shell In most cases, configuring the NewStar Digital KVM via IP to the same settings as the Serial Supervisor devices you are connecting should allow the devices to work with a minimum amount of configuration. However, you can also change the default settings on each Serial Supervisor device to fit your preferences and the needs of your application. If you click the Connect… button next to the device you want to configure, two new windows will appear.
on the other end of the connection. For Unix systems, the command is: stty –crtscts < /dev/[serial port] y Serial Supervisor devices use a simple RS-485 multidrop network running at 115,200 bps. It is possible that every Serial Supervisor device will not be inputting/outputting data at the same rate at all time. However, since these devices use interactive logins, it is unlikely that all channels would be busy at any one time.