
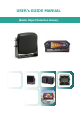
User's Guide

Changing Detection Mode
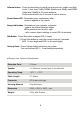
VIII
1) Press both “Dim” and “Vol” to enter hidden menu simultaneously for 3 seconds.
(You can find all LED are flashing at 3 times then power led is blinking.)
2) Press Dim button to select to Mode 1 ~ Mode 3. ( Mode 1, Mode 2 and Mode 3 are available)
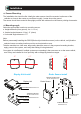
Mode 1 : 3.0 x 5.0 (L) meter (5 zones )
Mode 2 : 4.0 x 6.0 (L) meter (5 zones)
Mode 3 : 6.5 x 9.0 (L) meter (5 zones)
3) Press Vol button to save the required Mode. After 2 seconds, you can find “all led are flashing at 15 times then Power LED on”
(When fail to select the required mode, p
l
ease press Vol button again)
Mode Adjustment.
1) Dim Button : Press Dim button to adjust LED (2 steps) / Press Dim button to verify the current mode for 3 seconds.
(LED 1 is less bright and LED 2 is the most bright)
Dim button for long key ( press it for over 3 seconds), you can verify the saved current mode 1 ~ 3.
2) Volume button : Press Volume button for 3 seconds to switch silence
( 3 Steps)
3) Factory Reset: Press
button before turn on system. You can find that LED 1 ~ 3 are flashing sequentially.
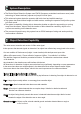
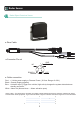
Button Explanation
When led # 1,#3 and #5 turn on, the system has malfunction. Please contact factory.
Factory Default Mode
● Detection mode : Mode 1 (3.0 x 5.0 meter, 5 Detection zones)
● Audio : Max
● LED Bright : Max
Before testing the system, make sure the sensors have a clear field of view.
This is the most important when testing indoors because the system may detect walls, posts, etc.
Verify the green LED on the display is illuminated and the system indicates .
NO objects are detected. (Indicator LEDs are
off).
9
When led #2 and #5 turn on, communication has error.
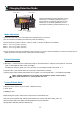
Dimmer button
Power status LED
Volume button
Range indication
(LED #5)
Mode 3
(LED #3)
Mode 1
(LED #1)
◆ LED # 5 is flashing (Furthest Detection zone 5)
◆ LED # 5, & 4 are flashing (Detection zone 4)
◆ LED # 5,4,& 3 are flashing (Detection zone 3)
◆ LED # 5 ~ 2 are flashing (Detection zone 2)
◆ All LEDs are flashing (Closest Detection zone 1)
Volume