
User manual

Page 12
Newer Technology MAXPower RAID eSATA 6G-4e
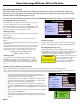
Tasks
The Newer Technology Web Manager has a built-in scheduling system to run background rebuilds, verica-
tions, integrity, and health checks to the attached arrays and drives. To enter the task scheduling systems,
click on “Task” menu item.
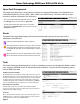
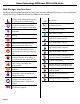
Events
The Newer Technology Web Manager software will automatically log all events that occur on the
MAXPower® controller card.
Indicates general information and occurrences.
Warning of minor occurrences and issues. These include
plugging of devices into the card and minor issues such
as inconsistent data that can be easily xed by a verify or
rebuild.
Warns of major occurrences and problems such as failed
drives and improper disconnections of drives and arrays.
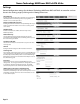
Health Inspector Scheduler
The Health Inspector Scheduler is always visible in the Task screen of
the Web Manager to check drive temperatures, bad sector counts, and
any other errors that may be reaching critical levels. If any problems
are found, a warning event will be created and logged. If you have
set SMTP settings for email notication of warnings in the “Settings”
section of the Web Manager, you will receive an email notication.
New Verify Task Scheduler
The New Task Scheduler is only visible when redundant RAID
arrays are present and is used to schedule times to run background
verications and rebuilds of arrays.
Tasks List
Once a Verify or Health Inspector task is created, it will appear in the
“Tasks List” section. To delete a scheduled task, select the checkbox
next to the task and click on the “Delete” button.
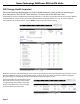
Spare Pool Management
The purpose of a spare pool is to have drives in reserve to instantly take the place of any failed drives in
a redundant RAID array such as a RAID 1, RAID 5, RAID 10, or RAID 50 array. This allows rebuilds to start
instantly in order to minimize the risk of data loss.
To access the Spare Pool Management screen, click on
the “Manage” menu item and select “Spare Pool”.
To add a drive to the Spare Pool, select an available
drive from the “Available Disks” section and click on the
“Add Spare” button.