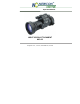
Operation Manual NIGHT VISION ATTACHMENT NVS-33 105 Sparks Ave.
IMPORTANT INFORMATION Read prior to activation. You have purchased a sophisticated electronic device. To operate it properly, please read this manual fully. Ignoring operation procedures described in this manual will void your warranty. Disassemble the unit. Device contains a NEVER source of high voltage, which may be hazardous to your health! Aim active unit towards intense light NEVER sources (i.e. lights, headlamps, campfires, the Sun, the Moon, etc.
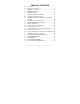
TABLE OF CONTENTS 1.1. 1.2. 2. 3. 4. 5. 5.1. 5.2. 5.3. 6. 6.1. 6.2. 6.3. 6.4. 6.5. 6.6. 6.7. 7. 8. 9. 10. 11. Overview..................................................................4 Key features of NVS-33...........................................5 DESIGN of NVS-33 ................................................6 SPECIFICATIONS ..................................................8 DELIVERY SET....................................................10 INSTALLATION ON A RIFLE ............................
1. BRIEF DESCRIPTION 1.1. Overview NVS-33 is an afocal night vision attachment to a daytime weapon scope designed for precise aiming in darkness. The device is equipped with a high-quality generation 3 electro-optical image intensifier tube that amplifies light in the visible and IR spectrum providing for up to a 400700 m effective observation range at low light.
1.2. Key features of NVS-33 Installation of NVS-33 in front of a day scope on a weapon does not affect the latter’s zeroing and scope’s tactical parameters Exit pupil fits a broad range of daytime scopes Accurate internal focus adjustment mechanism High quality image within the entire field of view Withstands large calibre recoil Optionally supplied with MIL-STD-1913 Weaver / Picatinny mount Mounting adapters fit a vast majority of the daytime riflescopes.
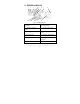
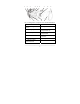
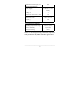
2. DESIGN of NVS-33 1 2 9 10 3 4 5 11 6 7 8 12 Fig.
1 2 3 4 5 6 7 8 9 10 11 12 13 Fig .
3. SPECIFICATIONS Optical Magnification, x Field of view, degrees Daytime scope magnification, x Acceptable Recommended Focus length, mm F-number Focus range Image intensifier tube Type Gain, min Resolution, lp/mm Infrared illuminator (optional) Type Power, mW Illumination angle, degree 1 8.8 1-20 3-12 78 1.5 10 m to infinity N3XT3631IC Gen.
Illumination wavelength, nm Electrical parameters Power supply 805 Voltage, V Continuous work time, h, min 1 CR123 or 1 AA battery 3 60 Mechanical characteristics Dimensions, mm Weight, g 180 x 75 x 60 615 Environmental conditions Operating temperature range Relative humidity Waterproof rating -50ºC to +55ºC Up to 98% IP67 NOTE: As the design is being continuously improved some parameters may differ from those given above.
4. DELIVERY SET - NVS 33 - Objective lens cap - Remote control switch - Operator’s manual - Ocular protective cap - Soft case - CR123 Battery - Additional battery cap for AA battery - Cleaning cloth - Quick release Picatinny mount - Light suppressor - Riflescope mounting adapter NC540.50 1 pc. 1 pc. 1 pc. 1 pc. 1 pc. 1 pc. 1 pc. 1 pc. 1 pc. 1 pc. 1 pc. 1 pc.
Optional accessories: - Hard case - Riflescope mounting adapter NC540.56, NC540.42 - Threaded adapters M48, M52, M54, M55 - M540 converter to convert NVS33 into 2x monocular - IR illuminator (mounted on the sight) (Configuration 2) 1 pc. 1 pc. of each 1 pc. of each 1 pc. of each 1 pc. Exact delivery set depends on particular order.
5. INSTALLATION ON A RIFLE 5.1. Installation with thread usage Your NVS-33 matches to the inner thread M52x0.75 of the objective lens of those daytime riflescopes that can accept daytime filters. If your scope does not match this thread, use mechanical adapters that transform M52 into M54, M55 or M48 threads. M52 adapter is used to increase the depth of the thread in case if the scope objective lens is close to the edge of the scope.
The night vision attachment NVS-33 is ready for use. NVS-33 can be screwed directly into the Newcon 312x50 riflescope. Its design allows such mounting without any additional adapters. To attach NVS-33 in front of NC 3-12x50, proceed as described above without using threaded adapters. Due to different designs of the daytime riflescopes we cannot guarantee that threaded connection is supported in all cases. This design may be not strong enough to hold the night vision attachment during shooting.
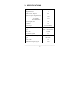
5.2. Installation with a riflescope mounting adapter NC540 Three adapter modifications are available for the NVS-33 night vision attachment to install it in front of daytime riflescopes of different models: Adapter Diameter of the objective lens of the daytime riflescope Plastic inserts set (quantity x thickness) NC540.56 56 mm 1pc.х1mm, 2pc.х2mm NC540.50 50mm 1pc.х1mm, 1pc.х2 mm NC540.42 42 mm 1pc.х1mm, 1pc.
1 4 5 3 6 7 2 Fig. 3 1. 2. 3. 4. 5. 6. 7. NVS-33 night vision attachment Adapter ring Fixing ring with the pin NC540.50 (NC540.56, NC540.
Assemble the adapter and mount the night sight attachment as follows (Fig. 3): 1. 2. 3. It’s necessary to select needed quantity of the plastic inserts (6) for a particular external diameter of the objective lens of the daytime riflescope. The objective lens of the daytime riflescope (7) should fit loose, but without apparent drift into the adapter (4) with the installed inserts (6) and loosen adapter screw (5).
The lens of the daytime scope must be positioned at least 15 mm behind the front edge of the scope body. This excludes mechanical contact of the NVS-33 night sight attachment and daytime scope objective lens. Last digits in the NC540 adapters part numbers correlate with the diameter of the daytime riflescope. For example, to use NVS33 with Swarovski Z6i 2-12x50 scope, you should take the adapter NC540.50.
5.3. Installation on a Picatinny rail The night vision attachment NVS-33 can be installed on a Picatinny rail in front of the daytime riflescope. For this purpose, it has an additional Picatinny rail on the side. Night sight Picatinny rail Fig. 4 The rail adapter is designed to make the night vision attachment profile as low as possible to work together with low-profile scopes.
Quick release rifle rail clamp Fig. 5 Night sight rail clamp with screw Actual height of the adapter must be determined at the moment of ordering of the Picatinny rail adapter. Each rifle and riflescope combination is unique, and it is necessary to know height of the line of sight above the Picatinny mount to produce this part precisely.
Distance between NVS-33 line of sight and daytime riflescope line of sight must not exceed 2 mm. In case of two different rails are used, the angle deviation between two rails must not exceed 2 degrees. Picatinny rail adapter is attached to the scope permanently by means of a small clamp and screw. The other side of the adapter is equipped with quick release clamp, which can be adjusted for width and pressing exertion. It allows almost immediate installation and de-installation of the sight on the rifle.
6. OPERATION INSTRUCTIONS WARNING! Lens cover should be always on when switching on NVS-33 in bright light conditions. Never aim the lens in the directions of bright light 6.1. Battery installation NVS-33 is powered by one standard CR123A battery or 1 AA battery. The type of the used battery is determined by the battery compartment cap. By default, the sight is delivered with CR123 battery compartment cap screwed to the battery compartment. AA battery compartment cap is included into delivery set.
Battery compartment cover Fig. 6 To install batteries unscrew the battery compartment cover insert batteries, observing correct polarity, and screw the cover back on. Your NVS-33 is equipped with the low battery indicator located in the field of view. This indicator starts blinking in red colour when the battery charge is low. Change the battery as soon as possible.
6.2. Testing NVS-33 in the daytime Daytime mode of NVS-33 was designed for testing purposes only. Image may be fuzzy. To test the device in the daylight: 1. Turn switch (5) (Fig.1) into ON position. 2. Direct the device at an object within 10-20 m from the viewer. 3. Turning the focus knob (7) (Fig.1) adjust focus to obtain 4. The sharpest image visible through the eyepiece. Keep the objective lens cover closed during daytime.
6.3. Testing NVS-33 at night To test NVS-33 in darkness: 1. 2. 3. 6.4. Take off the lens cover (9) (Fig.1) Turn on the device using switch (5) (Fig.1) By turning knob (7) (Fig.1) obtain clear image of the object. Testing NVS-33 at night with daytime scope 1. 2. 3. 4. Install NVS-33 (see Chapter 5 “INSTALLATION ON A RIFLE”) Take off the lens cap (9) (Fig.1). Turn on the device using on/off switch (5) (Fig.1). Greenish image must be seen through the daytime scope.
6.5. Operation at night Operation procedure: 1. Check the adjustment of the daytime riflescope (diopter adjustment, parallax adjustment, etc.). 2. Install the battery into the NVS-33 and mount it in front of the daytime riflescope as described above. Being mounted in front of a daytime riflescope, the night vision riflescope attachment NVS-33 keeps all tactical features of a daytime riflescope (zoom level, adjustment step, etc.) intact. 3. 4. 5. Open the objective lens cover (9) (Fig.1).
In order to get the maximum quality of night picture through the daytime riflescope, we recommend using riflescope magnifications from 3 to 12. 6. Aim the rifle to an object and focus the objective of device with the knob (7) (Fig.1) on its top until you get maximum sharpness of the observed picture. Observation and identification range provided by the night vision riflescope attachment NVS-33 depends on the ambient illumination, atmospheric transparency and contrast between the target and background.
7. If necessary, turn on the IR-illuminator (6) (Fig.2) (Special order only). NVS-33 is protected against accidental illuminator switch by the design of the switch handle. Press and rotate the switch (5) (Fig.2) to activate the illuminator. Divergence of IR beam could be changed from 5 to 20 degree by rotating of the IR lens. The sight is not necessarily equipped with the IR illuminator. Your sight configuration is determined by your order.
When mounted in front of the daytime riflescope, night vision attachment NVS-33 can change zeroing as not more than 3 cm at 100 m. This is connected with changes in the weapon balance, light distortions in the image intensifier tube, technological limits of the adjustment of the night riflescope attachment. This imprecision usually appears as fixed value and can be easily compensated by the adjustment mechanism of the daytime riflescope.
6.6. Use in a dark time as a 2x night vision monocular Operation procedure: 1. 2. 3. 4. 5. 6. 7. Screw the optional М-540 optical monocular into the eyepiece of the NVS-33 night vision attachment. Open the objective lens cover (9) (Fig.1). Turn the switch (5) (Fig.1) of the device into ON position. You should see a yellowish-green light through the eyepiece of a daytime riflescope (the device works in passive mode). Choose the object of observation. If necessary, turn on the IR-illuminator (5) (Fig.
6.7. Operation with remote control 1 2 3 4 5 Fig.
The NVS-33 night vision attachment has the capability of operation with the external remote control that turns on and off the device itself and its IR illuminator. Operation procedure: 1. 2. 3. 4. 5. Insert the jack of the remote control into the female connector (2) (Fig.7). Fix the remote control (4) (Fig.7) on the weapon by the fixating band (6) (Fig.7) in the comfortable place on the butt. Press and release the button (3) (Fig.7) to turn the device on. Press and release the button (5) (Fig.
7. STORAGE AND MAINTENANCE WARNING! If NVS-33 has been stored for a long time at temperature lower than -40C (-40F), then prior to using the device must be kept at an ambient temperature of -10C (14F) to +40C (104F) with humidity below 80%. NVS-33 is a sophisticated precise optical instrument equipped with electronics. It should be handled with due care: Unit contains fragile components and sensitive optics. Avoid impacts, dust, moisture and sharp changes of temperature.
Keep away from sources of heat, such as heating appliances, sunlight or central heating. Do not keep the device at temperatures higher than 60oC (140oF). Switch off the unit and remove the batteries during the extended periods of non-operation. Do not apply excessive force or pressure to the lens assembly, this may damage fragile elements and thread connections. Small dark and/or white marks may be seen in the field of view. This does not affect the operational capabilities of the device.
8. TROUBLESHOOTING The scope does not turn on Check whether the batteries are installed properly. Check the charge of the batteries. Replace if they are weak. Do not mix old batteries with new ones. The target does not appear in focus Bring the target to the center of the image. By turning the knob 7 (Fig.1) achieve the clearest target acquisition on the screen. If NVS-33 is used with daytime scope re-focus it. Repeat the focusing of NVS-33 and scope if necessary.
Condensation accumulates on the parts In order to avoid misting of the eyepiece lens at cold use the special protective cover. Black dots on the screen These are some blemishes in the image intensifier, which do not affect the performance or reliability of a night vision device. Blemishes may vary in size and number; they are inherent in the manufacturing process. Most of them are seen in the daytime only and become almost invisible during the night time. 9.
which, on inspection by Newcon, is found to be defective in materials or workmanship. What This Warranty Does Not Cover: NEWCON is not responsible for warranty service should the product fail as a result of improper maintenance, misuse, abuse, improper installation, neglect, damage caused by disasters such as fire, flooding, lightning, improper power supply, or service other than by a NEWCON Authorized Service.
10. CUSTOMER SUPPORT Should you experience any difficulties with your Newcon Optik product, please, consult this manual first. If the problem remains, contact our customer support department at +1(416) 663-6963 or toll free at 1-877-3686666 (North America only). Our operating hours are 9am-5pm, Monday - Friday, Eastern Standard Time. Under no circumstances should the equipment be sent to Newcon without authorisation from our technical support department.
11.
Unit serial number: _____________________________________________ The unit complies with all technical specifications and has passed the inspection.
NEWCON OPTIK 2010 Printed in Canada __________________________________________ 40