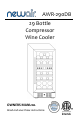
AWR-290DB 29 Bottle Compressor Wine Cooler OWNERS MANUAL Read and save these instructions.
A Name You Can Trust Trust has to be earned and we will earn yours. Customer happiness is the focus of our business. From the factory to the warehouse, from the sales floor to your home, the whole NewAir family promises to provide you with innovative products, exceptional service, and support when you need it the most. Count on NewAir. As a proud NewAir owner, welcome to our family. There are no robots here, real people shipped your product and real people are here to help you.
READ AND SAVE THESE INSTRUCTIONS. TABLE OF CONTENTS Safety Information & Warnings ............................................................................... 4 Parts List ................................................................................................................... 5 Electrical Circuit Diagram .................................................................................... 6 Installation .........................................................................................
SAFETY INFORMATION & WARNING S When using any electrical appliance, basic safety precautions must be followed in order to reduce the risk of fire, electrical shock and/or injury to persons or property. Be sure to read all instructions before using this appliance and observe the following safety tips: Attention: To avoid the risk of child entrapment, do not allow children to operate, play with, or crawl inside the unit.
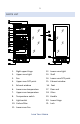
PARTS LIST 1. Right upper Hinge 12. Lower zone Light 2. Upper zone Light 13. Shelf 3. Fan 14. Lower zone NTC point 4. Upper zone NTC point 15. Exhaust window 5. Exhaust window 16. Foot 6. Lower zone temperature 17. Door seal 7. Upper zone temperature 18. Glass 8. Temperature switch 19. Handle 9. Light switch 20. Lower Hinge 10. Carbon filter 21. Lock 11.
ELECTRICAL CIRCUIT D IAGRAM TRANSFORMER PTC HEATER COMPRESSOR θ PLUG θ CONTROL PCB θ θ M M M M DISPLAY PCB SERNSOR1 SERNSOR2 LIGHT FAN1 FAN2 FAN3 FAN4 INSTALLATION Before connec the appliance to a power source, let it stand upright for approximately 2 hours. This will reduce the possibility of a malfun on in the cooling system from handling during transporta on. Before opera ng your wine cooler for the first me, follow these steps: Remove the exterior and interior packing.
OPERATING INSTRUCTIO NS HOW TO USE THE BUTTO NS ON THE DISPLAY PA NEL Raise the desired temperature. * Lower the desired temperature. * * To set the upper zone temperature, press the UP or DOWN button on the control panel. The interior temperature of the upper zone can be adjusted in increments of 1 degree between 40°F and 50°F (5° - 10°C). * To set the lower zone temperature, press the UP or DOWN button on the control panel.
CLEANING & MAINTENAN CE CLEANING YOUR COOL ER To clean your cooler: Unplug the cooler and remove anything inside. Wash the inside of the unit with a solution made of warm water and baking soda solution (2 tablespoons of baking soda to one quart of water). Unscrew the water reservoir at the bottom of the unit and rinse with water. To clean the outside of the unit, use a mild detergent and warm water. MOVING YOUR COOLER To move your cooler: Remove anything stored inside.
HOW LONG SHOULD I ST ORE MY WINE ? While most wines today are meant to be drunk “young” (within a few years of production) some fine wines are best served by proper aging. But aging too long can decrease the flavor of the wine. Generally speaking, red wines can age longer than white wines, but here is a storage guide for some popular vintages. Cabernet Sauvignon ....................... Pinot Noir ....................................... Merlot ............................................ Zinfandel .......
TROUBLESHOOTING Problem Wine cellar does not operate. Wine cellar is not cold enough. The light does not work. The cooler vibrates while operating. The cooler produces a lot of noise. Possible Causes The unit may be plugged in using a different voltage. The circuit breaker may be tripped or there is a blown fuse. The external environment may require a higher setting. The door may be opened too frequently. The door is not closed completely. The door seal does not seal properly.
Problem Possible Causes The door is not properly installed. The seal is weak. The shelves are out of position. The LED display does not work. There is an LED display error, or the LED displays “LO”. The buttons do not function. There may be a problem with the main control board. There is a problem with the plug. The cooling kit is no longer working properly. The PC Board is faulty. The temperature control panel may be damaged.
LIMITED MANUFACTURER ’S WARRANTY This appliance is covered by a limited manufacturer’s warranty. For one year from the original date of purchase, the manufacturer will repair or replace any parts of this appliance that prove to be defective in materials and workmanship, provided the appliance has been used under normal operating conditions as intended by the manufacturer.