
- Buck Stoves Owner's Manual VENT-FREE FP-BR-10-ZC


This list of specific instructions will help you make certain that
every installation operation is performed correctly. Complete the
installation steps in the sequence shown. STATE AND LOCAL
BUILDING CODES SHOULD BE CONSULTED IN ALL
CASES AS TO THE PARTICULAR REQUIREMENTS
CONCERNING THE INSTALLATION OF A FACTORY
BUILT FIREPLACES. Select the location for the fireplace by
taking into consideration the factors previously outlined in the
“Choosing the Location.” See page 5.
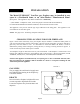
Framing the Firebox
The width of the framed opening must be 26 1/8". The height of
the framed opening must be 25 1/8". The entire fireplace can be
elevated above the floor to achieve a raised hearth effect. This can
be done by adding a small platform to achieve the desired height.
NOTE: The wiring for the lower blower must be installed during
the framing stage. The nailing flanges on both sides were designed
to allow the installation of 1/2" wallboard or plywood flush with
the face of the fireplace.
When the framing is inside, the outside wall will be insulated. If
the framing or chase is outside, thin insulation should be used in the
framing on the back, sides, and top. The bottom should be
insulated with a hard insulating board. This will prevent cold from
going into the chase through the fireplace to the living space.
Install the Firebox
Install the firebox into the framed opening by placing it directly in
front of the opening and sliding it into the proper position.
Level the Firebox
Check the level of the firebox on the top edge of the fireplace face.
Shim if necessary.
Secure the Firebox
Secure the fireplace to the framing. The nailing flanges on the
firebox will make securing the firebox to the frame quick and easy.
Use appropriate size nails or screws to secure the firebox.
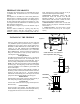
FIREPLACE CLEARANCES
The fireplace may be placed directly on a combustible floor, against
a combustible wall at marked clear-ances, or on a raised wooden
platform.
If the fireplace is to be installed on a raised wooden platform, the
platform must be a continuous level surface. The fireplace must be
secured in place so it cannot shift positions. The nailing flanges on
the sides of the firebox make securing it to the framing easy. They
were designed to allow the installation of 1/2" wallboard or plywood
flush with the face of the fireplace.
Only the header (see Figure 2) may rest on the stand-offs on top of
the firebox.
When the firebox is installed over carpeting, (vinyl) tile,or any
combustible material other than wood flooring, it must be
installed on a metal or wood panel extending its full
width and
depth. Alternatively, the carpeting, (vinyl) tile, etc. may be
removed beneath the fireplace before installing.
COMBUSTIBLE MATERIALS MUST NOT BE
INSTALLED OVER OR TOUCH ANY BLACK
PAINTED SURFACE. DO NOT BLOCK HEAT
CIRCULATING AIR OUTLETS. DOING SO MAY
RESULT IN POTENTIAL FIRE HAZARDS.
1. Sidewall Clearances: Clearances from the side of the
fireplace opening to any adjacent combustible wall should
not be less than 7".
2. Ceiling Clearances: The ceiling height should
not be less than 42" from the top of the fireplace
opening.
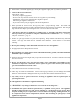
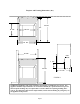
INSTALLING THE FIREBOX
26-1/8"
7" *
17-3/4"
1/2"
13-1/2"
25-1/8"
26-1/8"
FRONT
VIEW
SIDE
VIEW
TOP
VIEW
Figure 3
HEADER
FRAMING
13-1/2"
25-1/8"
* Note: Minimum 1/2" clearance
NOT required at this point
Page 8