NTI R 1275 Danner Dr Tel:330-562-7070 NETWORK TECHNOLOGIES Aurora, OH 44202 Fax:330-562-1999 www.networktechinc.
TRADEMARK XTENDEX is a trademark of Network Technologies Inc in the U.S. and other countries. COPYRIGHT Copyright © 2006 by Network Technologies Inc. All rights reserved. No part of this publication may be reproduced, stored in a retrieval system, or transmitted, in any form or by any means, electronic, mechanical, photocopying, recording, or otherwise, without the prior written consent of Network Technologies Inc, 1275 Danner Drive, Aurora, Ohio 44202.
TABLE OF CONTENTS Introduction...................................................................................................................................................................... 1 Materials .......................................................................................................................................................................... 1 Features and Functions............................................................................................................
NTI XTENDEX Wall Mount Extenders INTRODUCTION The XTENDEX Series Wall Mount VGA Video and Stereo Audio Extender (XTENDEX) is designed to enable the VGA video and stereo audio signals from one CPU to be viewed and heard by two users, one local and one remote. The remote user can be located as much as 500 feet away via Category 5 unshielded twisted-pair cable. The local user will be located near the CPU.
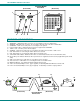
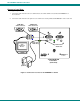
NTI XTENDEX Wall Mount Extenders ST-C5VA-WL500 Local Unit (Front View) 1 (Rear View) 2 VIDEO OUT VIDEO IN 15 AUDIO IN AUDIO OUT NTI 12VDC 1A R XTENDEX TM VA www.nti1.com 3 Local Unit 4 5 6 7 FEATURES AND FUNCTIONS 1. 2. 3. 4. 5. 6. 7. 8. 9. 10. 11. 12. 13. 14. 15. VIDEO OUT- 15HD female video connector- for connecting the local user's VGA monitor VIDEO IN- 15HD male video connector- for connecting to the video port on the CPU or KVM switch AUDIO OUT- 3.
NTI XTENDEX Wall Mount Extenders LIMITATIONS • Hot-plugging of devices is supported provided devices were originally connected at power-up. • The audio input of the XTENDEX is compatible with the following standard CPU audio outputs: • • • • Line out - typically lime green in color Speaker out- typically orange in color Headphone out- typically located on the CD-ROM The audio output of the XTENDEX is compatible with self-powered stereo speakers.
NTI XTENDEX Wall Mount Extenders INSTALLATION Installing The Local Unit Connect The CAT5 Cable A CAT5 cable with an RJ45 connector wired straight through (see specification on page 10) should extend from a UL Listed 2 gang electrical box at least far enough to make connection to the RJ45 connector on the back of the Local Unit (see Fig. 1). The outlet box must be at least 2 inches deep. 1. Connect the CAT5 cable to the Local Unit. When properly inserted the cable end should snap into place.
NTI XTENDEX Wall Mount Extenders Connect the CPU 1. Connect the VEXT-6 video cable (provided) to the male 15HD connector on the Local Unit labeled "VIDEO IN". Connect the other end of the cable to the video port on the CPU (see Fig. 2). 2. Connect the SA-6-MM audio cable (provided) between the connector on the Local Unit labeled "AUDIO IN" and the audio output jack on the CPU marked "line out", "spkr", or "headphones" (see Fig. 2). Notes: If all 3 jacks are available, use the jack marked "line out".
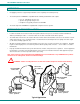
NTI XTENDEX Wall Mount Extenders Connect a Local User (Optional) 1. Connect the cable from the local user's VGA monitor to the female 15HD connector labeled "VIDEO OUT" on the Local Unit. 2. Connect the cable from the local speakers to the 3.5mm stereo audio jack labeled "AUDIO OUT" on the Local Unit. 15HD Male Video Connector 15HD Female Video Connector VIDEO OUT VIDEO IN AUDIO IN AUDIO OUT VGA Multi-Scan Monitor 3.5mm Stereo Audio Plug 3.
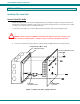
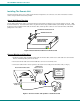
NTI XTENDEX Wall Mount Extenders Installing The Remote Unit The Remote Unit can either set on a desk near the monitor and speakers to be connected, or it can be mounted to a vertical surface using the wall mount brackets provided. Attach Wall Mount Brackets The two wall mount brackets can be secured to the Remote Unit using the four #4-40 x 1/4" screws provided (see Fig. 4). With the brackets attached, mount the Remote Unit to any desired surface using suitable hardware (not included).
NTI XTENDEX Wall Mount Extenders Connect the CAT5 cable Make sure the CAT5 cable has been installed in accordance with the “Preparation for Installation” instructions on page 3. Connect the CAT5 cable to the “Cat 5” port on the Remote Unit (see Fig. 6). When properly inserted the CAT5 cable end should snap into place. Front View of Remote Unit ! Green Power LED WARNING: Never connect the XTENDEX to an Ethernet card, Ethernet router, hub or switch or other Ethernet RJ45 connector of an Ethernet device.
NTI XTENDEX Wall Mount Extenders VIDEO QUALITY Automatic Video Quality Adjustment Video quality adjustment is done automatically to assure the image is as clear as possible. Note: When the cable is longer than 300 feet some colored lines can be seen at the black-to-white transitions. This is a normal behavior and is caused by the different twisting rates of each pair of wires in the CAT5 cable.
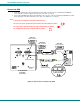
NTI XTENDEX Wall Mount Extenders INTERCONNECTION CABLE WIRING METHOD The CAT5 connection cable between the remote and local is terminated with RJ45 connectors and must be wired according to the EIA/TIA 568 B industry standard. Wiring is as per the table and drawing below.
NTI XTENDEX Wall Mount Extenders Problem Cause Solution Video Picture is not sharp or is smeared • • • • • The picture on the monitor is black and white, rather than color A constant vertical wobble appears down the screen Monitor sometimes loses sync, causing it to go blank for a second or two Image is not displayed properly, lacks definition No audio All Video Cables are not firmly seated. CAT5 cable is too long. The CAT5 cable is not properly connected.