
User's Manual


NTI RACKMUX Console Drawer with UNIMUX Switch
16
Language Selection
NOTE: The LANGUAGE SELECTION option will only be accessible if the administrator is logged in.
To enter the Select Language menu press <L> from the Change
Settings menu described on page 14.
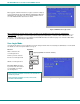
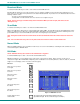
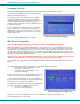
The Language Selection menu enables the user to manually
configure the UNIMUX to emulate a specific international Sun
keyboard regardless of what actual keyboard is connected. This
is recommended when the CPU needs the layout code (i.e. a
SUN CPU) and the keyboard doesn't have an explicit layout code
(i.e. Windows keyboards).
To choose a language, scroll through the menu (using either the
mouse or up/down arrows) and when the desired language is
highlighted press <Enter> on the main keyboard. The selected
language will be highlighted in red. Press <Esc> to return to the
Change Settings menu.
Figure 16- Select the keyboard language
For more on International Sun keyboards, see page 24.
MAC Ports Configuration
NOTE: The CONFIGURE MAC PORTS option will only be accessible if the administrator is logged in.
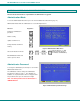
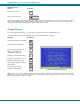
MAC Ports Configuration menu enables the administrator to select specific ports to be connected to MAC CPUs for passing
mouse information to the MAC CPUs. This is useful when the user wants to use mouse drivers provided by the mouse vendor,
which allows the use of programmable functions for each button. Ports should be configured at installation time or whenever
necessary. After setting, the configuration is stored in non-volatile memory and will be retrieved whenever the switch is power
ON. When the port is connected to a Windows or SUN CPU, this configuration SHOULD BE DISABLED. By default, all ports are
configured as non-MAC CPUs (Windows and SUN).
NOTE: If a port is configured as connected to a non-MAC CPU, but is in fact connected to a MAC CPU, the mouse will
still work as a generic mouse. No special functions provided by software drivers will be available.
To enter the MAC Ports Configuration menu, the administrator must press <M> from the Change Settings menu, described on
page 14.
A check list with all the ports numbers preceded by a check-box will be displayed in the window.
• unchecked box = the corresponding port is set as
connected to a non-MAC CPU
• checked box = the corresponding port is set as
connected to a MAC CPU
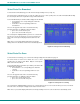
In order to change the status of a port, the administrator has to first
select the port. The selected port is highlighted with a green bar.
To select another port, the administrator can use the arrow keys or
mouse movement. The name of the selected port is displayed at the
bottom left of the menu, right above the yellow bar.
The administrator can toggle the state of the selected check box by
pressing the <Spacebar> or clicking the left mouse button.
• Press <S> to check all the ports
• Press <C> to uncheck all the ports
Figure 17- Configure Ports for MAC screen
When <Esc> is pressed, the display will return to the Change Settings menu. The list is automatically saved.
The settings apply to all users of the switch.