LSQ-40L LABEL PRINTING SCALE QUICK START MANUAL REV 1.
INDEX Before you begin……………………………………………………………2 Cleaning the scale Requirements for using a computer to program Setting up scale for first use………………………………………………..4 Testing printer Printing your first label……………………………………………………..5 Setting up the network……………………………………………………..6 Connecting the devices Installing the software Configuring you computer Configuring your scale(s)…………………………………………………..
BEFORE YOU BEGIN Please read this section carefully. The following has some important safeguards to prevent damage or failure of your scale. CLEANING THE SCALE: 1). You may use stainless cleaner or mild soap to wipe down the metal areas of the scale. The keyboards and display should be wiped down with a damp cloth only. While the keyboards and display are reasonably sealed, do not allow liquids to get between the plastic surfaces and the metal. 2). Use only the supplied cleaning kit to clean the print head.
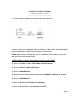
Network Adapter with category 5 cables The picture above shows an example of a 5 port hub. One computer and up to 4 scales can be connected for programming. NOTE: It is not necessary to have a computer to program your scale. Programming can be done by using the keyboard on the scale. However, it is much easier to program using a computer especially if you have more than one scale. A few other advantages of using a computer are: 1). Information can be saved to your hard drive or other backup device. 2).
SETTING UP THE SCALE FOR FIRST TIME 1). Carefully unpack scale from its box. Lift the indicators arm all the way up until it stops. Adjust the correct angle of the indicator by loosening the black nut on the arm next to the indicator. Move the indicator to the correct angle and then tighten the nut. DO NOT over tighten. 2). Plug in the ac adapter to the wall socket and the other end into the scale. The connector may appear tight on a new scale.
TO PRINT A LABEL (continued): 1). Place a product on the platter. Enter in the price. Press PRINT. A label should dispense with printed information such as weight, date, total sale, etc. NOTE: The printer will not print a label if no price is entered, no weight is on the platter or negative weight is displayed on the indicator. Repeat steps on page 5 if no label comes out. **CONGRADULATIONS!!** You have just printed your first label.
SETTING UP THE NETWORK (Skip this part if not using a computer) ____________________________ 1). Connect up the equipment as shown in the drawing below. 2). Place the Scalenet (LSQ-40L) software CD in your drive. The auto install should begin automatically. Complete the installation as instructed. NOTE: This software is intended to run on a Windows XP operating system with SP2 (Service Pack 2) installed only. CONFIGURING YOUR NETWORK ON YOUR COMPUTER: 1). Click on START, and then NETWORK CONNECTIONS. 2).
NOTE: If you are already using a network connection for another application, you may want to create a new connection and configure it for scale communications. CONFIGURING YOUR NETWORK ON THE SCALE: The scales network IP address should already be configured from the factory. If you want to check it or if you are using more than one scale, follow the procedure below. TO SEE/CHANGE SCALES IP ADDRESS: 1). If the scale is on, turn it off. 2). Turn on the scale.
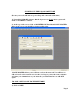
STARTING UP THE LSQ-40L SOFTWARE (Be sure your scale and hub are powered up and connected at this time) 1). Launch the LSQ-40L software. On the logon screen, do not enter a password. Click on ACCEPT to continue. 2). At the top of the screen, click on MAINTENANCE and then SCALE MASTER. Below is the screen you should be viewing at this point. SCALE MASTER allows you to add new scales to the network. You will have to add each scale to the network one at a time.
2). Go to the first IP box and click in it. Enter the first number. Press TAB and enter the second number. Repeat for the last two numbers. 3). Click on SEARCH FOR SCALES. If the network detects the scale, it will ask you ‘Do you want to add scale?’. Click YES. 4). The scales information should appear on the screen. If you have more than one scale, repeat step 1. NOTE: If you get an Enable message, the network did not find the scale.
ADDING PRODUCTS TO THE SCALE: 1). Click on NETWORK, then NET DISTRIBUTION (keep this window open while programming). On the left side of the screen, you can see your scale(s) and a Group1 icon. This is the network tree. You can drag and drop scales into different groups. You can also create/delete groups by right clicking in the tree box. By creating groups, you can program several scales at once with the same information.
Ingredient: Enter number as defined by ingredient table. This table has to be programmed in the Ingredients Master selection (found under MAINTENANCE). MOVING PRODUCTS TO AND FROM SCALE: 1). Click on PLU’S pull down arrow and click on READ. 2). Click on COPY. This should open 2 windows. The left window is what will be uploaded to the scale. The right window is the master products selection. 3). To add a product to the plu list, click on the product the click COPY PLU. 4).
GENERAL CONFIGURATION: This will configure label printing features, and lock/unlock other features, setting up the bar code, etc. Click on CONFIGURATION, then READ. SCROLLING MESSAGE: This message will scroll across your indicator when there are no sales in progress. INGREDIANTS: The number of lines dedicated for ingredient text on the label. HEADLINES: The number of lines of text that appears at the top of the label. Usually your store name, address, etc.
PRINTED TEXT ON LABEL: This allows you to change the text as it appears on the label. An example is if you would like to change Agent and have it print Employee instead. PRINT FORMAT: You can choose a selection of print formats. You can use labels or paper rolls. There are 4 preset formats or you can customize your own label. TO CUSTOMIZE A LABEL: 1). Select a LABEL/PAPER type. 2). Select CUSTOMIZE and then VIEW. 3).
PROGRAMMING USING THE SCALES KEYBOARDS This Section is for programming and editing without the use of a computer. Before you start programming your scale, you should perform startup operations on pages 4 and 5. This will confirm the scale is operating normally and will make programming easier. You can change the settings later if you need to. NOTE: At any time you need to enter PROGRAMMING MODE, please follow steps 1 to 3 on page 4 under QUICK TEST OF THE PRINTER.
NOTE: You can have up to 10 lines printed on the label. It is recommended no more than 2 lines used so all other text can be printed. Too much text will go past the end of the label causing another label to be used. You can correct this by making font sizes smaller, using less text lines, or using longer labels. TO SET AMOUNT OF TEXT LINES TO BE PRINTED: 1). Press ESC until HEADLINES appear. Press ENTER. 2). LINE 1 appears. Press arrow down until # LINES appear. Press ENTER. 3). Press DEL.
CONFIGURATION: This sets up the scales time, date, and prefences of the scale. Extreme care should be used as some features can cause loss of memory or be locked out of programming features. 1). Enter PROGRAMMING MODE. 2). Press the CONFIG button. What you can program in CONFIG: DATE (DDMMYR) Must be in this format. HOUR (HRMM) Must be in 24 hour format.
SETTING UP THE LABEL PRINT: If you are satisfied the way the labels are being printed, you can skip this section. If you are using Safe Handling Labels or want to customize your own label, then proceed to the next step. REMOVING THE BAR CODE: 1). Enter PROGRAMMING MODE. 2). Press PROG FORMAT. 3). Press ENTER when you see FORMAT. 4). Use arrow up/dwn to find LABEL W/ GAP. Press ENTER. 5). Use arrow up/dwn to find CUSTOMIZED. Press ENTER. 6). Press ESC twice. Arrow down to NO BAR CODE. Press ENTER.
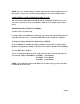
You should see something similar to PCCCCCCWWWWW. This is the bar code layout. Below are the meanings of the letters that make up the bar code. P = PREFIX (start code) W= WEIGHT C= PRODUCT CODE T = TOTAL SALE A = AGENTS# N = QUANTITY OF PRODUCTS X = NULL VARIABLE The prefix code usually starts with 2 or 02. So the first letter(s) will have to be P or PP. Most weighed barcodes look like PCCCCCCTTTTT or PPCCCCCTTTTT. The 13th digit is the end code that is set by the scale.
Below is a list of what you can put on a label. HEADLINE- Store information DESCRIPTION- Product name WEIGHT TEXT- The word WEIGHT WEIGHT – The weight of the product PRICE TEXT- The word PRICE PRICE- The price of the product TOTAL TEXT- The word TOTAL INGREDIENTS- Ingredients BAR CODE- The bar code (usually at the bottom but above add.
9). Arrow up/down to select what text you want placed on the coordinates you selected. Press ENTER. 10). SIZE (1-6) is displayed. Type font size and press ENTER. (1-sm 6-lg) 11). Repeat steps 7 to 9 until all text has been entered. 12). Press ESC to go back to PROGRAMMING MODE. ADDING PLU’S: The list below explains the information needed when adding a new plu.
3). Type in plu# and press ENTER. 4). Press the button on the main keyboard where you want it assigned to. 5). Press ENTER and repeat step 3 an 4 to assign another plu or ESC to go back to PROGRAMMING MODE.
TROUBLESHOOTING PROBLEM Scale will not turn on Too many labels come out CAUSE SOLUTION Power not getting to scale Fuse Blown No power at outlet Twist plug as you are inserting in scale. Replace fuse Plug in at a different outlet Too much text attempting to be printed Remove some of the text that is being printed Make font sizes smaller Clean sensor Bad sensor 19 Contact dealer 2 Label sensor Printout stretched out Poor printing of label Out of paper Defective step gear.
Label roll snapped Scale say unload or help Defective dc motor possible load cell damage Check if too tight coming thru cartridge Defective label roll/replace Replace motor Contact dealer Strange characters on display Corrupted memory Go to config/total reset/reset scales memory (all data will be lost) Scale drifts Vibration or air blowing on platter Relocate scale to hard/quiet area. Quick access keys show only a letter or other character when pressed In ABC mode Press ESC.
Limited Warranty Statement (1) Year Warranty TOR REY ELECTRONICS, INC. “TOR REY” WARRANTS THIS PRODUCT AGAINST DEFECTS IN MATERIALS OR WORKMANSHIP FOR A PERIOD OF ONE YEAR FROM THE DATE OF ORIGINAL PURCHASE. Should any manufacturing defect be discovered within one year from date of purchase, you must deliver the entire product to the TOR REY dealer that sold it or to a TOR REY service center in its original packaging or in packaging affording an equal degree of protection, along with proof of purchase.
Some states do not allow limitations on how long an implied warranty lasts and some states do not allow the exclusion or limitation of incidental or consequential damages, so the above limitation and exclusion may not apply to you. This warranty gives you specific legal rights, and you may also have other rights, which vary from state to state. How to obtain Warranty Service 1. Refer to the troubleshooting guide in you owner’s manual. This list may solve your problem. 2.
Customer Support If the suggestions in the user’s manual and the accompanying documentation do not solve your problem, please call your TOR REY dealer or the TOR REY service center at 1-888-748-3934 for additional support. IMPORTANT: PACKING AND SHIPPING INSTRUCTIONS When you send the product to a TOR REY service center, you should use the original box, and packaging material.