Wireless USB Adapter Version: 2.
Copyright Statement No part of this publication may be reproduced, stored in a retrieval system, or transmitted in any form or by any means, whether electronic, mechanical, photocopying, recording or otherwise without the prior writing of the publisher. Windows 95/98 and Windows 2000 are trademarks of Microsoft Corp. Pentium is trademark of Intel. All copyright is reserved.
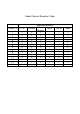
Radio Channel Selection Table Channel_ID U.S.A.
Table of Contents Chapter 1 Introduction 1-1 Package Contents 1-2 Advantages for Using Wireless Network Chapter 2 QUICK START TO WIRELESSS NETWORKING Chapter 3 STEP BY STEP INSTALLATION GUIDE 3-1 Install Wireless USB Adapter Driver 3-2 Install Wireless USB Adapter Utility 3-3 Wireless LAN Monitor Utility 3-4 Remove your Wireless USB Adapter 3-5 Uninstall the Wireless USB Adapter Utility / Driver Chapter 4 APPLICATION 4-1 File Sharing in Microsoft Windows 98.
Chapter 1 Introduction USB (Universal Serial Bus) provides a high-speed link for external devices to connect to a PC, and it has better Plug-and-Play support. Therefore, network adapters based on USB are easier to use than traditional PCI or PCMCIA adapters. With a wireless (IEEE 802.11b/Bluetooth) USB adapter, a desktop or laptop computer can communicate with another computer in a wireless way.
1.1 Package Contents The Wireless USB Adapter kit includes the following items: a. Wireless USB Adapter b. USB Cable c. The CD including: 1. Wireless USB Adapter Utility & Driver software 2. User’s Manual (this document) d. Quick Installation Guide 1.
Chapter 2 Quick Start to Wireless Networking 1. Plug the connector of the USB cable, which has been connected to the USB adapter, into any free USB port on your PC. 2. Windows will automatically detect the USB Adapter as a new device and display the Add New Hardware Wizard dialog box. Click Next to continue. 3. Follow the installation wizard to setup step by step. 4.
10. Click IE Explorer to surf the Internet.
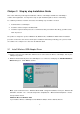
Chatper 3 Step by step Installation Guide This section will lead you through the installation of Wireless USB Adapter and Wireless USB Adapter software in through details. You may wish to skip to quick installation guide to wireless networking. To establish your wireless network connection, the following steps should be executed. 1. Install the Wireless USB Adapter. 2. Install the software using the installation CD. 3. Install the required network protocols to communicate with your network.
from Windows 98 or Me. A message will be prompted as follows, click “Yes” to complete the USB adapter setup. 3. The following dialog box asks how would you like to install the driver. Select the Search for the best driver…option and click Next. 4. Place the Wireless USB Adapter CD-ROM into the CD-ROM drive. Select the “Specify a location” check box and type the following path: E:\Wireless USB Adapter\ Driver (substitute the letter of your CD drive for E if needed). Click Next to continue.
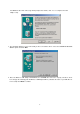
5. The Add New Hardware Wizard finds the correct driver, click Next to proceed. 6. After the Add New Hardware Wizard has completed the installation process, click Finish. The System Settings Change dialog box will appear asking to restart the system. Click Yes to restart.
3.2 Install Wireless USB Adapter Utility 1. Once your system has restarted, select Run from the Start menu. 2. Type “E:\Wireless USB Adapter\Utility\Setup.exe” in the Open box (where E: is your CD-ROM drive) and click OK. 3. Read the Welcome screen and click Next. 4. The next screen will tell you the directory into which the utility will be installed. Accept the default directory or if you wish, enter an alternate location, then click Next to proceed.
5. The Select Program Folder dialog box allows you to accept the default application program folder name or to assign a name of your preference. 6. Once the installation is complete, a dialog box will appear asking if you want to restart the system. Click Finish to accept. 3.3 Wireless LAN Monitor Utility Wireless USB Adapter has its own management software. Users can control all functions provided by the application named Wireless LAN Monitor Utility.
4. Click on “Specify an IP Address” and make sure having the same netid and subnetid of all the connected computers. 3.3.1 Setting l Operating Mode: If you want to connect with Access Point, please set the mode as” Infrastructure”. If you have more stations and just want to set them as local network, please set the Mode as ” Ad Hoc”. l Channel: It shows radio channel numbers that used for networking.
There are three processes once you want to change the parameter in the “Setting”: 1. Click the “Change” button first if you want to change any of the parameter. 2. Choose the parameter you wish to change. 3. After changing the parameter, please click on the “Submit” button to finish. 3.3.2 Statistics The following screen shows various statistics including the Data Packets, Management Packets and Rejected Packets in transmitting and receiving status. You can click the Clear button to reset Statistics Tab.
3.3.3 Site Survey The screen shows all the messages of Access Point around your Wireless USB Adapter device. The messages of Access Point include BSSID, SSID, Signal, the Channel used by AP, and enabled the Encryption AP or not. You can click the Rescan button to find the new AP. You can double-click the BSSID to choose the AP that you want to connect with.
3.3.4 Encryption You may desire an additional measure of security in your wireless network, which can be achieved by using the Encryption function. WEP Key to use: You can choose one of the four Keys you typed (Key1~Key4) as the WEP Key. WEP Mode: If you set the Mode to Optional, your device can communicate with the stations with disabled WEP. Otherwise, if you set Mode to Mandatory, then your device cannot communicate with the stations with disabled WEP.
3.3.5 Advanced The screen shows the advanced setting of the Wireless LAN Monitor Utility, and it includes Preamble Type, Fragmentation Threshold, and RTS / CTS Threshold. We suggest to use the default settings: Preamble Type: Long. Click on Submit button to save all the settings.
3.3.6 Version The screen shows the version of Driver, Firmware, and Application for Wireless USB Adapter Utility / Driver. 3.4 Remove your Wireless USB Adapter If you do not need the wireless connectivity of your Wireless USB Adapter, you can unplug your USB adapter directly, and follow the procedures mentioned below to remove the PC Card from its slot. ! Caution: When removing the Wireless USB Adapter, you will lose your connection to the network.
3.5 Uninstall the Wireless USB Adapter Utility / Driver If you do not need the wireless connectivity of your Wireless USB Adapter, 1. First you should remove the Wireless USB Adapter. 2. To uninstall the Wireless USB Adapter Utility and Driver, you can move to Control Panel ---> Add/Remove Programs---> Wireless USB Adapter , and click “ Add/Remove“.
3. You will be asked if you want to uninstall the Wireless USB Adapter Utility and all of its components. Click “ Yes “ to uninstall or click “ No “ to exit. 4. Now the un-installation is completed. Please click “ OK“.
Chapter 4 Application To enable the sharing of the Internet access, you should set your Wireless USB Adapter mode as “ Infrastructure “ and connect to the access point. When the procedure is completed, an Access Point will appear on the Wireless LAN Neighborhood of Wireless USB Adapter Utility. Double-click it to enter the Network Neighborhood folder. This folder contains the links to all the com puters in your workgroup on the entire network. 4.
If “ Read-Only “ is selected, the other users in the wireless network can only copy files from your folder. Copying files into your folder is not allowed. If “ Full “ is selected, the other users in the wireless network have full access into your folder. They can copy to and from your folder as well as modify files. You can also set the option to “ Depends on Password “ wherein the user in the wireless network can access to your folder through a set password.
4.2 Printer Sharing in Windows 98 In order to the printer can be shared across the network, it has to be set as the network printer. Follow the instructions below to set a printer as a network printer: 1. Click the “ Start “ button, point to the “ Settings “, and then click “ Printers “. 2. In the Printers window, click the printer you want to share. 3.Click “ Sharing… “ on the “ File “ menu. 4. Click the Sharing tab, then click “ Shared As “, and if necessary, enter a password.
4.3 Using the shared folder 1. Double-click the “ Network Neighborhood “ icon, and then double-click the computer where the shared folder is located. 2. Double-click the folder you want to connect to. 3. You may want to assign a drive letter for shared folder that you connect to. 4. In the “ Network Neighborhood “, double-click the computer where the shared folder is located. 5. Click the folder you want to connect, and click “ File “ menu, and then click “ Map Network Drive “. 6.
Chapter 5 Troubleshooting If you encounter some problems installing the Wireless USB Adapter or you want to confirm whether your card is installed properly or not, refer to the procedure below after you have installed the card. 5.1 Check the Various Properties of the Card To verify if the driver has been set in your computer properly, you can follow the procedures below. Right -click “ My Computer “ and then select “ Properties “, then you will enter your system properties.
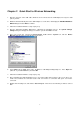
5.2 Microsoft Networking Checklist In order to the Wireless USB Adapter can run properly, some network items must be presented in the Microsoft “ Network Neighborhood “ setup. To check and activate the network setup, right-click the “Network Neighborhood“ and select “Properties”. The following items should be presented in the network setup: 1. Wireless USB Adapter 2. IPX / SPX-compatible Protocol -> Wireless USB Adapter 3. NetBEUI -> Wireless USB Adapter 4. TCP / IP -> Wireless USB Adapter 5.
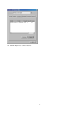
Network Service for Microsoft Networking: Click “ Add “ and select “ Service “. Select “ Microsoft “ as the manufacturer and choose “ File and printer sharing for Microsoft Networks “ for network service; Click “ OK “ to set the network service. 5.3 Others Additional Note for Windows 98 earlier edition If your system is running Windows 98 first edition, you may use one of the following ways to make Wireless LAN Monitor Utility work properly. 1. Copy and replace the file MFC42.