
User's Manual

2
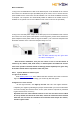
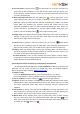
3. Add camera
After login, now click Add New Camera on the page of my camera in the user
control center. In the popup window enter the camera’s ID in the bar Camera ID (This
ID No. is a unique identity of the camera which is marked on the label of camera’s back
panel or package of the camera), then give the camera your favorite name in the bar
Camera Name (allow digits, letters and underline). Click Submit button to finish this
step. Finally, the added camera is displayed in the list of My cameras. (Note: The
camera can be successfully added when the Status indicator on camera’s back panel
stays lit in green.)
4. Plugin installation
Please ensure your computer has contained Java and Flash. If not, please download
them from relative websites or the Download Software page on this website, and install
them.
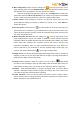
5. View video
In the camera list of My cameras, Sharing with me and the Multi-screen, click an
online camera (the camera with green words and play button) and its video will display.
The multi-screen enables 4 cameras to display at the same time. (Browser: IE7+, Firefox
5.0+, Chrome 13.0+, Safari 3.2+, 360 official 4.0+ etc.. Don’t use compatible mode while
using IE7+.)
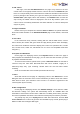
6. Playback and Download
On the page of a displaying camera, click Playback button to shift to the page of
video playback and download. On this page, you can select the time slot when you want
to playback and download video.
To use these two functions, please insert a piece of Micro SD card in the card slot of
camera to keep the video data. Max 32G Micro SD card is enabled, roughly for a
24hours-by-7days duty cycle recording. Smaller Micro SD card will allow shorter
recording.
Clock of recorded video refers to GMT (Greenwich Mean Time).
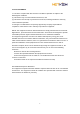
7. Share
Share with friends: On the page of a displaying camera, click Share button. In the
dialog box enter the username of the receiver with whom you want to share this camera.
Click share to finish. (The username of the receiver is a username registered on this
camera system by the receiver.)
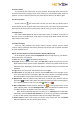
8. WiFi configuration
On the page of a displaying camera, click Camera Settings to enter interface of WiFi
and firmware settings. The system will automatically search for available WiFi and
information of the firmware version. When a WiFi list is enabled, please select your WiFi,
and enter its password and submit. Then follow the actual prompt to finish the procedure.
The prompt may ask you to unplug Ethernet cable after 15seconds, and then wait
for 3-5 minutes for the camera to get online and workable to play. If it fails, please plug in
Ethernet cable and reconfigure WiFi again.