
User's Manual

1
Basic installation
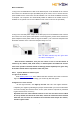
1. Plug in the included Ethernet cable to the Ethernet port on the backside of the camera
and connect it to the Ethernet port (Not WAN port) of the router, so as to access internet.
(Note: DHCP service of the router must be available. You can check the DHCP service by
a computer. The computer can automatically obtain IP address if the DHCP service is
available. If not, please refer to User’s Manual of the router on how to set up DHCP.)
2. Plug in the included power adapter to the DC input port on the backside of the camera
and connect it to an AC power outlet (Before connecting power, please check whether the
power adapter and the power outlet are in good condition.). The camera is well powered if
the Power indicator on the camera’s back panel stays lit in red.
Note: The Status indicator stays lit in green when
the camera is working well.
After the basic installation, now you can choose to use or set the NetVue II
camera by PC, iPhone, iPad, iPod touch, or android phone and tablet PC. Please
refer to the specific instruction below accordingly. Some helpful tips are given only
in the Part I below and not repeated in other two parts.
Part I. Operate NetVue II camera by PC
1. Login to the website
Enter www.mynetvue.com
in the address bar with a browser and come to camera’s
login interface. You are able to manage your camera by this web system.
2. Register for a user account
On the login interface, click Sign Up for free and enter user register interface.
Complete your register by following the prompt. Please fill with your correct information
and read carefully the NetView Terms of Use. (Note: Email is required for password
regain. Please ensure it correct.)
Important note: One camera which has been in one user account can’t be added
to use by another account at the same time, unless the camera has been deleted
from this user account. Do remember the username which keeps the camera,
and the register email.