Hassle Free IP Camera User’s Manual Version: 1.0.0 NetView reserves the right to make any changes and amendment to this manual. The content may be renewed as our service develops or changes. Please visit www.netviewtech.com for more information.
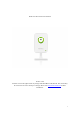
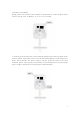
I. Hardware Installation Firstly, connect the network cable with the network interface on the backside of the camera and the route or Modern, so as to access network. 1. Connect the attached power adapter with the DC input port on the backside of the camera and the wall socket power or an electrical outlet (Before connecting power, please check whether the power adapter and the electrical outlet are in good condition, for the sake of your personal safety and avoiding unnecessary loss.
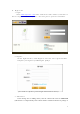
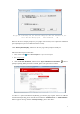
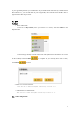
II. Begin to use 1. Login Enter www.mynetvue.com in the address bar with a browser, and come to the user register interface. If you are a new user, please open an account first. 2. Register On the login interface, click “Register” and enter user register interface. Complete your register by following the prompt. (Note: Email is required for password regain. Please ensure it correct.) 3. Add camera In the message box for adding camera, enter the camera’s ID in the bar Camera ID (This ID No.
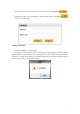
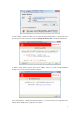
the camera), then give the camera your favorite name. Click Add button finish this procedure. If you currently don’t want to add the camera, select Cancel to , and it return back the page. III. Plugin installation Verify the installation of a small plugin: First, playing video from this camera on Web requires a small plugin java. If there is no this plugin installed in your computer before, after login please follow related prompt popped up on the browser to download the plugin.
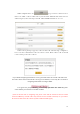
The page you are browsing uses Java. Microsoft webpage provides more information on Java. Do not show this message again. More information OK Based on the above sample prompt for java plugin on IE browser, here explain the installation process(Prompt for process on different browsers varies). Click “More information(M)”, and then on the new page follow prompt to install java. Follow the below steps to install Java: 1. Click “Start” button , then “Internet Explorer” to open Internet Explorer. 2.
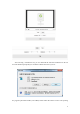
5. Click “Install”. ( Please note that, user can change default installation place C:\Program Files\Java into other places if user selects the check box Change Destination File and follows instructions.) 6. When a finish window appears, please click “Close”. There is no need to fulfill additional settings to Java, and no need to restart the computer. If you download it by a download tool like Thunder etc.
IV. Live viewing After finishing the procedure of adding your camera, with the mouse drag (move the mouse on the camera icon or name and then press left mouse button for movement) your camera(Or a shared camera from other user) to designated area on the right side. And the video starts to play. ( Note: Only when the camera is online can it be dragged and played. The camera is online when its icon is in green , and offline in red .) V.
After selecting a wanted time slot, you can download the video data memorized on the TF card. The download prompt may be varied due to different browsers you use.
to your appointed path after your confirmation. If you download the video data by a download tool like Thunder etc., you can find them in your assigned file, then with the mouse double click or right click the video clip to watch. 六、分享 VI.Share 1. Share with friends In the list of My Camera, move your mouse to a camera, and select Share in the dropdown list: In the message window, enter the shared user name (Shared user should have an account in this website) and click Share click Cancel to complete.
WIFI configuration is on page of user control center. Select an online camera. Then select your wanted wifi in the list of discovered wireless signal, and enter its password. Click Connect button to access. If the below prompt appears, it means that the wifi is being configured. User can close this window after several seconds. Then remove the network cable and repower the camera. If your WIFI configuring information is correct, please disconnect the network cable and restart the camera.
VIII. Firmware update Firmware update is in the Setting page of User Control Center. Select an online camera, and click “Firmware” after obtaining firmware/wifi information. On the firmware page, information includes camera name, firmware type, firmware version, and release date. Click Update firmware to complete. There will be prompt to restart the camera. Firmware update is finished. Would you like to restart the camera and re-login? Click (Yes) to restart the camera and exit.
2. Cancel Sharing: In the list My camera, move your mouse to the camera name you have added, and click click Cancel Sharing button in the dropdown list. Then from the list of cancel camera, select the username you would like to cancel sharing. If there is no other shared user, the list will be blank. 3. Rename Camera In the list My camera, move your mouse to the camera name you have added, and click Rename in the dropdown list.
other user, and click Rename in the dropdown list. Then in the dialog box enter a new name and click Rename don’t want to change the name of the camera, please click Cancel . If you currently and return. 6. Change password Click the button in the top right corner to change password. You will be required to enter your old password and new password, and confirm the new password. Then click Submit Cancel button to finish. If you currently don’t want to change password, click button to exit. 7.
Please enter your username and email address (The email must be the one you have associated with this username), and then click Reset Password button. The new password of this username will be sent in a mail to your email address. If you suddenly remember the password before reset password, you can click Login your account in the popped up login interface. button to login 8. Local storage for video data You can insert a piece of TF memory card with memory capacity of 2G/4G/8G/16G/32G etc.
camera is online can you play the video. The camera is online when its icon is in green and offline in gray , . There is no triangle button to play video when the camera is offline.) Add camera: On the live broadcast page of user control center, click Add camera: In the message box for adding camera, enter the camera’s ID in the bar Camera ID (This ID No. is a unique identity of the camera which is attached in the label or package of the camera), then give the camera your favorite name.
click Cancel button to stop. Remove camera: In the list My camera/Shared Camera, select a camera which you would like to remove. Click the left camera icon( / ), then click Remove button in the dropdown list. Then the camera is removed.
Cancel sharing: In the list My camera, select a camera which you would like to stop sharing with the other users. Click Sharing the left camera icon( / ), then click Cancel button in the dropdown list. In the popped up window, select the user name with whom you want to stop sharing. And click Cancel button. Then the sharing stops. If you currently don’t want to stop sharing the camera, click Cancel button to stop.
2、Android For Android mobile phone user, you need to download by your phone our application software name NetviewA.apk for the Android platform (Apps to download at: www.netviewtech.com). Software setup: Firstly, find the software downloaded on your phone. Now click and begin to setup: Click Install you have button as beginning.
install, click Cancel button to return back. Install interface will appear if you decide to install. If you want to experience the software to watch video, click Open button after finishing the installation. If you currently don’t want to use the software, click Finish button to end the procedure. You can find this application software in the software list on your phone. Click its icon to use it anytime when you want. Username and password are required to login.
Account management center: Enter the account management center after your login. There are functions here such as Watch Camera, Add Camera, Share Camera, and Remove Camera. Watch Camera: On the page Account Management Center, click Watch Camera . It appears your camera list (including the shared camera you got from the other users). Select an online camera and you can now watch real-time video. (Note: Only when the camera is online can it be played.
(The size of window to play video is related to the screen resolution of your cell phone) Add camera: On the page of Account Management Center, click Add camera: In the popped window, enter the camera’s ID in the bar Camera ID (This ID No. is a unique identity of the camera which is attached in the label or package of the camera), then give the camera your favorite name. Click Add button to finish this procedure.
Share Camera: On the page of Account Management Center, click Share camera: . Then select from the camera list a camera which you would like to share with the other users. In the popped window, enter the shared username. Click OK Cancel button to carry out sharing. If you currently don’t want to add the camera, select .
Revoke Camera: On the page of Account Management Center, click Revoke to enter a list which shows the shared users. Then select camera from the list the users with whom you would like to stop sharing.
cameras shared to you by the other users. Then select from the list the cameras you don’t want to keep. Logout: On the page of Account Management Center, click Logout to exit. It will come back to the login interface.
XI. Trouble shooting 1. Is it easy or not to install and setup a Hassle Free IP Camera? Answer: It’s extremely easy to install and setup a Hassle Free IP Camera. You can begin using it by just connecting its power and network cable. 2. Is it difficult to use the Hassle Free IP Camera? Answer: It’s also very easy to use this product. You can login to our operation website: www.mynetvue.com to register for an account first and then add the camera to begin watching video.
Answer: This function is under development, and will be available in subsequent versions. 16. Is there PTZ function? Answer: This function is under development, and will be available in subsequent versions. 17. Can its video be shared to a social network site and embedded to a third webpage? Answer: This function is under development, and will be available in subsequent versions. FCC Warning 1. This device complies with Part 15 of the FCC Rules.