
User's Manual


Wireless 11n Access Point
8
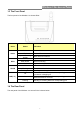
z LAN(1~2): Through these ports, you can connect the AP to your PCs and the other Ethernet
network devices.
z DC IN: Plug the circle end of the power adapter firmly into the rear panel of the Wireless AP,
and the other end put into an electric service outlet then the system is ready.
z Reset Button
Push the button for more than 5 seconds and then release it, the system will return to factory
default setting. In the meantime, system rewrites flash to default value and SYS LED flash for
a while. Approximately 60 seconds later, the SYS LED turn dark, now the whole system
parameters have returned to factory default value. If the process has been interrupted by any
reason (power off), the system will fail. Before performing the process, ensure a safe
operating environment please!
z Antenna: Used for enhancing the wireless signal, and expanding the range of signal.
z WPS: Help users to connect this AP quickly and security. It uses PIN configuration method or
PBC configuration method, in which users can easy setup WPS connection. Please refer to
WPS settings
for more information.
Warning
᧶
Incomplete factory setting reco
very procedure will cause the Wireless AP
malfunctionIf you are unfortunately in this situation, do not try to repair it by
yourself. Consult your local distributor for help!
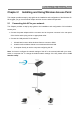
1.5 Placement (Optional)
There are two ways to place the AP. The first way is to place the AP vertically on a surface. The
second way is to attach it to the wall. If you select a wall-mount option, please follow the steps
below:
1. Select a location with access for cables and a power outlet.
2. Unplug the unit. Place it upside down on a flat surface and mark the two holes for anchors.
3. Installing the wall mount anchor (not supplied) into the wall with tools such as drill or hammer.
4. Insert the screws (not supplied) in each hole of the stand parts.
5. Attaches the unit to the anchors on the wall.