
User manual


6 Set Up and Share the Connection
S
ETTING
UP
YOUR
R
OUTER
WITH
THE
S
MART
S
TART
W
IZARD
The SmartStart Wizard is tailored for your platform, but it works the same way on either a PC or a Macintosh. Insert the Netopia CD, and in
the desktop navigation screen that appears, launch the
SmartStart
Wizard
application.
S
MART
S
TART
W
IZARD
CONFIGURATION
SCREENS
The SmartStart Wizard presents a series of screens to guide you through the preliminary configuration of a Netopia R-series Router. It will
then create a connection profile using the information you supply to it.
The screens described in this section are the default screens shipped on the Netopia CD. They derive from
two initialization (.ini) files included in the same directory as the SmartStart application file. Your reseller or
your ISP may have supplied you with customized versions of these files.
n If you have received a CD or diskette that has been customized by your reseller or ISP, you can run the
SmartStart Wizard directly from the CD or diskette and follow the instructions your reseller or ISP
provides. This makes your Netopia R-series Router configuration even easier.
n If you have received only the .ini files from your reseller or ISP, perform the following:
n Copy the entire directory folder containing the SmartStart Wizard application from the Netopia CD
to your hard disk.
n Copy the customized .ini files to the same directory folder that contains the SmartStart Wizard
application, allowing the copy process to overwrite the original .ini files.
n Run the SmartStart Wizard from your hard disk. You can then follow the instructions your reseller
or ISP provides.
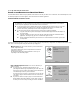
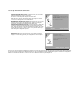
Welcome screen. The first screen welcomes you to the SmartStart
Wizard configuration utility.
Click the Next button after you have responded to the interactive
prompts in each screen.
The Help button will display useful information to assist you in
responding to the interactive prompts.
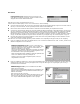
Easy or Advanced options screen. You can choose either Easy or
Advanced setup.
n If you choose Easy, SmartStart automatically uses the
preconfigured IP addressing setup built into your router. This is the
best choice if you are creating a new network or don’t already have
an IP addressing scheme on your new network.
If you choose Easy, you will see a Connection Test screen like the
one shown on page 7 while SmartStart checks the connection to
your router.
n If you choose Advanced, skip to page 11 now. The SmartStart
Wizard displays the Router IP Address screen shown on page 11,
in which you can choose ways to modify your router’s IP address.