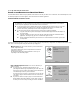
Step 3 ™ Netopia SmartStart Set Up and Share the Connection Netopia R-Series Routers
Copyright ©1997–98, Netopia, Inc., v.998 All rights reserved. Printed in the U.S.A. This manual and any associated artwork, software, and product designs are copyrighted with all rights reserved. Under the copyright laws such materials may not be copied, in whole or part, without the prior written consent of Netopia, Inc. Under the law, copying includes translation to another language or format. Netopia, Inc. 2470 Mariner Square Loop Alameda, CA 94501-1010 U.S.A.
Contents Introduction .............................................................................. 5 Before running SmartStart ................................................. 5 Setting up your Router with the SmartStart Wizard ...................... 6 Easy option ....................................................................... 7 Advanced option .............................................................. 11 Sharing the Connection ...........................................................
iv SmartStart Getting Started
INTRODUCTION Once you’ve connected your router to your computer and your telecommunications line and installed a web browser, you’re ready to run the Netopia SmartStart™ Wizard. The SmartStart Wizard will help you set up the router and share the connection. The SmartStart Wizard walks you through a series of questions and based on your responses automatically configures the router for connecting your LAN to the Internet or to your remote corporate network.
Set Up and Share the Connection SETTING UP YOUR ROUTER WITH THE SMARTSTART WIZARD The SmartStart Wizard is tailored for your platform, but it works the same way on either a PC or a Macintosh. Insert the Netopia CD, and in the desktop navigation screen that appears, launch the SmartStart Wizard application. SMARTSTART WIZARD CONFIGURATION SCREENS The screens described in this section are the default screens shipped on the Netopia CD. They derive from two initialization (.
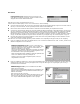
EASY OPTION Connection Test screen. SmartStart tests the connection to the router. While it is testing the connection, a progress indicator screen is displayed and the router’s Ethernet LEDs flash. When the test succeeds, SmartStart indicates success. If the test fails, the wizard displays an error screen. If the test fails, check the following: n n n n Check your cable connections. Be sure you have connected the router and the computer properly, using the correct cables.
Set Up and Share the Connection Additional ISDN Configuration screen. For ISDN dial-up connections, enter your Directory Numbers (DNs) and for North America only, Service Profile Identifiers (SPIDs). Your telephone company should have provided this information on an information sheet when your ISDN line was installed. If no additional ISDN configuration information is needed, this screen will not appear. Skip to Manual or Automated Connection Profile screen below.
Internet Service Provider Selection screen. Select an ISP from the list of Netopia ISP partners who have provided information for automatic setup. Choose Generic ISP if your ISP is not included on the list. If you don’t already have an account with the selected ISP, call and order service using the listed customer service telephone number. When you have done this, click Next.
Set Up and Share the Connection Connection Profile Test screen. SmartStart tests your connection profile by attempting to connect to your ISP. To test the connection profile with your ISP, click Next. While the test is running, SmartStart reports its progress in a brief succession of dialog boxes as described below. Available Line Test Progress screen. SmartStart tests to see if the router can place calls on your telephone line.
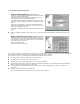
ADVANCED OPTION Router IP Address screen. If you selected the Advanced option in the Easy or Advanced options screen, SmartStart asks you to choose between entering the router’s current IP address and assigning an IP address to the router. If the router has already been assigned an IP address, select the first radio button. If you do this, the Known IP Address screen appears (shown below.) If you want to reconfigure the router with a new IP address and subnet mask, select the second radio button.
Set Up and Share the Connection SHARING THE CONNECTION CONFIGURING TCP/IP ON WINDOWS 95, 98, OR NT COMPUTERS Configuring TCP/IP on a Windows computer requires the following: n n An Ethernet card (also known as a network adapter) The TCP/IP protocol must be “bound” to the adapter or card DYNAMIC CONFIGURATION (RECOMMENDED) If you configure your Netopia R-series Router using SmartStart, you can accept the dynamic IP address assigned by your router.
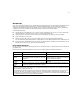
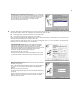
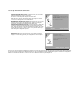
STATIC CONFIGURATION (OPTIONAL) If you are manually configuring for a fixed or static IP address, perform the following: 1. Go to Start Menu/Settings/Control Panels and double click the Network icon. From the Network components list, select the Configuration tab. 2. Select TCP/IP-->Your Network Card. Then select Properties. In the TCP/IP Properties screen (shown below), select the IP Address tab. Click “Specify an IP Address.” Enter the following: IP Address: 192.168.1.2 Subnet Mask: 255.255.255.
Set Up and Share the Connection CONFIGURING TCP/IP ON MACINTOSH COMPUTERS The following is a quick guide to configuring TCP/IP for MacOS computers. Configuring TCP/IP in a Macintosh computer requires the following: n You must have either Open Transport or Classic Networking (MacTCP) installed.
STATIC CONFIGURATION (OPTIONAL) If you are manually configuring for a fixed or static IP address, perform the following: 1. Go to the Apple menu. Select Control Panels and then TCP/IP or MacTCP. 2. With the TCP/IP window open, go to the Edit menu and select User Mode. Choose Advanced and click OK. Or, in the MacTCP window, select Ethernet and click the More button. 3. In the TCP/IP window or in the MacTCP/More window, select or type information into the fields as shown in the following table.