Netopia 3346-ENT/3356-ENT ADSL Router ® Getting Started Guide All Models
Copyright ©2003 Netopia, Inc., v.041905 All rights reserved. Printed in the U.S.A. Copyright 2005, Netopia, Inc. Netopia and the Netopia logo are registered trademarks belonging to Netopia, Inc., registered U.S. Patent and Trademark Office. Broadband Without Boundaries is a trademark belonging to Netopia, Inc. All other trademarks are the property of their respective owners. All rights reserved. Netopia, Inc. 6001 Shellmound Street, 4th Floor Emeryville, CA 94608 U.S.A.
Contents Contents 3 Chapter 1 — Introduction..........................................................1-5 Overview ....................................................................... 1-5 Features and Capabilities ............................................... 1-5 How to Use this Guide.................................................... 1-6 Chapter 2 — Making the Physical Connections..........................2-1 Find a Location ..............................................................
Getting Started Guide 4. Easy Setup Security Configuration ..................... 6-8 Appendix A — Technical Specifications and Safety Information ..A-1 Description.................................................................... A-1 Power requirements ............................................. A-1 Environment ........................................................ A-1 Software and protocols......................................... A-1 Agency approvals..............................................
Introduction 1-5 Chapter 1 Introduction Overview The Netopia 4-port ADSL Router (3346-ENT/3356-ENT, DE, EU models) is a full-featured, stand-alone DSL router for connecting diverse local area networks (LANs) to the Internet and other remote networks. The Netopia 4-port ADSL Router uses a high performance ADSL line to provide your whole network with a high-speed connection to the outside world.
1-6 Getting Started Guide • NAT/NAPT, Multi-NAT, and DHCP (client, server, and relay) for security and convenience • DNS proxy • IP Multicast Forwarding, IGMP V1, V2 • RIP1 and RIP2, static routes • IP QoS: TOS bit prioritization • VPN Pass-through for PPTP and IPSec • Built-in VPN gateway features offer support for up to 15 PPTP or IPSec VPN tunnels • IPSec implementation supports DES or 3DES encryption, MD5 or SHA1 encapsulation, and manual or IKE keying • Built-in firewall protects LAN r
Making the Physical Connections 2-1 Chapter 2 Making the Physical Connections This section tells you how to make the physical connections to your Netopia 4-port ADSL Router.
2-2 Getting Started Guide You will need: • A Windows–based PC or a Macintosh computer with Ethernet connectivity for configuring the Netopia 4-port ADSL Router. This may be built-in Ethernet or an add-on card, with TCP/IP installed and configured. See “Sharing the Connection” on page 4-1. • A DSL wall outlet wired for a connection to a telephone carrier who supports Asymmetric Digital Subscriber Line (ADSL) connections.
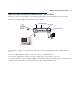
Making the Physical Connections 2-3 Identify the Connectors and Attach the Cables Identify the connectors and switches on the back panel and attach the necessary Netopia Router cables. Connect your computer, DSL line, and power source as shown. 10/100BT LAN DSL 2 4 3 LAN 2 1 DC Power Power Power Switch Off / On DSL 1 3 1. For a direct computer to router Ethernet connection, use the standard Ethernet cable included with your router. 2.
2-4 Getting Started Guide Netopia 4-port back panel 4 3 LAN 2 1 Power Off / On DSL DSL port Power switch Ethernet ports Power port . Port DSL port Ethernet ports Power port Power switch Description An RJ-48 jack labeled DSL for your ADSL connection. Four RJ-45 10/100Base-T Ethernet jacks. You can use one of these to configure the Netopia 4-port.
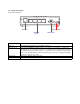
Making the Physical Connections 2-5 Netopia 4-port ADSL Router Status Lights The figure below represents the Netopia 4-port ADSL Router status light (LED) panel.
2-6 Getting Started Guide
Connecting to Your Local Area Network 3-1 Chapter 3 Connecting to Your Local Area Network This chapter describes how to physically connect the Netopia 4-port ADSL Router to your local area network (LAN). Before you proceed, make sure the Netopia 4-port ADSL Router is properly configured. You can customize the router’s configuration for your particular LAN requirements using console-based management (see “Telnet-Based Management” on page 5-1).
3-2 Getting Started Guide Ethernet: Ethernet hardware and software drivers enable your PC or Macintosh computer to communicate on the LAN. Once the Netopia 4-port ADSL Router is properly configured and connected to your LAN, PC and Macintosh computers that have their required components in place will be able to connect to the Internet or other remote IP networks.
Sharing the Connection 4-1 Chapter 4 Sharing the Connection Once you have set up your physical local area network, you will need to configure the TCP/IP stack on each client workstation connected to your Netopia 4-port ADSL Router. This chapter describes how to configure TCP/IP for both Windows-based and Macintosh computers.
4-2 Getting Started Guide b. Some Windows versions follow a path like this: Start menu -> Control Panel -> Network and Internet Connections -> Network Connections -> Local Area Connection -> Properties -> Internet Protocol [TCP/IP] -> Properties Then go to Step 2. Step 2. Select Obtain an IP address automatically. Step 3. Select Obtain DNS server address automatically, if available. Step 4. Remove any previously configured Gateways, if available. Step 5. OK the settings. Restart if prompted.
Sharing the Connection 4-3 Macintosh MacOS 8 or higher or Mac OS X Step 1. Access the TCP/IP Control Panel or Network Preference Pane. a. MacOS follows a path like this: Apple Menu -> Control Panels -> TCP/IP Control Panel b. Mac OS X follows a path like this: Apple Menu -> System Preferences -> Network Then go to Step 2. Step 2. Select Built-in Ethernet Step 3. Select Configure Using DHCP Step 4. Close and Save, if prompted.
4-4 Getting Started Guide
Telnet-Based Management 5-1 Chapter 5 Telnet-Based Management Telnet-based management is a menu-driven interface for the capabilities built into the Netopia 4-port ADSL Router. Telnet-based management provides access to a wide variety of features that the router supports. You can customize these features for your individual setup. This chapter describes how to access the Telnet-based management screens.
5-2 Getting Started Guide • The System Configuration menus display and permit changing: • IP Setup • Filter Sets • IP Address Serving • Network Address Translation (NAT) • Date and Time • SNMP (Simple Network Management Protocol) • Security • Upgrade Feature Set • Change Device to a Bridge • Logging • The Utilities & Diagnostics menus provide a selection of seven tools for monitoring and diagnosing the router's behavior, as well as for updating the firmware and rebooting the system.
Telnet-Based Management 5-3 • If you connect a PC with Microsoft Windows, you can use a Windows Telnet application or simply run Telnet from the Start menu. • If you connect a Macintosh computer running Classic Mac OS, you can use the NCSA Telnet program supplied on the Netopia CD. You install NCSA Telnet by dragging the application from the CD to your hard disk. Mac OS X users can use the Terminal application that comes with Mac OS X in the Utilities folder.
5-4 Getting Started Guide
Easy Setup 6-1 Chapter 6 Easy Setup This chapter describes how to use the Easy Setup Telnet screens on your Netopia 4-port ADSL Router. After completing the Easy Setup Telnet screens, your router will be ready to connect to the Internet or another remote site.
6-2 Getting Started Guide Quick Easy Setup Connection Path This section may be all you need to do to configure your Netopia 4-port ADSL Router. Your service provider will supply you with several parameter values.
Easy Setup 6-3 The following steps will get you up and running quickly: 1. Open a Telnet session to 192.168.1.1 to bring up the Main Menu. If you don't know how to do this, see “Connecting through a Telnet Session” on page 5-2. The Main Menu appears. Netopia 4-port Easy Setup... WAN Configuration... System Configuration... Utilities & Diagnostics... Statistics & Logs... Quick Menus... Quick View...
6-4 Getting Started Guide 1. ADSL Line Configuration ADSL Line Configuration Trellis Coding Enabled: On Fast Retrain Enabled: On Wiring Type... Data Link Encapsulation... AutoSense RFC1483 Data Circuit VPI (0-255): Data Circuit VCI (32-65535): 8 35 PREVIOUS SCREEN NEXT SCREEN Return/Enter brings you to next screen. 1. Select Trellis Coding Enabled. Toggle it to On (the default) or Off. Unless otherwise specified by your provider, you can accept this default. 2. Select Fast Retrain Enabled.
Easy Setup 6-5 2. Easy Setup Profile The Easy Setup Profile screen is where you configure the parameters that control the Netopia 4-port ADSL Router’s connection to a specific remote destination, usually your ISP or a corporate site. On a Netopia 4-port ADSL Router you can add up to 15 more connection profiles, for a total of 16, although you can only use one at a time, unless you are using Virtual Private Networks (VPNs). Connection Profile 1: Easy Setup Profile Underlying Encapsulation... RFC1483 Mode...
6-6 Getting Started Guide 3. IP Easy Setup The IP Easy Setup screen is where you enter information about your Netopia Router’s: • Ethernet IP address • Ethernet Subnet mask • Domain Name • Domain Name Server IP address • Default gateway IP address Consult with your network administrator to obtain the information you will need. For more information about setting up IP, see the Firmware User’s Guide chapter on “IP Setup”. IP Easy Setup Ethernet IP Address: Ethernet Subnet Mask: 192.168.1.1 255.
Easy Setup 6-7 4. Type the Primary Domain Name Server address your ISP gave you. Press Return. A new field Secondary Domain Name Server will appear. If your ISP gave you a secondary domain name server address, enter it here. Press Return until the next field Default IP Gateway is highlighted. 5. If you do not enter a Default IP Gateway value, the router defaults to the remote IP address you entered in the Easy Setup connection profile.
6-8 Getting Started Guide 4. Easy Setup Security Configuration The Easy Setup Security Configuration screen lets you password-protect your Netopia 4-port ADSL Router. Input your Write Access Name and Write Access Password with names or numbers totaling up to eleven digits. If you password protect the Telnet screens, you will be prompted to enter the name and password you have specified every time you log in to the Telnet screens. Do not forget your name and password.
Technical Specifications and Safety Information A-1 Appendix A Technical Specifications and Safety Information Description Dimensions: 13.5 cm (w) x 13.5 cm (d) x 3.5 cm (h) 5.25” (w) x 5.25” (d) x 1.5” (h) Communications interfaces: The Netopia 4-port Router has an RJ-45 jack for WAN line connections and a 4–port 10/100Base-T Ethernet switch for your LAN connections. Power requirements • 12 VDC input • .
A-2 Getting Started Guide • United States – UL: 1950 Third Edition • Canada – CSA: CAN/CSA-C22.2 No. 950-95 EMC: • United States – FCC Part 15 Class B • Canada – ICES-003 Telecom: • United States – FCC Part 68 • Canada – CS-03 International Safety Approvals: • Low Voltage (European directive) 73/23 • EN60950 (Europe) EMI Compatibility: • 89/336/EEC (European directive) • EN55022:1994 • EN300 386 V1.2.1 CISPR22 Class B Regulatory notices European Community.
Technical Specifications and Safety Information A-3 United States. This equipment has been tested and found to comply with the limits for a Class B digital device, pursuant to Part 15 of the FCC Rules. These limits are designed to provide reasonable protection against harmful interference in a residential installation.
A-4 Getting Started Guide Caution Users should not attempt to make such connections themselves, but should contact the appropriate electric inspection authority, or electrician, as appropriate. The Ringer Equivalence Number (REN) assigned to each terminal device provides an indication of the maximum number of terminals allowed to be connected to a telephone interface.
Technical Specifications and Safety Information A-5 47CFR Part 68 Information FCC Requirements 1. The Federal Communications Commission (FCC) has established Rules which permit this device to be directly connected to the telephone network. Standardized jacks are used for these connections. This equipment should not be used on party lines or coin phones. 2.
A-6 Getting Started Guide e) If this equipment, the Netopia ENT Enterprise Series router, causes harm to the telephone network, the telephone company will notify you in advance that temporary discontinuance of service may be required. But if advance notice isn’t practical, the telephone company will notify the customer as soon as possible. Also, you will be advised of your right to file a complaint with the FCC if you believe it is necessary.