™ Netopia 4652 SDSL/IDSL Router Getting Started Guide MAKING BROADBAND WORK™
Copyright ©2002 Netopia, Inc., v.053002 All rights reserved. Printed in the U.S.A. This manual and any associated artwork, software, and product designs are copyrighted with all rights reserved. Under the copyright laws such materials may not be copied, in whole or part, without the prior written consent of Netopia, Inc. Under the law, copying includes translation to another language or format. Netopia, Inc. 2470 Mariner Square Loop Alameda, CA 94501-1010 U.S.A.
Contents Contents 3 Chapter 1 — Introduction.............................................................5 Overview .......................................................................... 5 Features and Capabilities .................................................. 5 How to Use this Guide....................................................... 6 Chapter 2 — Making the Physical Connections.............................7 Find a Location .................................................................
User’s Reference Guide Easy Setup Profile ................................................. 35 IP Easy Setup ....................................................... 36 Easy Setup Security Configuration .......................... 38 Appendix A — Technical Specifications and Safety Information ...41 Description..................................................................... 41 Power requirements .............................................. 41 Environment ............................................
Introduction 1-5 Chapter 1 Introduction Overview The Netopia 4652 SDSL/IDSL Router is a full-featured, stand-alone DSL router for connecting diverse local area networks (LANs) to the Internet and other remote networks. The Netopia 4652 SDSL/IDSL Router uses a high performance SDSL or IDSL line to provide your whole network with a high-speed connection to the outside world.
1-6 Getting Started Guide How to Use this Guide In addition to the documentation contained in the accompanying Firmware User’s Guide, this guide is designed to get you up and running and connected to your local area network and the Internet. It is intended to be viewed on-line, using the powerful features of the Adobe Acrobat Reader. The information display has been deliberately designed to present the maximum information in the minimum space on your screen.
Making the Physical Connections 2-7 Chapter 2 Making the Physical Connections This section tells you how to make the physical connections to your Netopia 4652 SDSL/IDSL Router.
2-8 Getting Started Guide You will need: ■ A Windows–based PC or a Macintosh computer with Ethernet connectivity for configuring the Netopia 4652. This may be built-in Ethernet or an add-on card, with TCP/IP installed and configured. See “Sharing the Connection” on page 4-17. ■ A DSL wall outlet wired for a connection to a telephone carrier who supports Symmetric Digital Subscriber Line (SDSL) or ISDN DSL (IDSL) connections.
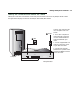
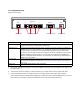
Making the Physical Connections 2-9 Identify the Connectors and Attach the Cables Identify the connectors and switches on the back panel and attach the necessary Netopia Router cables. The figure below displays the back of the Netopia 4652 SDSL/IDSL Router. 1 Ethernet 3 Power 2 DSL Connect your computer, DSL line, and power source as shown. 1. For a direct computer to router Ethernet connection, use the standard Ethernet cable included with your router. 2.
2-10 Getting Started Guide Netopia 4652 back panel Ethernet DSL 4 DSL port 3 2 Ethernet ports 1 Console Console port Power Power port . Port DSL port Ethernet ports Console port Power port Description An RJ-48 jack labeled DSL for your SDSL or IDSL connection. The Netopia 4652 supports connections to either SDSL or IDSL lines. Four RJ-45 10/100Base-T Ethernet jacks. You will use any one of these to configure the Netopia 4652. For a new installation, use an Ethernet connection.
Making the Physical Connections 2-11 Netopia 4652 SDSL/IDSL Router Status Lights The figure below represents the Netopia 4652 status light (LED) panel. P 1 P 2 P 3 P 4 S D S ID L S L A L E R T P O W E R Netopia 4652 LED front panel ETHERNET The following table summarizes the meaning of the various LED states and colors: When this happens...
2-12 Getting Started Guide
Connecting to Your Local Area Network 3-13 Chapter 3 Connecting to Your Local Area Network This chapter describes how to physically connect the Netopia 4652 to your local area network (LAN). Before you proceed, make sure the Netopia 4652 is properly configured. You can customize the router’s configuration for your particular LAN requirements using console-based management (see “Console-Based Management” on page 5-25).
3-14 Getting Started Guide Once the Netopia 4652 is properly configured and connected to your LAN, PC and Macintosh computers that have their required components in place will be able to connect to the Internet or other remote IP networks. Connecting to an Ethernet Network You can connect a standard 10/100Base-T Ethernet network to the Netopia 4652 using any of its available Ethernet ports.
Connecting to Your Local Area Network 3-15 If you add devices connected through a hub or switch, connect the hub or switch to any Ethernet port on the Netopia 4652. If you have more than four devices to connect, you can attach additional devices using standard Category 5 Ethernet cables (not provided) connected to a 10- or 100Base-T Ethernet hub or switch. All of the ports on the router will auto detect 10- or 100Base-T. Crossover cables are not required.
3-16 Getting Started Guide
Sharing the Connection 4-17 Chapter 4 Sharing the Connection Once you have set up your physical local area network, you will need to configure the TCP/IP stack on each client workstation connected to your Netopia 4652. This chapter describes how to configure TCP/IP for both Windows-based and Macintosh computers.
4-18 Getting Started Guide Dynamic configuration (recommended) To configure your PC for dynamic addressing do the following: 1. Go to the Start Menu/Settings/Control Panels and double click the Network icon. From the Network components list, select the Configuration tab. 2. Select TCP/IP-->Your Network Card. Then select Properties. In the TCP/IP Properties screen, select the IP Address tab. Click “Obtain an IP Address automatically”. 3. Click on the DNS Configuration tab. Click Disable DNS.
Sharing the Connection 4-19 Static configuration (optional) If you are manually configuring for a fixed or static IP address, perform the following: 1. Go to Start Menu/Settings/Control Panels and double click the Network icon. From the Network components list, select the Configuration tab. 2. Select TCP/IP-->Your Network Card. Then select Properties. In the TCP/IP Properties screen, select the IP Address tab. Click “Specify an IP Address.” Enter the following: IP Address: 192.168.1.2 Subnet Mask: 255.
4-20 Getting Started Guide 3. Click on the Gateway tab (shown below). Under “New gateway,” enter 192.168.1.1. Click Add. This is the Netopia 4652’s pre-assigned IP address. Click on the DNS Configuration tab. Click Enable DNS. Enter the following information: Host: Type the name you want to give to this computer. Domain: Type your domain name. If you don't have a domain name, type your ISP's domain name; for example, netopia.com.
Sharing the Connection 4-21 Configuring TCP/IP on Macintosh Computers The following is a quick guide to configuring TCP/IP for MacOS computers. Configuring TCP/IP in a Macintosh computer requires the following: You must have either Open Transport or Classic Networking (MacTCP) installed.
4-22 Getting Started Guide Static configuration (optional) If you are manually configuring for a fixed or static IP address, perform the following: 1. Go to the Apple menu. Select Control Panels and then TCP/IP or MacTCP. 2. With the TCP/IP window open, go to the Edit menu and select User Mode. Choose Advanced and click OK. Or, in the MacTCP window, select Ethernet and click the More button. 3.
Sharing the Connection 4-23 Note: You can use these instructions to configure other computers on your network to accept IP addresses served by the Netopia 4652. You can also use these instructions to configure other computers on your network with manual or static IP addresses. Be sure each computer on your network has its own IP address.
4-24 Getting Started Guide
Console-Based Management 5-25 Chapter 5 Console-Based Management Console-based management is a menu-driven interface for the capabilities built into the Netopia 4652. Console-based management provides access to a wide variety of features that the router supports. You can customize these features for your individual setup. This chapter describes how to access the console-based management screens.
5-26 Getting Started Guide may be using the router to connect to more than one service provider or remote site.
Console-Based Management 5-27 Configuring Telnet software If you are configuring your router using a Telnet session, your computer must be running a Telnet software program. ■ If you connect a PC with Microsoft Windows, you can use a Windows Telnet application or simply run Telnet from the Start menu. ■ If you connect a Macintosh computer, you can use the NCSA Telnet program supplied on the Netopia 4652 CD. You install NCSA Telnet by simply dragging the application from the CD to your hard disk.
5-28 Getting Started Guide Launch your terminal emulation software and configure the communications software for the values shown in the table below. These are the default communication parameters that the Netopia 4652 uses. Parameter Suggested Value Terminal type PC: ANSI-BBS Mac: ANSI, VT-100, or VT-200 Data bits 8 Parity None Stop bits 1 Speed 9600 - 57600 bits per second Flow Control None Note: The router firmware contains an autobaud detection feature.
Easy Setup 6-29 Chapter 6 Easy Setup This chapter describes how to use the Easy Setup console screens on your Netopia 4652. After completing the Easy Setup console screens, your router will be ready to connect to the Internet or another remote site.
6-30 Getting Started Guide Netopia 4652 Easy Setup... WAN Configuration... System Configuration... Utilities & Diagnostics... Statistics & Logs... Quick Menus... Quick View... If you do not see the Main Menu, verify that: ■ If you are using a serial connection, that your serial port speed is the same as the Netopia 4652’s default 9600 baud, for first use.
Easy Setup 6-31 Quick Easy Setup Connection Path This section may be all you need to do to configure your Netopia 4652 SDSL/IDSL Router. Your service provider will supply you with several parameter values.
6-32 Getting Started Guide IP Easy Setup Screen Ethernet IP Address: _______________________ Ethernet Subnet Mask: _______________________ Domain Name: _______________________ Primary Domain Name Server: _______________________ Secondary Domain Name Server: _______________________ Default IP Gateway: _______________________ (192.168.1.1 255.255.255.
Easy Setup 6-33 DSL Line Configuration SDSL Line Configuration Line Type... Operation Mode... SDSL-ATM Generic Data Rate... 384 Data Link Encapsulation... PPP Mode... PPP VC Multiplexed Data Circuit VPI (0-255): Data Circuit VCI (0-65535): 0 38 PREVIOUS SCREEN NEXT SCREEN Return/Enter to select ... Enter Information supplied to you by your telephone company. 1.
6-34 Getting Started Guide 2. If you chose the SDSL-ATM Line type, select Operation Mode and, from the pop-up menu, choose the type of DSL equipment that your service provider uses: Generic, Lucent, Nokia EOC Fast, Nokia Fixed, Paradyne, or Nortel UE IMAS. Note: Certain models are pre-configured for your service provider’s Operation Mode. In that case, there may be different (or fewer) Operation Mode options. If you chose the SDSL-HDLC or IDSL Line Type, this menu option does not appear. 3.
Easy Setup 6-35 ■ If you selected SDSL-HDLC or IDSL Line Types, you can choose Frame Relay as a Data Link Encapsulation method. Choosing Frame Relay reveals the PPP over Frame Relay Enabled toggle. If you toggle PPP over Frame Relay Enabled to On, the DLCI field appears, allowing you to enter a DLCI value (16 is the default). The LMI option also appears, allowing you to select from ANSI (Annex D), CCITT (Annex A), LMI, or None from the pull-down menu. 5.
6-36 Getting Started Guide If you selected Numbered, the following fields appear. ■ Select the editable field labeled Local WAN IP Address. The default address is 0.0.0.0, which allows for dynamic addressing, when your ISP assigns an address each time you connect. However, you can enter another specific address if you want to use static addressing. In that case, enter the local WAN address your ISP gave you. Press Return. ■ Select the editable field labeled Local WAN IP Mask.
Easy Setup 6-37 IP Easy Setup Ethernet IP Address: Ethernet Subnet Mask: 192.168.1.1 255.255.255.0 Domain Name: Primary Domain Name Server: Secondary Domain Name Server: isp.net 209.3.224.21 209.3.224.20 Default IP Gateway: 127.0.0.2 IP Address Serving: On Number of Client IP Addresses: 1st Client Address: 100 192.168.1.100 PREVIOUS SCREEN NEXT SCREEN Enter an IP address in decimal and dot form (xxx.xxx.xxx.xxx). Set up the basic IP & IPX attributes of your Netopia in this screen. 1.
6-38 Getting Started Guide 7. Toggle IP Address Serving to On or Off, depending on whether you want the device’s IP address server to supply dynamic IP addresses to your client workstations. Normally, you would accept the default On so that workstations on your LAN can have IP addresses assigned dynamically from the router. 8. The IP address server will provide 100 IP addresses automatically to workstations on your LAN.
Easy Setup 6-39 The Router will restart and your configuration settings will be activated. You can then Exit or Quit your Telnet application. Easy Setup is now complete.
6-40 Getting Started Guide
Technical Specifications and Safety Information -41 Appendix A Technical Specifications and Safety Information Description Dimensions: 124.0 cm (w) x 20.0 cm (d) x 5.3 cm (h) 9.4” (w) x 7.9” (d) x 2.1” (h) Communications interfaces: The Netopia 4652 SDSL/IDSL Router has an RJ-48 jack for the DSL connection; 4 RJ-45 10/100Base-T Ethernet ports for your LAN connections; and a DB-9 Console port. Power requirements ■ 12 VDC input ■ 1.
-42 Getting Started Guide December 1, 2000 ■ Canada – CSA: CAN/CSA-C22.2 No. 950-95 EMI: ■ FCC Part 15 Class B Regulatory notices Service Requirements. In the event of equipment malfunction, all repairs should be performed by our Company or an authorized agent. Under FCC rules, no customer is authorized to repair this equipment. This restriction applies regardless of whether the equipment is in or our of warranty.
Technical Specifications and Safety Information -43 The Load Number (LN) assigned to each terminal device denotes the percentage of the total load to be connected to a telephone loop which is used by the device, to prevent overloading. The termination on a loop may consist of any combination of devices subject only to the requirement that the total of the Load Numbers of all the devices does not exceed 100.
-44 Getting Started Guide
Limited Warranty and Limitation of Remedies-Revised January 2002 Limited Warranty and Limitation of Remedies-Revised January 2002 Netopia warrants to you, the end user, that the Netopia™ Router (the “Product”) will be free from defects in materials and workmanship under normal use for a period of two (2) years from date of purchase. Netopia’s entire liability and your sole remedy under this warranty during the warranty period is that Netopia shall, at its sole option, either repair or replace the Product.