DSL Equipment Installation Guide Netopia 45413 Router Version 2.2 2002 MegaPath Networks Inc. All Rights Reserved.
Table of Contents Follow Steps 1 through 5 to complete the DSL Equipment Installation Step 1: Verify Your System Requirements and Documents Step 2: Verify the Contents of Your DSL Equipment Kit Step 3: Install a Telephone Filter on Every Telephone Line Step 4: Install the Netopia® DSL Router Step 5: Configure Your Computer Windows 95 and 98 Dynamic Configuration Windows 95 and 98 Static Configuration Windows 2000 Dynamic Configuration Windows 2000 Static Configuration Windows NT Dynamic Configuration I
Welcome to MegaPath DSL service. You will find everything you need to install your DSL service in this kit. It is important to carefully and exactly follow the step-by-step instructions for your operating system. Note: Do NOT use the instructions that came with your Netopia.
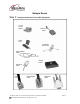
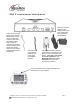
Netopia Router Step 2: Verify the Contents of Your DSL Equipment 1-2 way Phone Splitter 4-Phone Line Filters Power Cord 1-Standard Phone Cord Ethernet/Data Cable Netopia Router Serial Port Cable Phone Cord Ethernet/Data Cable Serial Port Cable Installation Guide for Customer Self Install, Windows 9x/ME/NT/2000/Mac 2002 MegaPath Networks Inc. All rights reserved.
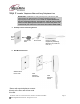
Step 3: Install a Telephone Filter on Every Telephone Line IMPORTANT: Install filters on every phone jack on your DSL line that will be used for an analog device to prevent interference from the digital signal provided by DSL service. A filter is required between all phones, answering machines, fax machines, Caller ID units or analog routers and the phone jack for the DSL line. Connect the phone line connected to your router to the side of the filter labeled “ADSL HPN” a.
c. DSL Router and Analog Device on the Same Jack 1. 1. Connect the filter to your phone jack. 2. 2. A filter is required between all phones, answering machines, fax machines, Caller ID units or analog routers and the phone jack for the DSL line. 3. 3. Connect the phone line connecter to your router to the side of the filter labeled “ADSL HPN”. d. DSL Router Running Directly from the Wall Jack with No Shared Devices 1. Connect the router to your phone jack. 1. 2. 2.
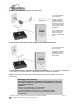
Step 4: Install the Netopia Connect one end of the phone cord to the jack labeled “DSL” on your router, and the other end to the side of the filter labeled “ADSL HPN”. This is not necessary if the router does not share the jack with another analog device such as a phone, answering machine, fax machine, etc. 45413 DSL Router Insert the connector from the power adapter to the power port, and plug the other end into an electrical outlet.
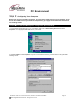
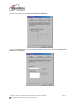
PC Environment Step 5: Configuring Your Computer Windows® 95 and Windows® 98 Dynamic Configuration (Recommended) Before you use your new DSL connection, you must have TCP/IP set up on your computer. If you do not see TCP/IP listed in your Network Components, go to page 22 and follow the instructions for installing TCP/IP. Windows 95 and Windows 98 Dynamic Configuration (Recommended) 1. Find the Network Neighborhood icon on your desktop. Right click on Network Neighborhood and select Properties.
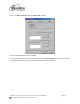
3. Select the IP Address tab. Click Obtain an IP Address automatically. 4. Click on the Gateway tab. If the box under Installed Gateways contains any IP addresses, highlight the IP addresses and click Remove. Installation Guide for Customer Self Install, Windows 9x/ME/NT/2000/Mac 2002 MegaPath Networks Inc. All rights reserved.
5. Click on the DNS Configuration tab. Click Disable DNS. Click OK. 6. When prompted, reboot the computer. Click OK. 7. To check the success of your setup, open a web browser and visit www.megapath.net. While there, you will find more information about additional services as well as setup and other support information. Installation Guide for Customer Self Install, Windows 9x/ME/NT/2000/Mac 2002 MegaPath Networks Inc. All rights reserved.
Windows 95 and Windows 98 Static Configuration (Optional) 1. Find the Network Neighborhood icon on your desktop. Right click on Network Neighborhood and select Properties. Once highlighted, left click on your mouse. 2. Highlight TCP/IP and click on the Properties button. If you do not see TCP/IP in the list, go to the section in this guide titled Installing TCP/IP. Installation Guide for Customer Self Install, Windows 9x/ME/NT/2000/Mac 2002 MegaPath Networks Inc. All rights reserved.
3. Select the IP Address tab. Click Specify an IP Address. Move your cursor to the IP address dialog box. Enter 192.168.1.2 as your IP address. Your subnet mask is 255.255.255.0. If you have multiple computers, use the same subnet mask number and different IP addresses for each computer. 192.168.1.3 - second computer 192.168.1.4 - third computer 192.168.1.5 - fourth computer 4. Click on the Gateway tab. Enter 192.168.1.1 in the box under New Gateway.
5. If you already have an Internet connection, this window will be populated with the information required by your current Internet provider. It is necessary to remove this information and replace it with the information below. Click on the DNS configuration tab. Enter the information as shown below. 4. Move your cursor to this dialog box and enter 66.80.130.23 and click Add. The IP address will appear in the box shown in Step 3. Enter 66.80.131.5 and click Add.
If you do not already have an Internet Service provider, move your cursor to each dialog box and enter the information as shown. 3. Type in 66.80.130.23 and click Add. The IP address will appear in the box shown in box 4. Type in 66.80.131.5 and click Add. The IP address will appear in the box shown in box 4. 1. Type in the word anything. 1. 3. 2. 2. Type in the word megapathdsl.net. 4. 6. Click OK. When prompted, restart the computer. 7.
Windows 2000 Dynamic Configuration (Recommended) 1. Right click on My Network Places and select Properties. Once highlighted, left click once on your mouse. 2. Double click on Local Area Connection. 3. Select the Properties button. Installation Guide for Customer Self Install, Windows 9x/ME/NT/2000/Mac 2002 MegaPath Networks Inc. All rights reserved.
4. Highlight Internet Protocol (TCP/IP) and click on the Properties button. If you do not see TCP/IP in the list, go to the section in this guide titled Installing TCP/IP. 5. Click Obtain an IP address automatically. Click Obtain DNS server address automatically. 6. Click OK twice to close the last two screens and click Close to close the last screen. Under most circumstances, Windows 2000 will not require a reboot. If it does, please do so. 7.
Windows 2000 Static Configuration (Optional) 1. Right click on My Network Places and select Properties. Once highlighted, left click once on your mouse. 2. Double click on Local Area Connection. 3. Select the Properties button. Installation Guide for Customer Self Install, Windows 9x/ME/NT/2000/Mac 2002 MegaPath Networks Inc. All rights reserved.
4. Highlight Internet Protocol (TCP/IP) and click on the Properties button. If you do not see TCP/IP in the list, go to the section in this guide titled Installing TCP/IP. 5. Click Use the following IP address. Enter in your static IP address, Subnet Mask, and Gateway as shown below. 1. Move your cursor to the “IP address” dialog box and enter 192.168.1.2. 2. Move your cursor to the “Subnet mask” box and enter 255.255.255.0. 3. Move your cursor to the “Default gateway” box and enter 192.168.1.1.
Windows NT Dynamic Configuration (Recommended) 1. Right click on My Network Places and select Properties. Once highlighted, left click once on your mouse. 2. Single click on the Protocols tab at the top of the window. Installation Guide for Customer Self Install, Windows 9x/ME/NT/2000/Mac 2002 MegaPath Networks Inc. All rights reserved.
3. In the next window, you will see TCP/IP Properties. Highlight this, and left click on the Properties button at the bottom of the Network Protocols window. 4. The following window will appear. Click on Obtain an IP address from DHCP server and then click OK. Installation Guide for Customer Self Install, Windows 9x/ME/NT/2000/Mac 2002 MegaPath Networks Inc. All rights reserved.
5. Click OK in this window as well. Under most circumstances, Windows NT will not require a reboot. If it does, please do so. 6. To check for the success of your setup, open a web browser and visit www.megapath.net. While there, you will find more information about additional services as well as setup and other support information. Installation Guide for Customer Self Install, Windows 9x/ME/NT/2000/Mac 2002 MegaPath Networks Inc. All rights reserved.
Installing TCP/IP for Windows Note: Complete this section only if you do not see TCP/IP listed in your Network Components when you begin configuring your computer. Once completed, return to “Configuring Your Computer.” 1. From the Start menu, open Settings/Control Panel. 2. Double click the Network icon. Installation Guide for Customer Self Install, Windows 9x/ME/NT/2000/Mac 2002 MegaPath Networks Inc. All rights reserved.
3. Click Add. 4. Select Protocol and click Add. 5. Select Microsoft® on the left half of the screen, and select TCP/IP on the right half of the screen. Click OK. Installation Guide for Customer Self Install, Windows 9x/ME/NT/2000/Mac 2002 MegaPath Networks Inc. All rights reserved.
6. From the Start menu, open Settings/Control Panel. 7. Double click the Network icon. Installation Guide for Customer Self Install, Windows 9x/ME/NT/2000/Mac 2002 MegaPath Networks Inc. All rights reserved.
8. Choose Client on the Network Control panel window. 9. Select Microsoft® on the left half of the screen, and select Client for Microsoft Networks on the right half of the screen. Click OK. Installation Guide for Customer Self Install, Windows 9x/ME/NT/2000/Mac 2002 MegaPath Networks Inc. All rights reserved.
MAC Environment Macintosh DHCP Configuration (Recommended) 1. Single click the Apple Menu and move down to Control Panels. Highlight TCP/IP and single click once on your mouse. 2. Select Ethernet form the Connect via: pull down menu. Installation Guide for Customer Self Install, Windows 9x/ME/NT/2000/Mac 2002 MegaPath Networks Inc. All rights reserved.
3. Select Using DHCP Server from the Configure pull down menu. 4. Single click in the DHCP Client ID and enter any name you choose for your Macintosh. Installation Guide for Customer Self Install, Windows 9x/ME/NT/2000/Mac 2002 MegaPath Networks Inc. All rights reserved.
5. Single left click on File, then select Quit. 6. A warning box will appear asking you to save your settings. Select Save, then restart your Macintosh. 7. To check for the success of your setup, open a web browser and visit www.megapath.net. While there, you will find more information about additional services as well as setup and other support information. Installation Guide for Customer Self Install, Windows 9x/ME/NT/2000/Mac 2002 MegaPath Networks Inc. All rights reserved.
Macintosh Static Configuration 1. Single click the Apple Menu and move down to Control Panels. Highlight TCP/IP and single click once on your mouse. 2. Select Ethernet from the Configure pull down menu. Installation Guide for Customer Self Install, Windows 9x/ME/NT/2000/Mac 2002 MegaPath Networks Inc. All rights reserved.
3. Select Manually from the Configure pull down menu. 4. Single click in the IP Address text box and enter 192.168.1.2 as shown below. Installation Guide for Customer Self Install, Windows 9x/ME/NT/2000/Mac 2002 MegaPath Networks Inc. All rights reserved.
5. Single click in the Subnet mask text box and enter your subnet mask. The Subnet Mask is always 255.255.255.0. 6. Single click in the Router Address text box and enter the LAN IP of the router. The LAN IP is always 192.168.1.1 as shown below. Installation Guide for Customer Self Install, Windows 9x/ME/NT/2000/Mac 2002 MegaPath Networks Inc. All rights reserved.
7. Single click in the Name server addr text box and enter the IP addresses for the domain name servers located where you live. Enter 66.80.130.23 and 66.80.131.5. 8. Single click in the Search domains text box and enter megapathdsl.net. Installation Guide for Customer Self Install, Windows 9x/ME/NT/2000/Mac 2002 MegaPath Networks Inc. All rights reserved.
9. Single click on File, then select Quit. 10. A warning box will appear asking you to save your settings. Select Save, then restart your Macintosh. Installation Guide for Customer Self Install, Windows 9x/ME/NT/2000/Mac 2002 MegaPath Networks Inc. All rights reserved.
Troubleshooting The Power, Ethernet , and DSL lights (labeled on the face of the router) should all turn solid green within two minutes after the unit is turned on. If the Power light does not turn solid green (it is also fine if it occasionally flashes amber), check your power cable. Are you connected to a live electrical outlet? Are all of the connections secure? If the Ethernet light does not turn solid green (it is also fine if it occasionally flashes amber), check your Ethernet connections.